kns 工具安装与使用指南
kns(Kubernetes Namespace Switcher)是一个快速切换 Kubernetes 命名空间的工具,结合了 kubectl 和 fzf,让命名空间切换变得更加便捷。
安装 fzf(必需依赖)
方法一:源码安装(推荐)
# 克隆 fzf 仓库
git clone --depth 1 https://github.com/junegunn/fzf.git ~/.fzf

# 运行安装脚本
~/.fzf/install
方法二:使用包管理器安装
# Ubuntu/Debian
sudo apt install fzf

# Arch Linux
sudo pacman -S fzf

# macOS (Homebrew)
brew install fzf
创建 kns 脚本
1. 创建脚本文件
vim kns
2. 脚本内容
#!/bin/sh
# 快速 Kubernetes 命名空间切换器
# ISC Blendle, 2017

set -eu

# 检查 kubectl 是否安装
if [ ! -x "$(which kubectl 2>/dev/null)" ]; then
  echo "请先安装 kubectl:https://kubernetes.io/docs/tasks/kubectl/install/" >&2
  exit 1
fi

# 检查 fzf 是否安装
if [ ! -x "$(which fzf 2>/dev/null)" ]; then
  echo "请先安装 fzf:https://github.com/junegunn/fzf" >&2
  exit 1
fi

# 获取当前上下文和命名空间
current="$(kubectl config current-context)"
namespace="$(kubectl config view -o jsonpath="{.contexts[?(@.name == '${current}')].context.namespace}")"
if [ -z "$namespace" ]; then
  namespace="default"
fi

# 使用 fzf 选择命名空间
selected=$( (kubectl get namespaces -o=jsonpath="{.items[?(@.metadata.name!='$namespace')].metadata.name}" | xargs -n 1; echo $namespace ) | fzf -0 -1 --tac -q "${1:-""}" --prompt "$current> ")

# 设置选中的命名空间
if [ -n "$selected" ]; then
  kubectl config set-context "$current" "--namespace=$selected" >/dev/null
  echo "已将上下文命名空间设置为 \"$selected\""
fi
安装 kns 脚本
1. 添加执行权限
chmod +x kns
2. 移动到系统路径
sudo mv kns /usr/local/bin/kns
使用方法
基本使用
# 运行 kns 命令
kns
运行命令后,会显示当前 Kubernetes 上下文和所有可用的命名空间列表。使用方向键或搜索功能选择目标命名空间,按回车确认。
搜索功能
在 fzf 界面中直接输入命名空间名称的部分字符即可进行搜索。
命令行参数
# 带初始搜索词
kns production  # 会直接筛选包含 "production" 的命名空间
工作原理
- 获取当前状态:脚本首先获取当前的 Kubernetes 上下文和命名空间
- 列出命名空间:使用 kubectl 获取所有可用的命名空间
- 交互选择:通过 fzf 提供交互式选择界面
- 更新配置:将选中的命名空间设置为当前上下文的默认命名空间
注意事项
- 权限要求:需要具有读取和修改 kubeconfig 文件的权限
- kubectl 配置:确保 kubectl 已正确配置并可以访问集群
- 命名空间权限:切换命名空间不会检查用户在该命名空间的权限,切换后操作可能因权限不足而失败
扩展功能
你可以根据需要修改脚本,添加以下功能:
- 多集群支持:扩展脚本以支持多个 Kubernetes 集群
- 上下文切换:结合 kubectx 工具实现上下文和命名空间的同时切换
- 别名设置:为常用命名空间设置简短别名
卸载
如果需要卸载 kns 工具:
sudo rm /usr/local/bin/kns
kns 工具大大简化了 Kubernetes 命名空间的管理工作,特别是在需要频繁切换不同环境时,能显著提高工作效率。
闰年的数学原理
为什么需要闰年?
地球绕太阳公转一周的实际时间(回归年)约为 365.2422 天,而不是整数 365 天。这个微小的差异如果不加以调整,经过数百年后,季节与月份就会完全错位。
闰年规则
四年一闰
百年不闰
四百年又闰
数学推导
1. 回归年的精确值
$$ 回归年 = 365 天 5 小时 48 分 46 秒 \approx 365.2422(天) $$
如果不设置闰年,经过 800 年后,季节会偏移约 194 天: $$ 0.2422 \times 800 \approx 194(天) $$ 这意味着夏天可能会过新年!
2. 误差分析
将时间差转换为天数: $$ 5 小时 48 分 46 秒 = a = \frac{10463}{43200} \approx 0.242199074(天) $$
3. 逐步逼近法
第一步:四年一闰
$$ a_1 = \frac{1}{4} = 0.25(天) $$ 每 4 年加 1 天,但每年多加了 0.0078 天。
第二步:百年不闰
$$ a_2 = \frac{1}{4 + \frac{1}{7}} = \frac{7}{49} \approx 0.2413793(天) $$ 每 49 年加 7 天,比实际少加了一些。
$$ a_3 = \frac{1}{4 + \frac{1}{7 + \frac{1}{1}}} = \frac{8}{33} \approx 0.2424242(天) $$ 每 33 年加 8 天,那么 99 年就是 24 天,所以百年(100年)不加闰日。
4. 误差累积计算
按照百年 24 天的规则,43200 年应加: $$ \frac{24}{100} \times 43200 = 10368(天) $$
实际需要: $$ 10463(天) $$
差距: $$ 10463 - 10368 = 95(天) $$
5. 四百年又闰
因为大约 40000 年少加 100 天,所以每 400 年再加 1 天。
按照现行规则,43200 年共加: $$ 10368 + \frac{1}{400} \times 43200 = 10476(天) $$
比实际多加了: $$ 10476 - 10463 = 13(天) $$
6. 进一步修正
理论上每 3323 年应减去一个闰年: $$ \frac{43200}{13} \approx 3323.0769(年) $$
实际应用
现行的格里高利历(公历)采用的就是“四年一闰,百年不闰,四百年又闰“的规则。这个规则已经足够精确,在几千年内都不需要调整。
判断闰年的方法
- 能被 4 整除但不能被 100 整除的年份是闰年
- 能被 400 整除的年份也是闰年
示例
- 2000 年:能被 400 整除 → 闰年
- 1900 年:能被 100 整除但不能被 400 整除 → 不是闰年
- 2024 年:能被 4 整除但不能被 100 整除 → 闰年
总结
闰年的设置是人类智慧与数学精确性的完美结合。通过简单的规则,我们成功地将 365.2422 天的回归年近似为 365.25 天,误差极小,足以满足日常生活的需要。
这个系统不仅体现了数学之美,也展示了人类如何通过观察自然、分析数据,创造出既实用又优雅的解决方案。
VS Code 远程开发配置指南
本文介绍如何使用 VS Code 的 Remote - SSH 扩展进行远程开发,让你能够在本地编辑远程服务器上的代码。
准备工作
1. 生成 SSH 密钥
ssh-keygen -t rsa
按提示操作,建议使用默认路径和空密码。
2. 复制公钥到远程服务器
ssh-copy-id -i ~/.ssh/id_rsa.pub root@192.168.1.1
输入远程服务器的密码,完成密钥配置。
配置 SSH 连接
1. 编辑 SSH 配置文件
vim ~/.ssh/config
2. 添加服务器配置
# 远程服务器配置
Host ali  # 自定义主机别名
  HostName 192.168.1.1  # 服务器 IP 地址
  User root  # 登录用户名
  IdentityFile ~/.ssh/id_rsa  # 私钥文件路径
  Port 22  # SSH 端口号
3. 测试连接
ssh ali
如果配置正确,应该可以直接登录,无需输入密码。
安装 VS Code 扩展
方法一:通过扩展市场安装
- 打开 VS Code
- 点击左侧扩展图标(或按
Ctrl+Shift+X) - 搜索 “Remote - SSH”
- 点击安装
方法二:使用命令行安装
code --install-extension ms-vscode-remote.remote-ssh
方法三:通过界面安装
点击 VS Code 左下角的远程连接图标(形如 “><” 的图标),按照提示安装 Remote - SSH 扩展。
连接远程服务器
1. 打开远程资源管理器
- 点击左侧活动栏的远程资源管理器图标
- 或者按
F1打开命令面板,输入 “Remote-SSH: Connect to Host”
2. 选择主机
从列表中选择配置好的主机(如 “ali”)
3. 选择打开方式
- 在当前窗口打开:关闭当前窗口,打开远程连接
- 在新窗口打开:保留当前窗口,新建窗口连接远程
远程开发功能
1. 文件管理
- 浏览远程服务器的文件系统
- 直接在远程服务器上创建、编辑、删除文件
- 支持拖放操作
2. 终端访问
- 集成终端直接连接到远程服务器
- 支持多个终端会话
- 完整的 shell 功能
3. 扩展安装
- 部分扩展可以在远程服务器上运行
- 扩展会根据连接环境自动调整
- 支持扩展的远程开发模式
4. 调试功能
- 在远程服务器上调试代码
- 支持多种编程语言的调试器
- 断点、变量查看等完整功能
高级配置
1. 多服务器配置
# ~/.ssh/config
Host server1
  HostName 192.168.1.100
  User developer
  IdentityFile ~/.ssh/id_rsa

Host server2
  HostName 192.168.1.101
  User admin
  IdentityFile ~/.ssh/id_rsa_2
  Port 2222
2. 跳板机配置
Host jump-server
  HostName 10.0.0.1
  User jumpuser

Host target-server
  HostName 192.168.100.100
  User targetuser
  ProxyJump jump-server
3. VS Code 设置同步
{
  "remote.SSH.configFile": "~/.ssh/config",
  "remote.SSH.defaultExtensions": [
    "ms-python.python",
    "ms-vscode.cpptools"
  ]
}
常见问题
问题 1:连接超时
# 检查网络连接
ping 192.168.1.1

# 检查 SSH 服务状态
ssh -v root@192.168.1.1
问题 2:权限被拒绝
# 检查密钥文件权限
chmod 600 ~/.ssh/id_rsa
chmod 644 ~/.ssh/id_rsa.pub

# 检查远程服务器 authorized_keys 权限
ssh root@192.168.1.1 "chmod 600 ~/.ssh/authorized_keys"
问题 3:扩展无法安装
- 确保有网络连接
- 检查 VS Code 版本是否支持
- 尝试重新安装扩展
性能优化
1. 连接参数优化
Host optimized-server
  HostName example.com
  User user
  Compression yes
  ServerAliveInterval 60
  ServerAliveCountMax 3
2. 文件同步设置
{
  "remote.SSH.useLocalServer": true,
  "remote.SSH.enableDynamicForwarding": true
}
3. 资源限制
对于资源有限的服务器,可以调整:
{
  "remote.SSH.maxReconnectionAttempts": 5,
  "remote.SSH.connectTimeout": 30
}
安全建议
1. 使用非 root 用户
# 创建专用开发用户
adduser developer
usermod -aG sudo developer
2. 密钥管理
- 定期更换 SSH 密钥
- 使用密码保护私钥
- 限制密钥的使用范围
3. 防火墙配置
# 只允许特定 IP 访问 SSH
sudo ufw allow from 192.168.1.0/24 to any port 22
替代方案
1. VS Code Remote - Containers
在 Docker 容器中开发,确保环境一致性。
2. VS Code Remote - WSL
在 Windows Subsystem for Linux 中开发。
3. 其他远程开发工具
- JetBrains Gateway: JetBrains IDE 的远程开发方案
- Eclipse Theia: 基于 Web 的 IDE,支持远程开发
- code-server: 将 VS Code 作为 Web 服务运行
VS Code 远程开发功能极大地简化了远程开发的工作流程,让开发者可以在熟悉的编辑环境中处理远程项目,提高开发效率。
Arch Linux 初始化配置指南
修改 Pacman 镜像源
1. 编辑镜像列表
sudo vim /etc/pacman.d/mirrorlist
添加以下中国镜像源:
## 中国镜像源
Server = https://mirrors.aliyun.com/archlinux/$repo/os/$arch
Server = http://mirrors.aliyun.com/archlinux/$repo/os/$arch
Server = https://mirrors.tuna.tsinghua.edu.cn/archlinux/$repo/os/$arch
Server = http://mirrors.tuna.tsinghua.edu.cn/archlinux/$repo/os/$arch
Server = https://mirrors.ustc.edu.cn/archlinux/$repo/os/$arch
Server = http://mirrors.ustc.edu.cn/archlinux/$repo/os/$arch
Server = https://mirrors.neusoft.edu.cn/archlinux/$repo/os/$arch
Server = http://mirrors.neusoft.edu.cn/archlinux/$repo/os/$arch
Server = http://mirrors.163.com/archlinux/$repo/os/$arch
Server = http://mirrors.bfsu.edu.cn/archlinux/$repo/os/$arch
Server = https://mirrors.bfsu.edu.cn/archlinux/$repo/os/$arch
2. 添加 Arch Linux CN 仓库
sudo vim /etc/pacman.conf
在文件末尾添加:
[archlinuxcn]
SigLevel = Optional TrustedOnly
Server = https://mirrors.tuna.tsinghua.edu.cn/archlinuxcn/$arch
Server = https://mirrors.ustc.edu.cn/archlinuxcn/$arch
Server = https://mirrors.aliyun.com/archlinuxcn/$arch
3. 更新软件包数据库
sudo pacman -Syy
4. 安装基础工具
sudo pacman -S yay base-devel tree neofetch git
安装常用软件
安装 Firefox 浏览器
sudo pacman -S firefox
安装字体
sudo pacman -S noto-fonts noto-fonts-cjk noto-fonts-emoji noto-fonts-extra ttf-dejavu ttf-liberation
配置本地化设置
1. 生成中文 locale
sudo vim /etc/locale.gen
取消注释以下行:
zh_CN.UTF-8 UTF-8
2. 生成 locale 并设置语言
sudo locale-gen
sudo echo "LANG=zh_CN.UTF-8" > /etc/locale.conf
安装中文输入法
1. 安装必要组件
sudo pacman -S archlinuxcn-keyring
sudo pacman -S fcitx5-im
sudo pacman -S fcitx5-chinese-addons
sudo pacman -S fcitx5-qt fcitx5-gtk fcitx5-lua
2. 配置输入法环境变量
mkdir -p ~/.config/environment.d
vim ~/.config/environment.d/fcitx.conf
添加以下内容:
GTK_IM_MODULE=fcitx
QT_IM_MODULE=fcitx
XMODIFIERS=@im=fcitx
修复日文字体显示问题
参考:Arch 简体中文本地化
创建字体配置文件:
cd /etc/fonts/conf.d/
sudo vim 64-language-selector-prefer.conf
添加以下配置:
<?xml version="1.0"?>
<!DOCTYPE fontconfig SYSTEM "fonts.dtd">
<fontconfig>
  <alias>
    <family>sans-serif</family>
    <prefer>
      <family>Noto Sans CJK SC</family>
      <family>Noto Sans CJK TC</family>
      <family>Noto Sans CJK JP</family>
    </prefer>
  </alias>
  <alias>
    <family>monospace</family>
    <prefer>
      <family>Noto Sans Mono CJK SC</family>
      <family>Noto Sans Mono CJK TC</family>
      <family>Noto Sans Mono CJK JP</family>
    </prefer>
  </alias>
</fontconfig>
配置指纹登录
参考:Arch 添加指纹登录
1. 安装指纹识别服务
sudo pacman -S fprintd
2. 配置 PAM 认证
编辑系统登录配置文件:
sudo vim /etc/pam.d/system-local-login
在文件开头添加:
auth    sufficient    pam_unix.so try_first_pass likeauth nullok
auth    sufficient    pam_fprintd.so
编辑 KDE 配置文件:
sudo vim /etc/pam.d/kde
在文件开头添加:
auth    sufficient    pam_unix.so try_first_pass likeauth nullok
auth    sufficient    pam_fprintd.so
3. 针对 CachyOS 系统不能使用密码验证 sudo 的问题
sudo vim /etc/pam.d/sudo
将其改为:
#%PAM-1.0
auth       sufficient   pam_fprintd.so
auth       required     pam_unix.so try_first_pass nullok
account    include      system-auth
session    include      system-auth
在不方便使用指纹验证时,可以 CTRL+C 取消,使用密码验证 sudo。
完成配置
完成以上步骤后,重启系统使所有配置生效。现在你的 Arch Linux 系统已经配置了中文环境、快速的软件源和方便的输入法,可以开始愉快地使用了。
Rust 项目发布指南:使用 cargo-dist 自动化发布到 GitHub
本指南详细介绍了如何使用 cargo-dist 工具将 Rust 项目自动化发布到 GitHub,涵盖从环境配置到持续集成的完整流程。
📋 目录
- Rust 项目使用 cargo-dist 发布到 GitHub 完整指南
1. 环境准备
1.1 安装 rustup(推荐)
不要使用系统自带的 Rust,请使用官方推荐的 rustup:
# 安装 rustup
curl --proto '=https' --tlsv1.2 -sSf https://sh.rustup.rs | sh

# 生效环境变量
source "$HOME/.cargo/env"

# 验证安装
which cargo
# 应输出:/home/你的用户名/.cargo/bin/cargo

cargo --version
# 输出应包含 "rustup" 字样
1.2 安装 cargo-dist
# 安装 cargo-dist
cargo install cargo-dist

# 如果提示找不到命令,创建软链接
ln -s ~/.cargo/bin/dist ~/.cargo/bin/cargo-dist

# 验证安装
cargo dist --version
1.3 卸载系统 Rust(可选但推荐)
# Ubuntu/Debian
sudo apt remove rustc cargo
sudo apt autoremove

# CentOS/Fedora
sudo dnf remove rustc cargo
2. 项目配置
2.1 完善 Cargo.toml
确保 Cargo.toml 包含完整的元数据:
[package]
name = "your-project-name"
version = "0.1.0"
edition = "2021"
description = "项目简短描述"
license = "MIT"
repository = "https://github.com/你的用户名/项目名"
homepage = "https://..."
keywords = ["rust", "tool"]
categories = ["command-line-utilities"]

[profile.release]
strip = true           # 去除调试符号,减小体积
lto = true             # 链接时优化
codegen-units = 1      # 增加编译时间但优化更好
2.2 准备必要文件
确保项目根目录包含:
your-project/
├── Cargo.toml
├── README.md          # 必须,包含安装和使用说明
├── LICENSE            # 必须,与 Cargo.toml 中 license 一致
├── CHANGELOG.md       # 推荐,记录版本变更
└── src/
    └── main.rs
2.3 代码检查
cargo fmt --check
cargo clippy
cargo test
3. 初始化 cargo-dist
3.1 执行初始化
在项目根目录执行:
cargo dist init
3.2 生成的文件
初始化后会生成以下文件:
| 文件 | 作用 |
|---|---|
.github/workflows/release.yml | GitHub Actions 自动发布流程 |
dist-workspace.toml | cargo-dist 配置文件 |
Cargo.toml | 可能添加 [package.metadata.dist] |
3.3 检查配置
查看 dist-workspace.toml 确认目标平台:
[dist]
targets = [
    "x86_64-unknown-linux-gnu",
    "x86_64-apple-darwin",
    "x86_64-pc-windows-msvc",
    "aarch64-apple-darwin",
]
3.4 预览发布计划(可选)
cargo dist plan
4. Git 配置与推送
4.1 初始化 Git 仓库
# 如果还没初始化
git init

# 添加所有文件
git add .

# 提交
git commit -m "feat: init cargo-dist release workflow"
4.2 关联远程仓库
# 替换为你的仓库地址
git remote add origin https://github.com/你的用户名/你的项目名.git

# 推送代码
git push -u origin main
# 或 master,取决于你的默认分支
4.3 启用 GitHub Actions
- 访问 GitHub 仓库
- 点击 Settings → Actions → General
- 确保 Allow GitHub Actions 已启用
- 确保 Allow GitHub Actions to create releases 已启用
5. 创建 Tag 触发发布
5.1 创建版本 Tag
# 创建带注释的 Tag(必须 v 开头)
git tag -a v0.1.0 -m "Release version 0.1.0"

# 推送 Tag 到远程(触发 GitHub Actions)
git push origin v0.1.0
5.2 Tag 命名规范
| 格式 | 说明 |
|---|---|
v0.1.0 | ✅ 推荐,语义化版本 |
v1.0.0 | ✅ 正式版本 |
v0.1.0-beta.1 | ✅ 预发布版本 |
0.1.0 | ❌ 缺少 v 前缀,可能不触发 |
6. 验证发布结果
6.1 监控 GitHub Actions
- 打开 GitHub 仓库
- 点击 Actions 标签
- 找到 Release 工作流
- 等待运行完成(通常 5-15 分钟)
6.2 检查 Releases 页面
访问:https://github.com/你的用户名/你的项目名/releases
应看到:
- ✅ 版本标签
v0.1.0 - ✅ 各平台二进制包
- ✅ 安装脚本
6.3 生成的文件示例
| 文件 | 说明 |
|---|---|
your-project-v0.1.0-x86_64-unknown-linux-gnu.tar.gz | Linux 包 |
your-project-v0.1.0-x86_64-apple-darwin.tar.gz | macOS 包 |
your-project-v0.1.0-x86_64-pc-windows-msvc.zip | Windows 包 |
installer.sh | Linux/macOS 安装脚本 |
installer.ps1 | Windows 安装脚本 |
.sha256 | 校验和文件 |
6.4 测试安装
# Linux/macOS
curl --proto '=https' --tlsv1.2 -sSf https://github.com/你的用户名/你的项目名/releases/download/v0.1.0/installer.sh | sh

# Windows PowerShell
powershell -c "irm https://github.com/你的用户名/你的项目名/releases/download/v0.1.0/installer.ps1 | iex"
7. 后续版本更新
7.1 发布新版本流程
# 1. 更新 Cargo.toml 中的版本号
# 2. 提交更改
git add Cargo.toml
git commit -m "chore: bump version to 0.2.0"
git push

# 3. 创建新 Tag
git tag -a v0.2.0 -m "Release version 0.2.0"
git push origin v0.2.0
7.2 使用 cargo-release 自动化(可选)
# 安装
cargo install cargo-release

# 自动更新版本、打 Tag、推送
cargo release patch --execute    # 0.1.0 → 0.1.1
cargo release minor --execute    # 0.1.0 → 0.2.0
cargo release major --execute    # 0.1.0 → 1.0.0
8. 常见问题排查
| 问题 | 解决方案 |
|---|---|
cargo dist 命令找不到 | 创建软链接:ln -s ~/.cargo/bin/dist ~/.cargo/bin/cargo-dist |
| Actions 未触发 | 检查 Tag 格式是否为 v*,检查仓库 Actions 权限设置 |
| 编译失败 | 查看 Actions 日志,检查代码是否有平台特定问题 |
| 权限错误 | Settings → Actions → General → 启用 “Allow GitHub Actions to create releases” |
| 想手动触发 | Actions 页面 → 选择工作流 → “Run workflow” |
| 想预览打包结果 | 运行 cargo dist plan |
9. 附录:AUR 发布指南
9.1 创建 PKGBUILD
# Maintainer: Your Name <your.email@example.com>
pkgname=你的项目名
pkgver=0.1.0
pkgrel=1
pkgdesc="项目描述"
arch=('x86_64' 'aarch64')
url="https://github.com/你的用户名/你的项目名"
license=('MIT')
depends=()
makedepends=('cargo')
source=("$pkgname-$pkgver.tar.gz::https://github.com/你的用户名/你的项目名/archive/refs/tags/v$pkgver.tar.gz")
sha256sums=('SKIP')

build() {
    cd "$srcdir/$pkgname-$pkgver"
    cargo build --release
}

package() {
    cd "$srcdir/$pkgname-$pkgver"
    install -Dm755 "target/release/$pkgname" "$pkgdir/usr/bin/$pkgname"
    install -Dm644 LICENSE "$pkgdir/usr/share/licenses/$pkgname/LICENSE"
}
9.2 生成 .SRCINFO
sudo pacman -S pacman-contrib
cd aur
makepkg --printsrcinfo > .SRCINFO
9.3 提交到 AUR
# 克隆 AUR 仓库
git clone ssh://aur@aur.archlinux.org/你的项目名.git

# 复制文件并提交
cp PKGBUILD .SRCINFO 你的项目名/
cd 你的项目名
git add PKGBUILD .SRCINFO
git commit -m "Initial release v0.1.0"
git push
9.4 用户安装
yay -S 你的项目名
# 或
paru -S 你的项目名
📌 快速检查清单
□ rustup 已安装且 PATH 正确
□ cargo-dist 已安装且可运行
□ Cargo.toml 元数据完整
□ README.md 和 LICENSE 存在
□ cargo dist init 成功执行
□ Git 仓库已关联远程
□ GitHub Actions 已启用
□ Tag 格式为 v*.*.*
□ Releases 页面可见下载文件
□ 安装脚本测试通过
🔗 相关资源
Linux SSH 双因素认证配置指南
本文介绍如何在 Linux 系统上为 SSH 登录配置双因素认证(2FA),使用 Google Authenticator 增强系统安全性。
准备工作
1. 安装手机应用
在手机上安装以下任意一款验证器应用:
- Google Authenticator
- Microsoft Authenticator
- Authy
2. 安装系统组件
根据你的 Linux 发行版安装相应软件包:
Debian/Ubuntu:
sudo apt-get install libpam-google-authenticator -y
CentOS/RHEL:
sudo yum install epel-release -y
sudo yum install libpam-google-authenticator -y
Arch Linux:
sudo pacman -S libpam-google-authenticator
配置 Google Authenticator
1. 运行配置向导
google-authenticator
2. 配置选项说明
选项 1:基于时间的令牌
Do you want authentication tokens to be time-based (y/n) y
选择 y,使用基于时间的动态令牌。
选项 2:扫描二维码
程序会显示一个二维码,用手机验证器应用扫描它。
选项 3:跳过初始验证
Enter code from app (-1 to skip): -1
输入 -1 跳过初始验证。
选项 4:保存配置文件
Do you want me to update your "/home/用户名/.google_authenticator" file? (y/n) y
选择 y,保存配置文件。重要:这个文件包含你的密钥,如果丢失令牌可以用它紧急登录。
选项 5:防止令牌重用
Do you want to disallow multiple uses of the same authentication token? (y/n) y
选择 y,防止同一个令牌被多次使用,增加安全性。
选项 6:时间窗口设置
Do you want to increase the time window? (y/n) n
选择 n,使用默认的 3 个令牌窗口(前后各 1 个,共 30 秒时间容差)。
选项 7:启用频率限制
Do you want to enable rate-limiting? (y/n) y
选择 y,启用频率限制,防止暴力破解。
修改系统配置
1. 配置 PAM 认证
编辑 SSH 的 PAM 配置文件:
sudo vim /etc/pam.d/sshd
在文件开头添加:
auth required pam_google_authenticator.so
2. 配置 SSH 服务
编辑 SSH 服务配置文件:
sudo vim /etc/ssh/sshd_config
修改以下配置项:
启用质询响应认证
ChallengeResponseAuthentication yes
说明:启用质询-响应认证机制,允许服务器向客户端发送验证码请求。
启用 PAM 支持
UsePAM yes
说明:必须启用 PAM 支持,否则质询无法传递。
启用键盘交互认证
KbdInteractiveAuthentication yes
说明:启用键盘交互认证界面。
设置认证方法
AuthenticationMethods publickey password keyboard-interactive
说明:设置认证顺序:先公钥,再密码,最后验证码。
3. 完整配置示例
UsePAM yes
KbdInteractiveAuthentication yes
ChallengeResponseAuthentication yes
PubkeyAuthentication yes
PasswordAuthentication yes
AuthenticationMethods publickey password keyboard-interactive
#PermitEmptyPasswords no
重启 SSH 服务
1. 测试配置语法
sudo sshd -t
如果没有错误输出,说明配置语法正确。
2. 重启 SSH 服务
sudo systemctl restart sshd
测试登录
现在尝试使用 SSH 登录,系统会要求:
- 输入密码
- 输入 Google Authenticator 生成的 6 位验证码
注意事项
1. 备份紧急代码
.google_authenticator 文件中的紧急代码非常重要,建议安全备份。
2. 时间同步
确保服务器和手机的时间同步,否则验证码可能失效。
3. 多用户配置
每个需要 2FA 的用户都需要单独运行 google-authenticator 命令。
4. 故障排除
如果无法登录,可以:
- 检查系统时间是否正确
- 查看
/var/log/auth.log获取详细错误信息 - 暂时禁用 2FA 进行测试
安全建议
- 结合公钥认证:建议同时使用 SSH 公钥认证,提供多层保护
- 限制登录尝试:配置 fail2ban 防止暴力破解
- 定期备份:定期备份验证器配置
- 备用方案:准备备用登录方式,防止验证器丢失
通过配置双因素认证,可以显著提高 SSH 登录的安全性,防止密码泄露导致的未授权访问。
键盘布局切换指南:Colemak vs QWERTY
本文介绍如何在 Linux 系统中快速切换键盘布局,特别是 Colemak 和 QWERTY 布局之间的切换。
Colemak 键盘布局
切换到 Colemak 布局
setxkbmap us -variant colemak
Colemak 布局特点
Colemak 是一种优化的键盘布局,相比传统的 QWERTY 布局,它:
- 减少手指移动距离
- 提高打字效率
- 降低重复性劳损风险
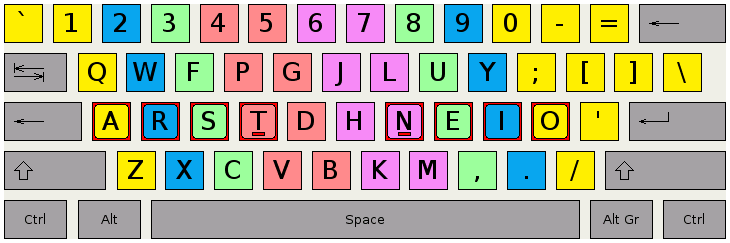
QWERTY 键盘布局
切换回 QWERTY 布局
setxkbmap us; xset -r 66
命令说明
setxkbmap us:设置为美式 QWERTY 布局xset -r 66:重置 Caps Lock 键状态
永久设置键盘布局
方法一:修改 X11 配置
创建或编辑 ~/.xprofile 文件:
vim ~/.xprofile
添加以下内容(根据你的偏好选择):
# 使用 Colemak 布局
setxkbmap us -variant colemak

# 或者使用 QWERTY 布局
# setxkbmap us
方法二:使用桌面环境设置
大多数桌面环境(GNOME、KDE、XFCE)都提供图形化工具设置键盘布局:
- 打开系统设置
- 找到“区域与语言“或“键盘“设置
- 添加或选择需要的键盘布局
常用快捷键
快速切换布局
# 创建别名方便切换
alias colemak='setxkbmap us -variant colemak'
alias qwerty='setxkbmap us; xset -r 66'

# 添加到 ~/.bashrc 或 ~/.zshrc
echo "alias colemak='setxkbmap us -variant colemak'" >> ~/.bashrc
echo "alias qwerty='setxkbmap us; xset -r 66'" >> ~/.bashrc
查看当前布局
setxkbmap -query
布局对比
| 特性 | QWERTY | Colemak |
|---|---|---|
| 设计年代 | 1873年 | 2006年 |
| 设计目标 | 防止打字机卡键 | 提高打字效率 |
| 常用键位置 | 分散 | 集中在主行 |
| 学习曲线 | 低(已掌握) | 中等 |
| 效率提升 | - | 约 35% |
学习建议
如果你打算学习 Colemak 布局:
- 循序渐进:先学习主行键位,再扩展
- 使用练习工具:如 Colemak Academy
- 保持耐心:通常需要 2-4 周适应期
- 不要完全放弃 QWERTY:在某些场景下可能还需要使用
故障排除
问题:切换后布局不生效
# 重启 X11 服务(谨慎使用)
sudo systemctl restart lightdm  # 或你使用的显示管理器

# 或者重新登录
问题:Caps Lock 键异常
# 完全重置键盘设置
setxkbmap -option
问题:某些应用不识别布局
有些应用(如游戏、终端模拟器)可能需要单独配置键盘布局。
参考资料
选择适合自己的键盘布局可以显著提高打字效率和舒适度。无论你选择传统的 QWERTY 还是优化的 Colemak,重要的是找到最适合自己工作习惯的方案。
禁用笔记本合盖休眠功能
本文介绍如何在 Linux 系统中禁用笔记本合盖时的自动休眠功能,适用于需要合盖继续运行的情况。
问题背景
默认情况下,大多数 Linux 发行版在合上笔记本盖子时会触发休眠或挂起操作。这在某些场景下可能不方便,例如:
- 外接显示器使用时
- 运行长时间任务时
- 作为服务器使用时
配置方法
1. 编辑配置文件
sudo vim /etc/systemd/logind.conf
2. 修改配置项
找到或添加以下配置:
HandleLidSwitch=ignore
3. 重启服务
sudo systemctl restart systemd-logind
其他相关配置
电源按钮行为
HandlePowerKey=poweroff    # 按下电源键:关机
HandleSuspendKey=suspend   # 按下休眠键:挂起
HandleHibernateKey=hibernate # 按下休眠键:休眠
合盖时的其他选项
HandleLidSwitch=ignore        # 忽略合盖动作
HandleLidSwitch=suspend       # 合盖时挂起(默认)
HandleLidSwitch=hibernate     # 合盖时休眠
HandleLidSwitch=lock          # 合盖时锁定屏幕
HandleLidSwitch=poweroff      # 合盖时关机
临时解决方案
如果只需要临时禁用合盖休眠,可以使用以下命令:
禁用合盖检测
systemctl mask sleep.target suspend.target hibernate.target hybrid-sleep.target
重新启用合盖检测
systemctl unmask sleep.target suspend.target hibernate.target hybrid-sleep.target
图形界面设置
GNOME 桌面环境
- 打开“设置“ → “电源”
- 找到“合上盖子时“选项
- 选择“不执行任何操作“
KDE Plasma 桌面
- 打开“系统设置“ → “电源管理”
- 选择“节能“标签页
- 配置“合上盖子时“的行为
XFCE 桌面
- 打开“设置管理器“ → “电源管理器”
- 在“系统“标签页中配置合盖行为
验证配置
检查当前设置
# 查看 logind 配置
cat /etc/systemd/logind.conf | grep HandleLidSwitch

# 查看服务状态
systemctl status systemd-logind
测试效果
- 合上笔记本盖子
- 等待几秒钟
- 打开盖子,检查系统是否仍在运行
注意事项
1. 散热问题
禁用合盖休眠后,笔记本在合盖状态下可能散热不良,建议:
- 确保通风良好
- 监控温度:
sensors - 考虑使用散热垫
2. 外接显示器
如果使用外接显示器,合盖后可能需要调整显示设置:
# 禁用内置显示器
xrandr --output eDP-1 --off

# 启用外接显示器
xrandr --output HDMI-1 --auto
3. 电池寿命
合盖继续运行会消耗更多电量,建议:
- 连接电源适配器
- 调整电源管理设置
- 监控电池状态:
upower -i /org/freedesktop/UPower/devices/battery_BAT0
恢复默认设置
如果需要恢复默认的合盖休眠行为:
1. 恢复配置文件
sudo vim /etc/systemd/logind.conf
将 HandleLidSwitch 改为:
HandleLidSwitch=suspend
2. 重启服务
sudo systemctl restart systemd-logind
高级配置
用户特定配置
可以为特定用户设置不同的行为:
# 创建用户配置目录
mkdir -p ~/.config/systemd/user

# 创建覆盖配置
vim ~/.config/systemd/user/logind.conf.d/override.conf
添加内容:
[Login]
HandleLidSwitch=ignore
条件性配置
可以根据电源状态设置不同行为:
# 使用电源时忽略合盖
HandleLidSwitchExternalPower=ignore

# 使用电池时挂起
HandleLidSwitch= suspend
故障排除
问题:修改后不生效
# 检查配置文件语法
systemd-analyze verify /etc/systemd/logind.conf

# 重新加载所有配置
sudo systemctl daemon-reload
sudo systemctl restart systemd-logind
问题:合盖后无法唤醒
如果遇到合盖后无法唤醒的问题,可以尝试:
- 检查内核参数:
cat /proc/cmdline - 更新显卡驱动
- 检查 ACPI 事件:
acpi_listen
通过合理配置合盖行为,可以让笔记本更好地适应不同的使用场景,提高工作效率。
Ollama 服务发现配置指南
问题背景
当你在 Docker 容器中部署需要访问本地 Ollama 服务的应用时(如 OpenWeb-UI),可能会遇到容器无法发现主机上运行的 Ollama 服务的问题。这是因为默认情况下,Ollama 只监听本地回环地址(127.0.0.1)。
解决方案:修改 Ollama 服务配置
步骤 1:编辑 systemd 服务文件
使用你喜欢的文本编辑器打开 Ollama 的 systemd 服务配置文件:
sudo vim /etc/systemd/system/ollama.service
或者使用其他编辑器:
sudo nano /etc/systemd/system/ollama.service
步骤 2:添加环境变量
在 [Service] 部分添加以下环境变量配置:
[Service]
Environment="OLLAMA_HOST=0.0.0.0"  # 允许所有网络接口访问
完整的服务文件应该类似这样:
[Unit]
Description=Ollama Service
After=network-online.target

[Service]
Type=exec
ExecStart=/usr/local/bin/ollama serve
Environment="OLLAMA_HOST=0.0.0.0"
User=ollama
Group=ollama
Restart=always
RestartSec=3

[Install]
WantedBy=default.target
步骤 3:重新加载并重启服务
应用配置更改:
# 重新加载 systemd 配置
sudo systemctl daemon-reload

# 重启 Ollama 服务
sudo systemctl restart ollama
步骤 4:验证配置
检查服务状态和监听端口:
# 检查服务运行状态
sudo systemctl status ollama

# 验证 Ollama 是否在所有接口上监听
sudo netstat -tlnp | grep 11434
应该能看到类似这样的输出:
tcp6 0 0 :::11434 :::* LISTEN [ollama进程ID]
安全注意事项
⚠️ 重要提醒:将 OLLAMA_HOST 设置为 0.0.0.0 意味着 Ollama 服务将在所有网络接口上监听,包括公网接口(如果存在)。这可能会带来安全风险。
推荐的安全措施
- 使用防火墙:配置防火墙规则,只允许特定 IP 或网段访问 11434 端口
- 内网部署:确保 Ollama 服务只在内网环境中使用
- 反向代理:通过 Nginx 等反向代理添加身份验证
- VPN 访问:通过 VPN 访问内网服务
防火墙配置示例(UFW)
# 允许特定 IP 访问 Ollama 端口
sudo ufw allow from 192.168.1.0/24 to any port 11434

# 或者只允许 Docker 网桥
sudo ufw allow from 172.17.0.0/16 to any port 11434
故障排除
问题 1:修改后服务无法启动
- 检查服务文件语法:
sudo systemctl status ollama - 查看详细日志:
sudo journalctl -u ollama -f
问题 2:容器仍然无法连接
- 确认主机防火墙配置
- 检查 Docker 网络模式
- 尝试在容器中使用
host.docker.internal作为主机地址
问题 3:性能问题
如果发现性能下降,可以考虑:
- 调整 Ollama 的内存限制
- 使用 GPU 加速(如果支持)
- 优化模型加载策略
替代方案
如果你不想修改 Ollama 的主配置,还可以考虑:
- 使用 Docker 的 host 网络模式:让容器共享主机网络命名空间
- 创建专用网络:为 Ollama 和相关服务创建独立的 Docker 网络
- 使用服务发现工具:如 Consul 或 etcd
总结
正确配置 Ollama 服务发现是使用 Docker 部署 AI 相关应用的关键一步。虽然修改 OLLAMA_HOST 是最直接的解决方案,但务必结合实际情况考虑安全因素。
对于生产环境,建议结合防火墙、网络隔离和访问控制等多层安全措施,确保服务既可用又安全。
更新记录:
- 2024-03-10:初始版本,基于 Ollama 0.1.30 测试
- 配置方法可能随 Ollama 版本更新而变化,建议参考官方文档
ZSH:强大的 Shell 替代方案
ZSH(Z Shell)是一个功能强大的 Unix shell,可以作为 Bash 的替代品。它提供了丰富的功能和高度可定制性,是开发者和高级用户的理想选择。
安装 ZSH
Ubuntu/Debian
sudo apt update
sudo apt install zsh
CentOS/RHEL
sudo yum install zsh
Arch Linux
sudo pacman -S zsh
macOS
brew install zsh
验证安装
zsh --version
# 输出类似:zsh 5.8.1 (x86_64-ubuntu-linux-gnu)
设置为默认 Shell
1. 查看可用 Shell
cat /etc/shells
2. 设置 ZSH 为默认 Shell
chsh -s $(which zsh)
3. 验证设置
echo $SHELL
# 应该输出:/bin/zsh 或 /usr/bin/zsh
首次运行配置
第一次启动 ZSH 时,会进入配置向导:
配置选项说明
(1)  Continue to the main menu.
(2)  Populate your ~/.zshrc with the configuration recommended
     by the system administrator and exit (you will need to edit
     the file yourself).
(3)  Exit, creating the file ~/.zshrc containing just a comment.
     That will prevent this function from being run again.
(4)  Exit without creating ~/.zshrc.
建议选择 (2) 或 (3),然后手动配置。
基本配置
创建配置文件
# 如果不存在则创建
touch ~/.zshrc
常用配置示例
# 启用自动补全
autoload -Uz compinit
compinit

# 启用颜色支持
autoload -Uz colors
colors

# 历史记录配置
HISTFILE=~/.zsh_history
HISTSIZE=10000
SAVEHIST=10000
setopt appendhistory
setopt sharehistory
setopt incappendhistory

# 键绑定
bindkey -e  # 使用 Emacs 键绑定
# 或
bindkey -v  # 使用 Vi 键绑定

# 别名
alias ll='ls -alF'
alias la='ls -A'
alias l='ls -CF'
ZSH 特色功能
1. 智能补全
ZSH 的补全系统比 Bash 更强大,支持:
- 命令补全
- 参数补全
- 文件类型感知补全
- 拼写纠正
2. 主题系统
ZSH 支持丰富的主题和提示符定制:
# 安装 oh-my-zsh 获取更多主题
sh -c "$(curl -fsSL https://raw.githubusercontent.com/ohmyzsh/ohmyzsh/master/tools/install.sh)"
3. 插件系统
ZSH 有丰富的插件生态系统:
- 语法高亮
- 自动建议
- 历史搜索
- Git 集成
4. 通配符扩展
更强大的文件匹配功能:
# 递归查找所有 .txt 文件
ls **/*.txt

# 查找最近修改的文件
ls *(m-7)  # 7天内修改的文件
从 Bash 迁移
1. 导入 Bash 配置
# 将常用的 Bash 配置复制到 .zshrc
cat ~/.bashrc >> ~/.zshrc
2. 环境变量
确保重要的环境变量在 ZSH 中可用:
# 在 .zshrc 中添加
export PATH=$PATH:/usr/local/bin
export EDITOR=vim
3. 函数和别名
迁移自定义函数和别名:
# 检查 Bash 中的别名
alias

# 检查 Bash 中的函数
declare -f
性能优化
1. 延迟加载
对于大型插件,使用延迟加载提高启动速度:
# 在 .zshrc 中
zplugin light zsh-users/zsh-autosuggestions
2. 缓存补全
# 启用补全缓存
zstyle ':completion:*' use-cache on
zstyle ':completion:*' cache-path ~/.zsh/cache
3. 定期清理
# 清理旧的补全缓存
rm -f ~/.zcompdump
compinit
常用工具和框架
1. Oh My Zsh
最流行的 ZSH 配置框架:
# 安装
sh -c "$(curl -fsSL https://raw.githubusercontent.com/ohmyzsh/ohmyzsh/master/tools/install.sh)"
2. Prezto
另一个流行的配置框架:
git clone --recursive https://github.com/sorin-ionescu/prezto.git "${ZDOTDIR:-$HOME}/.zprezto"
3. Zinit
强大的插件管理器:
# 安装
sh -c "$(curl -fsSL https://git.io/zinit-install)"
故障排除
问题:ZSH 启动缓慢
# 分析启动时间
time zsh -i -c exit

# 或使用专门工具
zprof
问题:补全不工作
# 重新生成补全缓存
rm -f ~/.zcompdump
autoload -Uz compinit
compinit
问题:历史记录不保存
# 检查权限
ls -la ~/.zsh_history

# 修复权限
chmod 600 ~/.zsh_history
学习资源
ZSH 的学习曲线可能比 Bash 稍陡,但一旦掌握,它能显著提高命令行工作效率。从简单的配置开始,逐步探索其强大功能,你会发现它值得投入时间学习。
Oh My Zsh 安装与配置指南
项目仓库
https://github.com/ohmyzsh/ohmyzsh
自动安装(推荐)
一键安装
sh -c "$(curl -fsSL https://raw.githubusercontent.com/ohmyzsh/ohmyzsh/master/tools/install.sh)"
安装位置
默认安装到 ~/.oh-my-zsh(主目录下的隐藏文件夹,可以通过 cd ~/.oh-my-zsh 访问)
手动安装
如果你想自定义安装位置,可以在安装前设置 ZSH 环境变量:
1. 下载安装脚本
wget https://raw.githubusercontent.com/ohmyzsh/ohmyzsh/master/tools/install.sh
2. 设置安装路径并运行
如果你想安装到 $HOME/awesome-shell/oh-my-zsh:
ZSH="$HOME/awesome-shell/oh-my-zsh" sh install.sh
配置文件
1. 主配置文件:~/.zshrc
安装后会自动创建或更新 .zshrc 文件,包含以下重要配置:
# Oh My Zsh 安装路径
export ZSH="$HOME/.oh-my-zsh"

# 主题设置
ZSH_THEME="robbyrussell"

# 插件列表
plugins=(git)

# 加载 Oh My Zsh
source $ZSH/oh-my-zsh.sh
2. 自定义配置
你可以在 ~/.zshrc 中添加自定义配置,建议添加到文件末尾:
# 自定义别名
alias ll='ls -alF'
alias la='ls -A'
alias l='ls -CF'

# 自定义环境变量
export PATH="$PATH:$HOME/.local/bin"
export EDITOR='vim'

# 自定义函数
function mkcd() {
    mkdir -p "$1" && cd "$1"
}
主题配置
1. 查看可用主题
ls $ZSH/themes/
2. 更换主题
在 ~/.zshrc 中修改:
ZSH_THEME="agnoster" # 更换为 agnoster 主题
3. 热门主题推荐
- robbyrussell: 默认主题,简洁明了
- agnoster: 功能丰富,显示 Git 状态
- af-magic: 现代风格,色彩鲜艳
- bira: 简洁实用,显示时间
- powerlevel10k: 高度可定制,性能优秀
4. 自定义主题
# 复制现有主题进行修改
cp $ZSH/themes/robbyrussell.zsh-theme ~/.oh-my-zsh/custom/themes/my-theme.zsh-theme

# 在 .zshrc 中使用自定义主题
ZSH_THEME="my-theme"
插件管理
1. 内置插件
Oh My Zsh 自带大量插件,位于 $ZSH/plugins/ 目录。
2. 启用插件
在 ~/.zshrc 的 plugins 数组中添加:
plugins=(
    git
    docker
    kubectl
    python
    npm
    yarn
    zsh-autosuggestions
    zsh-syntax-highlighting
)
3. 常用插件推荐
| 插件 | 功能描述 |
|---|---|
| git | Git 命令别名和提示 |
| docker | Docker 命令补全 |
| kubectl | Kubernetes 命令补全 |
| python | Python 开发工具 |
| npm/yarn | Node.js 包管理器 |
| zsh-autosuggestions | 命令自动建议 |
| zsh-syntax-highlighting | 语法高亮 |
4. 自定义插件
# 创建自定义插件目录
mkdir -p ~/.oh-my-zsh/custom/plugins/my-plugin

# 创建插件文件
vim ~/.oh-my-zsh/custom/plugins/my-plugin/my-plugin.plugin.zsh

# 在 .zshrc 中启用
plugins=(... my-plugin)
更新和维护
1. 手动更新
# 进入 Oh My Zsh 目录
cd ~/.oh-my-zsh

# 拉取最新代码
git pull

# 重新加载配置
source ~/.zshrc
2. 自动更新
Oh My Zsh 默认启用自动更新,可以通过以下配置调整:
# 禁用自动更新
DISABLE_AUTO_UPDATE="true"

# 设置更新频率(天)
UPDATE_ZSH_DAYS=13

# 更新时显示详细信息
DISABLE_UPDATE_PROMPT="true"
3. 检查更新
# 检查是否有可用更新
omz update --check
故障排除
问题 1:安装失败
# 检查网络连接
curl -I https://raw.githubusercontent.com/ohmyzsh/ohmyzsh/master/tools/install.sh

# 使用 wget 替代
wget -O install.sh https://raw.githubusercontent.com/ohmyzsh/ohmyzsh/master/tools/install.sh
bash install.sh
问题 2:主题显示异常
# 检查字体支持
echo -e "\ue0b0 \u00b1 \ue0a0 \u27a6 \u2718 \u26a1 \u2699"

# 安装 Powerline 字体
# 参考:https://github.com/powerline/fonts
问题 3:启动缓慢
# 分析启动时间
time zsh -i -c exit

# 禁用不需要的插件
# 在 plugins 数组中移除不常用的插件
问题 4:命令补全不工作
# 重新生成补全缓存
rm -f ~/.zcompdump
compinit

# 检查插件是否正确加载
echo $plugins
高级功能
1. 自定义目录
# 自定义配置目录
ZSH_CUSTOM="$HOME/.my-zsh-custom"

# 自定义插件目录
ZSH_CUSTOM/plugins/

# 自定义主题目录
ZSH_CUSTOM/themes/
2. 条件配置
# 根据操作系统配置
if [[ "$OSTYPE" == "darwin"* ]]; then
    # macOS 特定配置
    plugins+=(macos)
elif [[ "$OSTYPE" == "linux-gnu"* ]]; then
    # Linux 特定配置
    plugins+=(systemd)
fi
3. 性能优化
# 禁用自动更正
DISABLE_CORRECTION="true"

# 禁用自动标题
DISABLE_AUTO_TITLE="true"

# 禁用等待提示
COMPLETION_WAITING_DOTS="false"
卸载 Oh My Zsh
1. 使用卸载脚本
# 运行卸载脚本
sh $ZSH/tools/uninstall.sh

# 或手动删除
uninstall_oh_my_zsh
2. 手动卸载
# 删除 Oh My Zsh 目录
rm -rf ~/.oh-my-zsh

# 恢复原始 .zshrc
mv ~/.zshrc.pre-oh-my-zsh ~/.zshrc 2>/dev/null || true

# 或删除 .zshrc
rm ~/.zshrc
最佳实践
1. 配置备份
# 备份配置文件
cp ~/.zshrc ~/.zshrc.backup

# 使用版本控制
git init ~/.oh-my-zsh/custom
git add .
git commit -m "Initial custom configuration"
2. 渐进式配置
- 从默认配置开始
- 逐步添加需要的插件
- 定期清理不需要的配置
3. 社区资源
Oh My Zsh 是一个强大的 Zsh 配置框架,通过合理的配置可以显著提升命令行使用体验。建议从基础配置开始,根据个人需求逐步定制。
Powerlevel10k:强大的 Zsh 主题
GitHub 仓库
https://github.com/romkatv/powerlevel10k.git
安装方法
方法一:使用 Oh My Zsh 安装
- 克隆仓库到 Oh My Zsh 自定义主题目录:
git clone --depth=1 https://github.com/romkatv/powerlevel10k.git ${ZSH_CUSTOM:-$HOME/.oh-my-zsh/custom}/themes/powerlevel10k
- 修改
~/.zshrc文件:
ZSH_THEME="powerlevel10k/powerlevel10k"
- 退出终端并重新打开,或执行:
source ~/.zshrc
方法二:手动安装(不使用 Oh My Zsh)
- 克隆仓库:
git clone --depth=1 https://github.com/romkatv/powerlevel10k.git ~/powerlevel10k
- 在
~/.zshrc中添加:
source ~/powerlevel10k/powerlevel10k.zsh-theme
方法三:使用包管理器
macOS (Homebrew)
brew install romkatv/powerlevel10k/powerlevel10k
echo 'source /usr/local/opt/powerlevel10k/powerlevel10k.zsh-theme' >> ~/.zshrc
Arch Linux (AUR)
yay -S zsh-theme-powerlevel10k-git
Ubuntu/Debian
sudo apt install zsh-theme-powerlevel10k
配置向导
首次启动 Powerlevel10k 时会自动运行配置向导:
1. 字体安装
配置向导会提示安装推荐的字体:
- Meslo Nerd Font:推荐字体,支持所有图标
- 其他 Nerd Fonts:如 Fira Code、JetBrains Mono 等
2. 样式选择
向导提供多种样式预设:
- Lean:简洁风格,占用空间小
- Classic:经典风格,功能丰富
- Rainbow:彩色风格,视觉突出
- Pure:类似 Pure 主题的风格
3. 元素配置
可以配置显示的元素:
- 当前目录
- Git 状态
- 命令执行时间
- 错误代码
- 时间日期
- 电池状态
- 虚拟环境
- Kubernetes 上下文
常用配置
1. 基本配置
在 ~/.p10k.zsh 中配置:
# 启用瞬时提示模式
typeset -g POWERLEVEL9K_INSTANT_PROMPT=quiet

# 设置提示符样式
typeset -g POWERLEVEL9K_PROMPT_ADD_NEWLINE=true
typeset -g POWERLEVEL9K_PROMPT_ON_NEWLINE=true

# 右侧提示符元素
typeset -g POWERLEVEL9K_RIGHT_PROMPT_ELEMENTS=(
    status                  # 退出状态
    command_execution_time  # 命令执行时间
    background_jobs         # 后台任务
    direnv                  # direnv 状态
    asdf                    # asdf 版本管理器
    virtualenv              # Python 虚拟环境
    anaconda                # Conda 环境
    pyenv                   # pyenv 环境
    goenv                   # goenv 环境
    nodenv                  # nodenv 环境
    nvm                     # nvm 环境
    nodeenv                 # nodeenv 环境
    rbenv                   # rbenv 环境
    rvm                     # rvm 环境
    fvm                     # Flutter 版本管理器
    luaenv                  # luaenv 环境
    jenv                    # jenv 环境
    plenv                   # plenv 环境
    phpenv                  # phpenv 环境
    scalaenv                # scalaenv 环境
    haskell_stack           # Haskell Stack
    kubecontext             # Kubernetes 上下文
    terraform               # Terraform 工作区
    aws                     # AWS 配置
    aws_eb_env              # AWS Elastic Beanstalk 环境
    azure                   # Azure 订阅
    gcloud                  # Google Cloud 配置
    google_app_cred         # Google 应用凭证
    context                 # 用户和主机名
    nordvpn                 # NordVPN 状态
    ranger                  # Ranger shell
    nnn                     # nnn shell
    vim_shell               # Vim shell
    midnight_commander      # Midnight Commander shell
    nix_shell               # Nix shell
    todo                    # todo.sh 状态
    timewarrior             # Timewarrior 状态
    taskwarrior             # Taskwarrior 状态
    time                    # 当前时间
    newline                 # 换行
)
2. Git 状态配置
# Git 状态显示
typeset -g POWERLEVEL9K_VCS_BRANCH_ICON='\uF126 '
typeset -g POWERLEVEL9K_VCS_UNTRACKED_ICON='?'
typeset -g POWERLEVEL9K_VCS_UNSTAGED_ICON='!'
typeset -g POWERLEVEL9K_VCS_STAGED_ICON='+'

# Git 状态颜色
typeset -g POWERLEVEL9K_VCS_CLEAN_FOREGROUND=2
typeset -g POWERLEVEL9K_VCS_UNTRACKED_FOREGROUND=3
typeset -g POWERLEVEL9K_VCS_MODIFIED_FOREGROUND=3
3. 目录显示配置
# 目录显示设置
typeset -g POWERLEVEL9K_SHORTEN_STRATEGY=truncate_to_unique
typeset -g POWERLEVEL9K_SHORTEN_DELIMITER='…'
typeset -g POWERLEVEL9K_SHORTEN_DIR_LENGTH=1
typeset -g POWERLEVEL9K_DIR_MAX_LENGTH=80
高级功能
1. 瞬时提示
Powerlevel10k 支持瞬时提示,在输入命令前显示提示符:
# 启用瞬时提示
typeset -g POWERLEVEL9K_INSTANT_PROMPT=verbose

# 禁用瞬时提示
typeset -g POWERLEVEL9K_INSTANT_PROMPT=off
2. 异步渲染
提示符元素异步加载,不阻塞终端:
# 启用异步渲染
typeset -g POWERLEVEL9K_DISABLE_GITSTATUS=false
3. 条件显示
根据条件显示或隐藏元素:
# 只在 Git 仓库中显示 Git 状态
function prompt_my_git() {
if git rev-parse --git-dir > /dev/null 2>&1; then
p10k segment -f 2 -i '' -t "$(git branch --show-current)"
fi
}
自定义主题
1. 创建自定义配置
# 复制默认配置
cp ~/.p10k.zsh ~/.p10k.zsh.custom

# 修改自定义配置
vim ~/.p10k.zsh.custom
2. 切换配置
# 在 .zshrc 中切换配置
[[ ! -f ~/.p10k.zsh.custom ]] || source ~/.p10k.zsh.custom
3. 自定义元素
# 添加自定义元素
function prompt_my_custom() {
    p10k segment -b 1 -f 3 -i '⭐' -t 'Custom'
}

# 添加到提示符
typeset -g POWERLEVEL9K_LEFT_PROMPT_ELEMENTS=(
    my_custom
    dir
    vcs
    newline
    prompt_char
)
性能优化
1. 禁用不需要的元素
# 禁用不使用的元素
typeset -g POWERLEVEL9K_RIGHT_PROMPT_ELEMENTS=()
2. 减少更新频率
# 减少 Git 状态检查频率
typeset -g POWERLEVEL9K_VCS_MAX_INDEX_SIZE_DIRTY=-1
3. 使用缓存
# 启用缓存
typeset -g POWERLEVEL9K_VCS_GIT_HOOKS=(
    vcs-detect-changes
    git-untracked
    git-aheadbehind
    git-stash
    git-remotebranch
    git-tagname
)
故障排除
问题 1:图标不显示
# 检查字体是否安装
fc-list | grep -i "nerd"

# 设置终端字体
# 在终端设置中使用 Nerd Fonts
问题 2:配置向导不启动
# 手动启动配置向导
p10k configure

# 或删除配置文件重新配置
rm ~/.p10k.zsh
问题 3:性能问题
# 检查加载时间
time zsh -i -c exit

# 分析性能
zprof
问题 4:与其他插件冲突
# 检查插件加载顺序
# 确保 Powerlevel10k 最后加载

# 在 .zshrc 中
source $ZSH/oh-my-zsh.sh
source ${ZSH_CUSTOM:-~/.oh-my-zsh/custom}/themes/powerlevel10k/powerlevel10k.zsh-theme
常用命令
1. 配置命令
# 重新运行配置向导
p10k configure

# 重新加载配置
source ~/.zshrc

# 查看当前配置
p10k display
2. 调试命令
# 显示所有段
p10k segments

# 显示配置
p10k config

# 显示帮助
p10k help
3. 维护命令
# 更新 Powerlevel10k
git -C ${ZSH_CUSTOM:-$HOME/.oh-my-zsh/custom}/themes/powerlevel10k pull

# 清理缓存
rm -rf ~/.cache/p10k-*
与其他工具集成
1. 与 tmux 集成
# 在 .tmux.conf 中
set -g default-terminal "screen-256color"
set -ga terminal-overrides ",xterm-256color:Tc"
2. 与 iTerm2 集成
- 在 iTerm2 设置中使用 Nerd Fonts
- 启用真彩色支持
3. 与 VS Code 集成
// settings.json
{
    "terminal.integrated.fontFamily": "MesloLGS NF",
    "terminal.integrated.fontSize": 14
}
最佳实践
1. 版本控制配置
# 备份配置
cp ~/.p10k.zsh ~/.p10k.zsh.backup

# 使用 Git 管理配置
cd ~
git init
git add .p10k.zsh
git commit -m "Add Powerlevel10k configuration"
2. 多机器同步
# 使用 dotfiles 管理
git clone https://github.com/yourusername/dotfiles.git
ln -s ~/dotfiles/.p10k.zsh ~/.p10k.zsh
3. 定期更新
# 创建更新脚本
cat > ~/update-p10k.sh << 'EOF'
#!/bin/bash
cd ${ZSH_CUSTOM:-$HOME/.oh-my-zsh/custom}/themes/powerlevel10k
git pull
source ~/.zshrc
EOF

chmod +x ~/update-p10k.sh
Powerlevel10k 是一个功能强大且高度可定制的 Zsh 主题,通过合理配置可以大大提高终端使用体验。建议从默认配置开始,逐步根据个人需求进行定制。
Zsh-autosuggestions:Zsh 自动建议插件
官方文档
https://github.com/zsh-users/zsh-autosuggestions/blob/master/INSTALL.md
安装方法
方法一:使用 Oh My Zsh 安装
- 克隆仓库到 Oh My Zsh 自定义插件目录:
git clone https://github.com/zsh-users/zsh-autosuggestions ${ZSH_CUSTOM:-~/.oh-my-zsh/custom}/plugins/zsh-autosuggestions
- 在
~/.zshrc的插件列表中添加:
plugins=(
    # 其他插件...
    zsh-autosuggestions
)
- 重新加载配置:
source ~/.zshrc
方法二:手动安装(不使用 Oh My Zsh)
- 克隆仓库:
git clone https://github.com/zsh-users/zsh-autosuggestions ~/.zsh/zsh-autosuggestions
- 在
~/.zshrc中添加:
source ~/.zsh/zsh-autosuggestions/zsh-autosuggestions.zsh
方法三:使用包管理器
macOS (Homebrew)
brew install zsh-autosuggestions
echo 'source /usr/local/share/zsh-autosuggestions/zsh-autosuggestions.zsh' >> ~/.zshrc
Arch Linux (AUR)
yay -S zsh-autosuggestions-git
Ubuntu/Debian
sudo apt install zsh-autosuggestions
基本使用
1. 接受建议
- 右箭头键 (
→) 或End:接受当前建议 - Ctrl-F:接受当前建议
- Ctrl-E:接受当前建议并执行
2. 部分接受
- Ctrl-→:接受建议到下一个单词
- Alt-F:接受建议到下一个单词
3. 忽略建议
- 继续输入:建议会自动更新
- Esc:清除当前建议
配置选项
1. 建议策略
# 设置建议策略(默认:history)
ZSH_AUTOSUGGEST_STRATEGY=(history completion)

# 可用策略:
# - history: 基于历史命令
# - completion: 基于补全系统
# - match_prev_cmd: 匹配上一个命令
2. 建议触发
# 触发建议的最小字符数(默认:1)
ZSH_AUTOSUGGEST_BUFFER_MAX_SIZE=20

# 异步获取建议(默认:启用)
ZSH_AUTOSUGGEST_USE_ASYNC=true

# 建议获取延迟(毫秒,默认:200)
ZSH_AUTOSUGGEST_COMPLETION_IGNORE=200
3. 外观设置
# 建议文本颜色(默认:8,灰色)
ZSH_AUTOSUGGEST_HIGHLIGHT_STYLE='fg=8'

# 可用颜色:
# - fg=black, red, green, yellow, blue, magenta, cyan, white
# - fg=0-255 (256色)
# - bg=颜色 (背景色)
# - underline (下划线)
# - bold (粗体)

# 示例:使用亮青色
ZSH_AUTOSUGGEST_HIGHLIGHT_STYLE='fg=cyan,bold'
4. 行为控制
# 禁用某些命令的建议
ZSH_AUTOSUGGEST_HISTORY_IGNORE="cd *|ls *|rm *"

# 忽略大小写(默认:敏感)
ZSH_AUTOSUGGEST_CASE_SENSITIVE=false

# 接受建议时是否添加空格(默认:true)
ZSH_AUTOSUGGEST_ACCEPT_SPACE=true
高级配置
1. 自定义快捷键
# 自定义接受建议的快捷键
bindkey '^ ' autosuggest-accept
bindkey '^n' autosuggest-accept
bindkey '^p' autosuggest-execute

# 自定义部分接受的快捷键
bindkey '^f' forward-word
bindkey '^b' backward-word

# 自定义清除建议的快捷键
bindkey '^c' autosuggest-clear
2. 事件钩子
# 建议接受前执行的函数
ZSH_AUTOSUGGEST_ACCEPT_WIDGETS=(
    forward-char
    end-of-line
    vi-forward-char
    vi-end-of-line
    vi-add-eol
)

# 建议部分接受前执行的函数
ZSH_AUTOSUGGEST_PARTIAL_ACCEPT_WIDGETS=(
    forward-word
    emacs-forward-word
    vi-forward-word
    vi-forward-word-end
    vi-forward-blank-word
    vi-forward-blank-word-end
    vi-find-next-char
    vi-find-next-char-skip
)

# 建议清除时执行的函数
ZSH_AUTOSUGGEST_CLEAR_WIDGETS=(
    history-search-forward
    history-search-backward
    history-beginning-search-forward
    history-beginning-search-backward
    history-substring-search-up
    history-substring-search-down
    up-line-or-beginning-search
    down-line-or-beginning-search
    up-line-or-history
    down-line-or-history
    accept-line
    copy-earlier-word
)
3. 性能优化
# 限制历史记录大小
HISTSIZE=10000
SAVEHIST=10000

# 启用共享历史
setopt share_history

# 忽略重复命令
setopt hist_ignore_all_dups
setopt hist_save_no_dups
setopt hist_ignore_space
与其他插件集成
1. 与 zsh-syntax-highlighting 集成
# 确保加载顺序正确
# zsh-syntax-highlighting 必须在最后加载
plugins=(
    # 其他插件...
    zsh-autosuggestions
    zsh-syntax-highlighting
)
2. 与 zsh-history-substring-search 集成
# 配置快捷键避免冲突
bindkey '^[[A' history-substring-search-up
bindkey '^[[B' history-substring-search-down
3. 与 fzf 集成
# 使用 fzf 选择历史建议
bindkey '^r' fzf-history-widget
自定义建议源
1. 自定义建议函数
# 创建自定义建议函数
function _my_custom_suggestions() {
    local suggestions=()

    # 添加自定义建议
    suggestions+=("echo 'Hello World'")
    suggestions+=("cd ~/projects")
    suggestions+=("git status")

    # 返回建议
    echo "${suggestions[@]}"
}

# 注册自定义建议源
ZSH_AUTOSUGGEST_CUSTOM_STRATEGIES=(my_custom_suggestions)
ZSH_AUTOSUGGEST_STRATEGY=(my_custom_suggestions history)
2. 基于上下文的建议
# 根据当前目录提供建议
function _context_based_suggestions() {
    local current_dir=$(basename "$PWD")
    local suggestions=()

    case $current_dir in
        git*)
            suggestions+=("git status")
            suggestions+=("git pull")
            suggestions+=("git push")
            ;;
        docker*)
            suggestions+=("docker ps")
            suggestions+=("docker-compose up")
            suggestions+=("docker logs")
            ;;
        python*)
            suggestions+=("python manage.py runserver")
            suggestions+=("pip install -r requirements.txt")
            suggestions+=("python -m pytest")
            ;;
    esac

    echo "${suggestions[@]}"
}
故障排除
问题 1:建议不显示
# 检查插件是否加载
echo $plugins | grep autosuggestions

# 检查配置文件
cat ~/.zshrc | grep -A5 -B5 "plugins="

# 手动加载测试
source ${ZSH_CUSTOM:-~/.oh-my-zsh/custom}/plugins/zsh-autosuggestions/zsh-autosuggestions.zsh
问题 2:快捷键冲突
# 查看当前快捷键绑定
bindkey | grep autosuggest

# 查看冲突的快捷键
bindkey | grep -E "\^\[\[A|\^\[\[B|\^R|\^S"
问题 3:性能问题
# 检查 Zsh 启动时间
time zsh -i -c exit

# 禁用异步获取(如果性能差)
ZSH_AUTOSUGGEST_USE_ASYNC=false

# 减少历史记录大小
HISTSIZE=1000
SAVEHIST=1000
问题 4:颜色不显示
# 检查终端颜色支持
echo $TERM

# 检查颜色配置
echo $ZSH_AUTOSUGGEST_HIGHLIGHT_STYLE

# 测试颜色
for i in {0..255}; do print -Pn "%K{$i}  %k%F{$i}${(l:3::0:)i}%f " ${${(M)$((i%6)):#3}:+$'\n'}; done
最佳实践
1. 配置文件管理
# 创建插件配置目录
mkdir -p ~/.zsh/plugins

# 备份配置
cp ~/.zshrc ~/.zshrc.backup
cp -r ${ZSH_CUSTOM:-~/.oh-my-zsh/custom}/plugins/zsh-autosuggestions ~/.zsh/plugins/backup/
2. 版本控制
# 使用 Git 管理配置
cd ~
git init
git add .zshrc
git add .oh-my-zsh/custom/plugins/zsh-autosuggestions
git commit -m "Add zsh-autosuggestions configuration"
3. 定期更新
# 创建更新脚本
cat > ~/update-zsh-autosuggestions.sh << 'EOF'
#!/bin/bash
cd ${ZSH_CUSTOM:-~/.oh-my-zsh/custom}/plugins/zsh-autosuggestions
git pull
source ~/.zshrc
echo "zsh-autosuggestions updated successfully"
EOF

chmod +x ~/update-zsh-autosuggestions.sh
替代方案
1. fish-style 自动建议
# 使用 fish 风格的自动建议
# zsh-autosuggestions 就是模仿 fish 的自动建议
2. 历史搜索
# 使用历史搜索替代
plugins=(history-substring-search)
3. 智能补全
# 使用更智能的补全系统
plugins=(zsh-completions)
性能测试
1. 基准测试
# 测试建议响应时间
time for i in {1..100}; do echo "test $i"; done | grep -q ""

# 测试历史加载时间
time fc -l 1
2. 内存使用
# 检查内存使用
ps aux | grep zsh | grep -v grep

# 检查插件内存
pmap $(pgrep zsh) | tail -20
3. 启动时间优化
# 延迟加载插件
function load_zsh_autosuggestions() {
    source ${ZSH_CUSTOM:-~/.oh-my-zsh/custom}/plugins/zsh-autosuggestions/zsh-autosuggestions.zsh
}

# 在需要时加载
autoload -Uz load_zsh_autosuggestions
zsh-autosuggestions 是一个非常实用的插件,可以大大提高命令行输入效率。通过合理配置,可以获得类似 fish shell 的流畅体验。
Zsh-autocomplete:实时自动补全插件
GitHub 仓库
https://github.com/marlonrichert/zsh-autocomplete
安装方法
方法一:使用 Oh My Zsh 安装
- 克隆仓库到 Oh My Zsh 自定义插件目录:
git clone --depth 1 -- https://github.com/marlonrichert/zsh-autocomplete.git ${ZSH_CUSTOM:-~/.oh-my-zsh/custom}/plugins/zsh-autocomplete
- 在
~/.zshrc的插件列表中添加:
plugins=(
    # 其他插件...
    zsh-autocomplete
)
- 重新加载配置:
source ~/.zshrc
方法二:手动安装(不使用 Oh My Zsh)
- 克隆仓库:
git clone --depth 1 https://github.com/marlonrichert/zsh-autocomplete.git ~/.zsh/zsh-autocomplete
- 在
~/.zshrc中添加:
source ~/.zsh/zsh-autocomplete/zsh-autocomplete.plugin.zsh
方法三:使用 Zinit(推荐)
# 使用 Zinit 安装
zinit light marlonrichert/zsh-autocomplete

# 或使用延迟加载
zinit ice wait lucid
zinit light marlonrichert/zsh-autocomplete
功能特性
1. 实时补全
- 输入时实时显示补全建议
- 支持命令、参数、文件路径补全
- 智能过滤和排序
2. 多级补全
- 支持嵌套补全(如
git commit -m "message") - 上下文感知补全
- 动态补全列表
3. 可视化界面
- 彩色高亮显示
- 分组显示不同类型补全
- 可配置的布局和样式
基本使用
1. 导航补全列表
- Tab:选择下一个补全项
- Shift-Tab:选择上一个补全项
- Ctrl-N:向下导航
- Ctrl-P:向上导航
- Ctrl-F:向右翻页
- Ctrl-B:向左翻页
2. 接受补全
- Enter:接受当前补全
- → 或 End:接受补全并继续
- Ctrl-Space:接受补全并保持列表打开
3. 过滤补全
- 继续输入:自动过滤补全列表
- Ctrl-U:清除当前行
- Ctrl-W:删除前一个单词
配置选项
1. 补全行为
# 设置补全策略
zstyle ':autocomplete:*' default-context ''
zstyle ':autocomplete:*' min-input 1
zstyle ':autocomplete:*' list-lines 16

# 补全触发延迟(毫秒)
zstyle ':autocomplete:*' delay 0.1

# 启用模糊匹配
zstyle ':autocomplete:*' fzf-completion yes
2. 外观设置
# 补全列表颜色
zstyle ':autocomplete:*' list-colors ''
zstyle ':autocomplete:*' color yes

# 补全列表布局
zstyle ':autocomplete:*' group-name ''
zstyle ':autocomplete:*' group-order \
    'local-directories' \
    'path-directories' \
    'executables' \
    'builtins' \
    'commands' \
    'aliases' \
    'functions' \
    'parameters' \
    'reserved-words'
3. 性能优化
# 缓存设置
zstyle ':autocomplete:*' cache-path ~/.cache/zsh-autocomplete
zstyle ':autocomplete:*' cache-policy ''

# 限制补全数量
zstyle ':autocomplete:*' max-matches 100
zstyle ':autocomplete:*' max-candidates 1000
高级配置
1. 自定义补全源
# 添加自定义补全源
function _my_custom_completions() {
    local -a completions

    # 添加自定义补全
    completions+=('custom-command:自定义命令描述')
    completions+=('another-command:另一个命令描述')

    _describe 'custom completions' completions
}

compdef _my_custom_completions my-command
2. 上下文感知补全
# 根据当前目录提供补全
function _context_aware_completions() {
    case ${PWD##*/} in
        git*)
            _arguments \
                '--help[显示帮助信息]' \
                '--version[显示版本信息]' \
                '*: :_files'
            ;;
        docker*)
            _arguments \
                '(- *)'--help'[显示帮助信息]' \
                '(- *)'--version'[显示版本信息]' \
                '*: :_docker_complete'
            ;;
    esac
}
3. 集成其他补全系统
# 集成 fzf 补全
zstyle ':autocomplete:*' fzf-completion yes
zstyle ':autocomplete:*' fzf-bindings \
    'ctrl-space:accept' \
    'ctrl-a:toggle-all' \
    'ctrl-d:deselect-all' \
    'ctrl-t:toggle' \
    'ctrl-y:yank'
与其他插件集成
1. 与 zsh-syntax-highlighting 集成
# 确保加载顺序正确
# zsh-autocomplete 应该在 zsh-syntax-highlighting 之前加载
plugins=(
    # 其他插件...
    zsh-autocomplete
    zsh-syntax-highlighting
)
2. 与 zsh-autosuggestions 集成
# 配置避免冲突
zstyle ':autocomplete:*' complete-word yes
zstyle ':autocomplete:*' insert-unambiguous yes
3. 与 zsh-history-substring-search 集成
# 配置快捷键
bindkey '^[[A' history-substring-search-up
bindkey '^[[B' history-substring-search-down
自定义补全规则
1. 命令别名补全
# 为别名添加补全
compdef _git g=git
compdef _docker d=docker
compdef _kubectl k=kubectl

# 自定义别名补全函数
function _my_alias_completion() {
    local -a completions
    completions=('--help' '--version' '--verbose')
    _describe 'my alias completions' completions
}
compdef _my_alias_completion my-alias
2. 文件类型补全
# 根据文件类型提供补全
zstyle ':completion:*:*:*:*.*' file-patterns \
    '*.txt:text files' \
    '*.md:markdown files' \
    '*.py:python files' \
    '*.js:javascript files' \
    '*.json:json files'
3. 参数补全
# 自定义参数补全
function _my_command_completion() {
    _arguments \
        '(-v --verbose)'{-v,--verbose}'[详细输出]' \
        '(-q --quiet)'{-q,--quiet}'[安静模式]' \
        '(-f --file)'{-f,--file}'[输入文件]:filename:_files' \
        '(-o --output)'{-o,--output}'[输出文件]:filename:_files' \
        '*: :_my_custom_completions'
}
性能优化
1. 延迟加载
# 使用 Zinit 延迟加载
zinit ice wait"1" lucid
zinit light marlonrichert/zsh-autocomplete
2. 缓存策略
# 启用缓存
zstyle ':completion:*' use-cache on
zstyle ':completion:*' cache-path ~/.zsh/cache

# 设置缓存过期时间
zstyle ':completion:*' rehash true
3. 限制补全范围
# 只对特定命令启用高级补全
zstyle ':autocomplete:*' complete-in-word false
zstyle ':autocomplete:*' insert-unambiguous false
故障排除
问题 1:补全不显示
# 检查插件是否加载
echo $plugins | grep autocomplete

# 检查补全系统
autoload -Uz compinit && compinit

# 查看补全配置
zstyle -L | grep autocomplete
问题 2:性能问题
# 检查启动时间
time zsh -i -c exit

# 禁用实时补全
zstyle ':autocomplete:*' min-input 3

# 减少补全数量
zstyle ':autocomplete:*' max-matches 50
问题 3:快捷键冲突
# 查看当前快捷键绑定
bindkey | grep -E "Tab|Shift|Ctrl"

# 重新绑定快捷键
bindkey '^I' complete-word
bindkey '^[[Z' reverse-menu-complete
问题 4:与其他插件冲突
# 调整插件加载顺序
# zsh-autocomplete 应该在其他补全相关插件之后加载

# 禁用冲突功能
zstyle ':autocomplete:*' fzf-completion no
最佳实践
1. 渐进式配置
# 从简单配置开始,逐步添加功能
# 1. 先启用基本补全
# 2. 添加颜色和分组
# 3. 配置快捷键
# 4. 添加高级功能
2. 配置文件组织
# 创建单独的配置文件
mkdir -p ~/.zsh/completion
echo 'source ~/.zsh/completion/autocomplete.zsh' >> ~/.zshrc

# 在 autocomplete.zsh 中配置
cat > ~/.zsh/completion/autocomplete.zsh << 'EOF'
# zsh-autocomplete 配置
zstyle ':autocomplete:*' default-context ''
zstyle ':autocomplete:*' min-input 1
zstyle ':autocomplete:*' list-lines 16
EOF
3. 定期维护
# 更新插件
cd ${ZSH_CUSTOM:-~/.oh-my-zsh/custom}/plugins/zsh-autocomplete
git pull

# 清理缓存
rm -rf ~/.zsh/cache
rm -rf ~/.cache/zsh-autocomplete
替代方案
1. zsh-completions
# 传统补全插件
plugins=(zsh-completions)
autoload -Uz compinit && compinit
2. fzf-tab
# 使用 fzf 的补全插件
plugins=(fzf-tab)
3. 原生 Zsh 补全
# 使用 Zsh 内置补全系统
autoload -Uz compinit
compinit

# 配置补全
zstyle ':completion:*' menu select
zstyle ':completion:*' list-colors ''
性能测试
1. 补全响应测试
# 测试补全响应时间
time (echo "git " && sleep 0.1 && echo "com") > /dev/null
2. 内存使用测试
# 检查内存使用
ps aux | grep zsh | grep -v grep | awk '{print $6/1024 " MB"}'

# 检查插件内存
pmap $(pgrep zsh) | grep -E "autocomplete|Total"
3. 启动时间优化
# 测量启动时间
for i in {1..5}; do
    time zsh -i -c exit
done | awk '/real/ {sum += $2} END {print "平均启动时间:", sum/NR "s"}'
zsh-autocomplete 是一个功能强大的实时补全插件,可以显著提高命令行输入效率。通过合理配置,可以获得流畅的补全体验。
Zsh-syntax-highlighting
https://github.com/zsh-users/zsh-syntax-highlighting
Installation
-
- Clone this repository into
$ZSH_CUSTOM/plugins(by default~/.oh-my-zsh/custom/plugins)
- Clone this repository into
git clone https://github.com/zsh-users/zsh-syntax-highlighting.git ${ZSH_CUSTOM:-~/.oh-my-zsh/custom}/plugins/zsh-syntax-highlighting
- Add the plugin to the list of plugins for Oh My Zsh to load (inside
~/.zshrc):
plugins=(
    # ...
    zsh-syntax-highlighting
)
Zsh-you-should-use
Installation
- Clone the repo into your oh-my-zsh plugins directory.
git clone https://github.com/MichaelAquilina/zsh-you-should-use.git ${ZSH_CUSTOM:-~/.oh-my-zsh/custom}/plugins/you-should-use
- Add
you-should-useto the list of plugins in your~/.zshrcfile.
plugins=(
    # other plugins...
    you-should-use
)
Auto-Venv
Auto-activate Virtual Environments in Python Projects
- Clone this repository into
$ZSH_CUSTOM/plugins(by default~/.oh-my-zsh/custom/plugins)
git clone https://github.com/lxp731/auto-venv $ZSH_CUSTOM/plugins/auto-venv
- Add
auto-venvto the plugins array in your~/.zshrcfile
plugins=(
    ...
    auto-venv
)
fzf:命令行模糊查找工具
官方网站
安装 fzf
源码安装(推荐)
# 克隆 fzf 仓库
git clone --depth 1 https://github.com/junegunn/fzf.git ~/.fzf

# 运行安装脚本
~/.fzf/install
包管理器安装
# Ubuntu/Debian
sudo apt install fzf

# Arch Linux
sudo pacman -S fzf

# macOS (Homebrew)
brew install fzf

# 安装后需要运行
$(brew --prefix)/opt/fzf/install
配置 .bashrc
基础示例:切换 Git 分支
# 使用 fzf 选择并切换 Git 分支
alias gcb="git branch | fzf --preview 'git show --color=always {-1}' \
                 --bind 'enter:become(git checkout {-1})' \
                 --height 60% --layout reverse"
初始化 fzf 环境
# fzf 初始化
eval "$(~/.fzf/bin/fzf --bash)"
[ -f ~/.fzf.bash ] && source ~/.fzf.bash
默认快捷键
fzf 内置了以下默认快捷键:
| 快捷键 | 功能 |
|---|---|
| Ctrl+R | 搜索命令历史 |
| Ctrl+T | 搜索文件和目录 |
| Alt+C | 切换目录 |
你可以自定义这些功能:
高级配置
1. 命令历史搜索优化
# 使用 Ctrl-Y 复制命令到剪贴板
export FZF_CTRL_R_OPTS="
  --bind 'ctrl-y:execute-silent(echo -n {2..} | pbcopy)+abort'
  --color header:italic
  --header '按 Ctrl-Y 复制命令到剪贴板'
  --height 80% --layout reverse"
2. 文件搜索优化
# 使用 bat 预览文件内容
export FZF_CTRL_T_OPTS="
  --walker-skip .git,node_modules,target
  --preview 'batcat -n --color=always {}'
  --bind 'ctrl-/:change-preview-window(down|hidden|)'
  --height 80% --layout reverse"
3. 目录切换优化
# 使用 tree 预览目录结构
export FZF_ALT_C_OPTS="
  --walker-skip .git,node_modules,target
  --preview 'tree -C {}'
  --height 80% --layout reverse"
4. 高级搜索函数:ripgrep -> fzf -> vim
# 安装依赖:sudo apt install -y ripgrep bat
rfv() (
  RELOAD='reload:rg --column --color=always --smart-case {q} || :'
  OPENER='if [[ $FZF_SELECT_COUNT -eq 0 ]]; then
            vim {1} +{2}     # 无选择:在 Vim 中打开当前行
          else
            vim +cw -q {+f}  # 有选择:为选中项创建 quickfix 列表
          fi'
  fzf --disabled --ansi --multi \
      --bind "start:$RELOAD" --bind "change:$RELOAD" \
      --bind "enter:become:$OPENER" \
      --bind "ctrl-o:execute:$OPENER" \
      --bind 'alt-a:select-all,alt-d:deselect-all,ctrl-/:toggle-preview' \
      --delimiter : \
      --preview 'batcat --style=full --color=always --highlight-line {2} {1}' \
      --preview-window '~4,+{2}+4/3,<80(up)' \
      --query "$*"
)
提示:在 fzf 界面中,按 Esc 键可以退出。
常用功能
1. 搜索文件内容
# 在当前目录递归搜索包含 "keyword" 的文件
rg --color=always -n "keyword" | fzf

# 使用预览功能
rg --color=always -n "keyword" | fzf --preview 'batcat --color=always --highlight-line {2} {1}'
2. 进程管理
# 搜索并管理进程
ps aux | fzf

# 杀死选中的进程
ps aux | fzf --multi | awk '{print $2}' | xargs kill -9
3. Git 操作
# 查看 Git 提交历史
git log --oneline --graph --color=always | fzf

# 选择并查看特定提交
git log --oneline --graph --color=always | fzf --preview 'git show --color=always {1}'
4. SSH 主机连接
# 从 SSH 配置中选择主机
grep "^Host" ~/.ssh/config | cut -d' ' -f2 | fzf --preview 'ssh {} "hostname && whoami"'
配置技巧
1. 主题定制
# 使用 solarized 主题
export FZF_DEFAULT_OPTS="--color=bg+:#073642,bg:#002b36,spinner:#719e07,hl:#586e75 \
--color=fg:#839496,header:#586e75,info:#cb4b16,pointer:#719e07 \
--color=marker:#719e07,fg+:#839496,prompt:#719e07,hl+:#719e07"
2. 布局设置
# 设置默认布局
export FZF_DEFAULT_OPTS="--height 40% --layout=reverse --border"
3. 搜索命令
# 使用 fd 替代 find(更快)
export FZF_DEFAULT_COMMAND='fd --type f --hidden --follow --exclude .git'
与其他工具集成
1. 与 Vim 集成
" 安装 fzf.vim 插件
Plug 'junegunn/fzf', { 'do': { -> fzf#install() } }
Plug 'junegunn/fzf.vim'
" 快捷键映射
nnoremap <C-p> :Files<CR>
nnoremap <C-g> :Rg<CR>
nnoremap <C-b> :Buffers<CR>
2. 与 Zsh 集成
# 在 .zshrc 中添加
[ -f ~/.fzf.zsh ] && source ~/.fzf.zsh
3. 与 Tmux 集成
# 在 tmux 中使用 fzf
tmux list-sessions | fzf | cut -d: -f1 | xargs tmux switch-client -t
性能优化
1. 使用更快的查找工具
# 安装 fd (替代 find)
sudo apt install fd-find # Ubuntu
brew install fd # macOS
# 配置 fzf 使用 fd
export FZF_DEFAULT_COMMAND='fd --type f --hidden --follow --exclude .git'
export FZF_CTRL_T_COMMAND="$FZF_DEFAULT_COMMAND"
2. 缓存结果
# 对于大型目录,可以使用缓存
export FZF_DEFAULT_COMMAND='find . -type f 2>/dev/null | head -10000'
3. 限制搜索范围
# 忽略特定目录
export FZF_DEFAULT_COMMAND='find . -type f -not -path "*/node_modules/*" -not -path "*/.git/*"'
常见问题
问题 1:安装后快捷键不生效
# 重新加载 shell 配置
source ~/.bashrc
# 或
source ~/.zshrc
问题 2:预览功能不工作
# 安装预览工具
sudo apt install bat tree # Ubuntu
brew install bat tree # macOS
问题 3:搜索速度慢
# 使用更快的工具
sudo apt install ripgrep fd-find # Ubuntu
brew install ripgrep fd # macOS
实用别名
# 快速搜索历史命令
alias h='history | fzf'
# 快速切换目录
alias d='cd $(find . -type d | fzf)'
# 快速编辑文件
alias e='vim $(fzf)'
# 快速查看文件
alias v='bat $(fzf)'
# 快速搜索并替换
alias sr='rg --files-with-matches "$1" | fzf | xargs vim -c "%s/$1/$2/g" -c "wq"'
fzf 是一个非常强大的命令行工具,通过模糊查找大大提高了命令行工作效率。花时间学习和配置 fzf,你会发现它值得每一分钟的投入。
FZF Replace Bash Completion
Github Repo
https://github.com/lincheney/fzf-tab-completion
Install Script
mkdir -p ~/.fzf/shell && \
wget -O ~/.fzf/shell/fzf-bash-completion.sh \
https://raw.githubusercontent.com/lincheney/fzf-tab-completion/refs/heads/master/bash/fzf-bash-completion.sh
Modify .bashrc
cat >> ~/.bashrc << EOF
# use fzf replace system completion
source ~/.fzf/shell/fzf-bash-completion.sh
bind -x '"\t": fzf_bash_completion'
EOF
source ~/.bashrc
FZF Integrate Git
Github Repo
https://github.com/junegunn/fzf-git.sh
Install
mkdir -p ~/.fzf/shell && \
cd ~/.fzf/shell && \
wget https://raw.githubusercontent.com/junegunn/fzf-git.sh/refs/heads/main/fzf-git.sh
Modify .bashrc
cat >> ~/.bashrc << EOF
# fzf integrade git
source ~/.fzf/shell/fzf-git.sh
EOF
source ~/.bashrc
CI/CD:持续集成与持续部署
概述
CI/CD(持续集成/持续部署)是现代软件开发的核心实践,旨在简化和加速软件开发生命周期。
持续集成(CI)
持续集成是指开发人员频繁地将代码变更集成到共享代码仓库的实践。每次集成都通过自动化构建和测试来验证,确保新代码不会破坏现有功能。
持续部署(CD)
持续部署是一个两阶段过程:
- 持续交付:自动将经过测试的代码部署到类生产环境
- 持续部署:自动将代码发布到生产环境
两者的主要区别在于:持续交付需要人工批准才能部署到生产环境,而持续部署是完全自动化的。
为什么 CI/CD 很重要?
1. 提高代码质量
通过自动化测试和集成,CI/CD 帮助团队:
- 及早发现和修复缺陷
- 减少代码冲突
- 保持代码库的健康状态
2. 加速交付流程
自动化减少了人工干预,使得:
- 代码从提交到部署的时间大大缩短
- 发布频率显著提高
- 系统停机时间最小化
3. 应对复杂项目
随着应用规模的增长,CI/CD 能够:
- 降低系统复杂性
- 提高团队效率
- 优化工作流程
4. 改善用户体验
快速集成更新意味着:
- 用户反馈能够更频繁地被采纳
- 新功能更快地到达用户手中
- 整体用户体验得到提升
CI/CD 工作流程
典型流程
- 代码提交:开发人员提交代码到版本控制系统
- 自动构建:CI 服务器检测到变更并触发构建
- 自动化测试:运行单元测试、集成测试等
- 代码质量检查:静态代码分析、安全检查
- 部署到测试环境:自动部署到测试服务器
- 人工验收测试(可选):测试人员验证功能
- 生产部署:自动或手动部署到生产环境
常见 CI/CD 工具
开源工具
- Jenkins: 最流行的开源自动化服务器
- GitLab CI/CD: 与 GitLab 深度集成
- GitHub Actions: GitHub 原生 CI/CD 解决方案
- Travis CI: 云原生的持续集成服务
- CircleCI: 现代化的 CI/CD 平台
商业工具
- Azure DevOps: 微软的 DevOps 平台
- AWS CodePipeline: AWS 的持续交付服务
- Bamboo: Atlassian 的 CI/CD 工具
实施 CI/CD 的最佳实践
1. 从小处开始
- 从简单的自动化构建开始
- 逐步添加测试和部署环节
- 优先自动化最频繁的任务
2. 保持快速反馈
- 构建和测试应该快速完成
- 失败时提供清晰的错误信息
- 实时通知构建状态
3. 版本控制一切
- 将 CI/CD 配置也纳入版本控制
- 使用基础设施即代码(IaC)
- 确保环境一致性
4. 安全考虑
- 在 CI/CD 管道中集成安全检查
- 管理好敏感信息(API 密钥、密码等)
- 定期审计和更新工具
CI/CD 带来的挑战
技术挑战
- 复杂的测试环境管理
- 多环境配置的一致性
- 构建性能优化
组织挑战
- 团队文化转变
- 技能培训需求
- 流程标准化
安全挑战
- 供应链安全
- 访问控制管理
- 合规性要求
成功案例
案例 1:大型电商平台
通过实施 CI/CD,实现了:
- 每日部署次数从个位数增加到数百次
- 平均修复时间减少 80%
- 用户满意度显著提升
案例 2:金融科技公司
CI/CD 帮助:
- 符合严格的监管要求
- 确保每次变更都有完整审计跟踪
- 提高系统稳定性和安全性
未来趋势
1. GitOps
将 Git 作为单一事实来源,自动化基础设施和应用的部署。
2. AI/ML 集成
使用机器学习优化测试策略和部署决策。
3. 安全左移
在开发早期集成安全检查和测试。
4. 多云部署
支持跨多个云平台的自动化部署。
开始使用 CI/CD
第一步:评估现状
- 分析当前的开发和部署流程
- 识别瓶颈和痛点
- 确定改进优先级
第二步:选择工具
- 根据团队规模和技术栈选择合适工具
- 考虑集成成本和维护成本
- 评估社区支持和文档质量
第三步:试点项目
- 选择一个相对简单的项目开始
- 设定明确的目标和成功标准
- 收集反馈并持续改进
第四步:推广扩展
- 将成功经验推广到其他项目
- 建立标准和最佳实践
- 提供培训和支持
CI/CD 不仅是技术实践,更是组织文化和流程的转变。通过持续改进和自动化,团队可以更快、更可靠地交付高质量软件。
GitLab CI/CD 经典配置脚本
配置文件示例
variables:
$CI_REGISTRY: habor.dcits.auto
$CI_REGISTRY_IMAGE: liuxp731/webui
stages:
- test
- build
- deploy
run_test:
stage: test
image: python:3.9-slim-buster
before_script:
- apt-get update && apt-get install -y make
script:
- make test
build_image:
stage: build
image: docker:20.10.16
services:
- docker:20.10.16-dind
variables:
DOCKER_TLS_CERTDIR: "/certs"
before_script:
- docker login -u $CI_REGISTRY_USER -p $CI_REGISTRY_PASSWORD $CI_REGISTRY
script:
- docker build -t $CI_REGISTRY_IMAGE:$CI_COMMIT_SHA .
- docker push $CI_REGISTRY_IMAGE:$CI_COMMIT_SHA
deploy:
stage: deploy
before_script:
- chmod 400 $SSH_KEY
script:
- ssh -o StrictHostKeyChecking=no -i $SSH_KEY $SSH_USER@$SSH_HOST "
docker login -u $CI_REGISTRY_USER -p $CI_REGISTRY_PASSWORD $CI_REGISTRY &&
docker pull $CI_REGISTRY_IMAGE:$CI_COMMIT_SHA &&
docker ps -a | xargs docker stop | xargs docker rm &&
docker run -dit -p 5000:5000 $CI_REGISTRY_IMAGE:$CI_COMMIT_SHA
"
配置文件详解
1. 基础结构
# 定义流水线阶段
stages:
- build
- test
- deploy
# 定义全局变量
variables:
DOCKER_DRIVER: overlay2
DOCKER_TLS_CERTDIR: ""
2. 构建阶段
build-job:
stage: build
script:
- echo "开始构建..."
- docker build -t myapp:$CI_COMMIT_SHA .
- docker tag myapp:$CI_COMMIT_SHA myapp:latest
artifacts:
paths:
- build/
expire_in: 1 week
3. 测试阶段
test-job:
stage: test
script:
- echo "运行单元测试..."
- npm test
- echo "运行集成测试..."
- npm run test:integration
coverage: '/All files[^|]*\|[^|]*\s+([\d\.]+)/'
4. 部署阶段
deploy-job:
stage: deploy
script:
- echo "部署到生产环境..."
- kubectl apply -f k8s/
environment:
name: production
url: https://example.com
only:
- main
常用配置选项
1. 镜像配置
# 使用特定 Docker 镜像
image: node:16-alpine
# 使用服务容器
services:
- postgres:13-alpine
- redis:6-alpine
# 定义服务变量
variables:
POSTGRES_DB: myapp_test
POSTGRES_USER: runner
POSTGRES_PASSWORD: ""
2. 缓存配置
cache:
key: ${CI_COMMIT_REF_SLUG}
paths:
- node_modules/
- .npm/
policy: pull-push
3. 制品配置
artifacts:
paths:
- dist/
- coverage/
exclude:
- node_modules/
expire_in: 30 days
when: on_success
4. 触发条件
# 仅针对特定分支
only:
- main
- develop
# 排除特定分支
except:
- tags
# 使用规则
rules:
- if: $CI_COMMIT_BRANCH == "main"
when: always
- if: $CI_PIPELINE_SOURCE == "merge_request_event"
when: manual
高级功能
1. 并行执行
parallel: 5
2. 重试机制
retry:
max: 2
when:
- runner_system_failure
- stuck_or_timeout_failure
3. 超时设置
timeout: 1h 30m
4. 资源限制
resource_group: production-deploy
实用脚本示例
1. Docker 构建和推送
build-and-push:
stage: build
script:
- docker login -u $CI_REGISTRY_USER -p $CI_REGISTRY_PASSWORD $CI_REGISTRY
- docker build -t $CI_REGISTRY_IMAGE:$CI_COMMIT_SHA .
- docker push $CI_REGISTRY_IMAGE:$CI_COMMIT_SHA
- docker tag $CI_REGISTRY_IMAGE:$CI_COMMIT_SHA $CI_REGISTRY_IMAGE:latest
- docker push $CI_REGISTRY_IMAGE:latest
2. Kubernetes 部署
deploy-to-k8s:
stage: deploy
script:
- echo $KUBECONFIG | base64 -d > kubeconfig.yaml
- export KUBECONFIG=kubeconfig.yaml
- kubectl config use-context production
- kubectl apply -f k8s/deployment.yaml
- kubectl rollout status deployment/myapp
3. 数据库迁移
database-migration:
stage: deploy
script:
- npm run db:migrate
environment:
name: production
only:
- main
4. 安全检查
security-scan:
stage: test
script:
- npm audit
- trivy image --exit-code 1 $CI_REGISTRY_IMAGE:$CI_COMMIT_SHA
allow_failure: true
环境变量管理
1. 预定义变量
# 使用 GitLab 预定义变量
script:
- echo "项目ID: $CI_PROJECT_ID"
- echo "提交SHA: $CI_COMMIT_SHA"
- echo "分支名称: $CI_COMMIT_REF_NAME"
- echo "流水线ID: $CI_PIPELINE_ID"
2. 项目变量
在 GitLab 项目设置中定义:
CI_REGISTRY_USERCI_REGISTRY_PASSWORDKUBECONFIGAWS_ACCESS_KEY_ID
3. 文件变量
variables:
KUBECONFIG: $KUBECONFIG_FILE
流水线优化
1. 依赖缓存
cache:
key:
files:
- package-lock.json
paths:
- node_modules/
2. 阶段依赖
test-job:
stage: test
dependencies:
- build-job
needs: ["build-job"]
3. 条件执行
deploy-review:
stage: deploy
script:
- echo "部署到预览环境"
environment:
name: review/$CI_COMMIT_REF_NAME
url: https://$CI_ENVIRONMENT_SLUG.example.com
only:
- branches
except:
- main
4. 手动确认
production-deploy:
stage: deploy
script:
- echo "部署到生产环境"
when: manual
only:
- main
故障排除
1. 调试模式
# 启用调试输出
variables:
CI_DEBUG_TRACE: "true"
2. 日志查看
# 查看流水线日志
gitlab-ci-lint .gitlab-ci.yml
# 本地测试
gitlab-runner exec docker build-job
3. 性能分析
# 添加时间戳
before_script:
- date
after_script:
- date
4. 错误处理
script:
- some_command || exit_code=$?
- if [ $exit_code -ne 0 ]; then
echo "命令失败,但继续执行";
fi
最佳实践
1. 配置文件组织
# 使用 include 引入其他文件
include:
- local: '/templates/.gitlab-ci-template.yml'
- project: 'mygroup/myproject'
file: '/templates/.gitlab-ci-template.yml'
- remote: 'https://example.com/ci-template.yml'
2. 模板化配置
# 定义模板
.docker-build:
script:
- docker build -t $IMAGE_TAG .
- docker push $IMAGE_TAG
# 使用模板
build-app:
extends: .docker-build
variables:
IMAGE_TAG: $CI_REGISTRY_IMAGE/app:$CI_COMMIT_SHA
3. 安全性考虑
# 避免在日志中输出敏感信息
script:
- echo "正在部署..."
# 不要这样做:
# - echo "密码是: $PASSWORD"
4. 性能优化
# 使用更小的基础镜像
image: alpine:latest
# 并行执行独立任务
test-unit:
stage: test
script: npm run test:unit
test-integration:
stage: test
script: npm run test:integration
扩展功能
1. Webhook 集成
# 触发其他流水线
trigger:
project: mygroup/myproject
branch: main
strategy: depend
2. 质量门禁
quality-gate:
stage: test
script:
- sonar-scanner
- check-coverage.sh
allow_failure: false
3. 通知配置
# 流水线状态通知
notify-slack:
stage: .post
script:
- curl -X POST -H 'Content-type: application/json' --data '{"text":"流水线 $CI_PIPELINE_ID 已完成"}' $SLACK_WEBHOOK_URL
when: always
通过合理配置 GitLab CI/CD,可以实现自动化构建、测试和部署流程,提高开发效率和代码质量。建议从简单配置开始,逐步添加高级功能。
Jenkins CI
Jenkins Variables
Jenkins 提供了许多内置变量,可以用来生成唯一的镜像标签。常用的变量包括:
-
BUILD_ID:当前构建的唯一 ID。
-
BUILD_NUMBER:当前构建的编号(每次构建递增)。
-
GIT_COMMIT:当前 Git 提交的 SHA-1 哈希值(前 7 位即可)。
-
BRANCH_NAME:当前 Git 分支的名称。
Classic Jenkinsfile Example
pipeline {
environment {
// DOCKER_IMAGE_TAG = "${env.GIT_COMMIT.substring(0, 7)}"
DOCKER_IMAGE_TAG = "0.${env.BUILD_NUMBER}"
DOCKER_IMAGE = "harbor.frombyte.auto/library/my-nginx:${DOCKER_IMAGE_TAG}"
REGISTRY_CREDENTIAL = '53464224-8c68-45a8-adb1-e8974d14e122'
}
agent {
node {
label 'rancher'
}
}
stages {
stage('Check Tools Version') {
steps {
sh 'git --version'
sh 'docker --version'
}
post {
failure {
echo "Error: Failed to check tools version!"
}
}
}
stage('Prepare') {
steps {
sh '''
if [ ! -d "automation" ]; then
git clone https://gitea.tryanks.com/burgess/automation.git
cd automation
else
cd automation
git fetch --all
git reset --hard origin/main
fi
'''
}
post {
failure {
echo "Error: Failed to prepare the repository!"
}
}
}
stage('Build') {
steps {
sh 'cd automation && docker build -t ${DOCKER_IMAGE} .'
}
post {
failure {
echo "Error: Failed to build the Docker image!"
}
}
}
stage('Push') {
steps {
withCredentials([usernamePassword(
credentialsId: "${REGISTRY_CREDENTIAL}",
usernameVariable: 'HARBOR_USERNAME',
passwordVariable: 'HARBOR_PASSWORD'
)]) {
sh '''
docker login -u ${HARBOR_USERNAME} -p ${HARBOR_PASSWORD} harbor.frombyte.auto
docker push ${DOCKER_IMAGE}
docker logout
'''
}
}
post {
failure {
echo "Error: Failed to push the Docker image!"
}
}
}
}
post {
always {
sh 'docker rmi ${DOCKER_IMAGE} || true'
}
failure {
echo "Pipeline failed! Check the logs for more details."
}
success {
echo "Pipeline succeeded!"
}
}
}
Linux 环境变量配置指南
在 Linux 系统中,环境变量用于存储程序执行时所需的信息。它们在系统运行和软件开发中扮演着至关重要的角色。
.bashrc Configuration
# 设置shell命令查找
set -o vi
# 设置Ctrl+L清屏
bind -x '"\C-l":clear'
# helm complete
source <(helm completion bash)
source <(kubectl completion bash)
# alias kubectl & setting completion
alias k=kubectl
complete -o default -F __start_kubectl k
# highlight version cat
alias dog='highlight -O ansi'
# more high-level cat
alias cat='batcat'
# fzf change git branch
alias gcb="git branch | fzf --preview 'git show --color=always {-1}' \
--bind 'enter:become(git checkout {-1})' \
--height 60% --layout reverse"
# Auto-activate uv venv
PROJECT_PATH=""
CURRENT_PATH=""
auto_activate() {
local NEW_PATH=$(pwd)
# 只有在路径改变时才进行检查
if [[ "$NEW_PATH" != "$CURRENT_PATH" ]]; then
CURRENT_PATH="$NEW_PATH"
if [[ -z "$PROJECT_PATH" ]]; then
if [ -d ".venv" ]; then
source .venv/bin/activate
PROJECT_PATH="$CURRENT_PATH"
fi
else
if [[ "$CURRENT_PATH" == "$PROJECT_PATH"* ]]; then
return
else
if [[ -n "$VIRTUAL_ENV" ]]; then
deactivate
fi
PROJECT_PATH=""
fi
fi
fi
}
PROMPT_COMMAND=auto_activate
Modify .user-dirs.dirs
Update the Contents
XDG_DESKTOP_DIR="$HOME/desktop"
XDG_DOCUMENTS_DIR="$HOME/document"
XDG_DOWNLOAD_DIR="$HOME/download"
XDG_MUSIC_DIR="$HOME/music"
XDG_PICTURES_DIR="$HOME/picture"
XDG_PUBLICSHARE_DIR="$HOME/public"
XDG_TEMPLATES_DIR="$HOME/template"
XDG_VIDEOS_DIR="$HOME/video"
Update the Folder Names of Home Path
mv 桌面/ desktop
mv 文档/ document
mv 下载/ download
mv 音乐/ music
mv 图片/ picture
mv 公共/ public
mv 模板/ template
mv 视频/ video
Reboot
reboot
Vim 插件管理器:vim-plug 使用指南
官方网站
https://github.com/junegunn/vim-plug
安装 vim-plug
自动安装
curl -fLo ~/.vim/autoload/plug.vim --create-dirs \
https://raw.githubusercontent.com/junegunn/vim-plug/master/plug.vim
手动安装
如果自动安装失败,可以手动下载:
mkdir -p ~/.vim/autoload
wget https://raw.githubusercontent.com/junegunn/vim-plug/master/plug.vim -O ~/.vim/autoload/plug.vim
配置 .vimrc
1. 添加插件管理器配置
在 ~/.vimrc 文件中添加以下内容:
" 插件安装目录
call plug#begin('~/.vim/plugged')
" 在这里列出你的插件
" 示例:安装一个基础插件
Plug 'tpope/vim-sensible'
" 更多插件示例
" Plug 'scrooloose/nerdtree' " 文件浏览器
" Plug 'vim-airline/vim-airline' " 状态栏
" Plug 'tpope/vim-fugitive' " Git 集成
" Plug 'ycm-core/YouCompleteMe' " 代码补全
call plug#end()
2. 插件配置说明
call plug#begin()和call plug#end()之间是插件列表- 每行
Plug '作者/插件名'定义一个插件 - 支持 GitHub 仓库、本地路径、其他 Git 托管服务
使用命令
安装插件
重新加载配置文件或重启 Vim 后,执行:
:PlugInstall
更新插件
:PlugUpdate
查看更新差异
:PlugDiff
查看上次更新以来的变化。
清理未使用的插件
:PlugClean
移除配置文件中已删除的插件。
升级 vim-plug 自身
:PlugUpgrade
高级功能
1. 延迟加载
对于大型插件,可以使用延迟加载提高启动速度:
" 只在打开特定文件类型时加载
Plug 'scrooloose/syntastic', { 'for': 'python' }
" 在特定命令执行时加载
Plug 'tpope/vim-fugitive', { 'on': 'Gstatus' }
" 延迟到需要时加载
Plug 'scrooloose/nerdtree', { 'on': 'NERDTreeToggle' }
2. 分支和标签
" 使用特定分支
Plug 'vim-airline/vim-airline', { 'branch': 'master' }
" 使用特定标签
Plug 'neoclide/coc.nvim', { 'tag': 'v0.0.81' }
" 使用特定提交
Plug 'junegunn/fzf', { 'commit': 'd6aa5ab' }
3. 本地插件
" 本地插件目录
Plug '~/my-vim-plugins/my-plugin'
" 相对路径
Plug '../other-plugin'
常见问题
问题 1:安装失败
# 检查网络连接
curl -I https://raw.githubusercontent.com/junegunn/vim-plug/master/plug.vim
# 尝试使用代理
export https_proxy=http://127.0.0.1:7890
问题 2:插件冲突
如果插件之间发生冲突:
- 暂时禁用部分插件测试
- 检查插件加载顺序
- 查看错误日志:
:messages
问题 3:启动缓慢
" 使用 :PlugStatus 查看插件状态
:PlugStatus
" 使用性能分析
:profile start profile.log
:profile func *
:profile file *
" 执行操作后
:profile pause
插件推荐
基础必备
- vim-sensible: 合理的默认配置
- vim-surround: 快速操作包围符号
- vim-commentary: 快速注释代码
文件管理
- nerdtree: 文件浏览器
- ctrlp.vim: 快速文件搜索
- fzf.vim: 模糊查找
代码开发
- coc.nvim: 智能代码补全
- vim-gitgutter: Git 差异显示
- vim-fugitive: Git 集成
界面美化
- vim-airline: 状态栏美化
- onedark.vim: 配色方案
- vim-devicons: 文件图标
配置示例
完整配置示例
" ~/.vimrc
set nocompatible
filetype off
" 插件管理器
call plug#begin('~/.vim/plugged')
" 基础插件
Plug 'tpope/vim-sensible'
Plug 'tpope/vim-surround'
Plug 'tpope/vim-commentary'
" 文件管理
Plug 'scrooloose/nerdtree'
Plug 'junegunn/fzf', { 'do': { -> fzf#install() } }
Plug 'junegunn/fzf.vim'
" Git 集成
Plug 'tpope/vim-fugitive'
Plug 'airblade/vim-gitgutter'
" 代码补全
Plug 'neoclide/coc.nvim', {'branch': 'release'}
" 界面美化
Plug 'vim-airline/vim-airline'
Plug 'vim-airline/vim-airline-themes'
Plug 'joshdick/onedark.vim'
call plug#end()
" 插件配置
colorscheme onedark
let g:airline_theme='onedark'
其他插件管理器
1. Vundle
" 安装
git clone https://github.com/VundleVim/Vundle.vim.git ~/.vim/bundle/Vundle.vim
" 配置
set nocompatible
filetype off
set rtp+=~/.vim/bundle/Vundle.vim
call vundle#begin()
Plugin 'VundleVim/Vundle.vim'
" 添加插件
call vundle#end()
2. Pathogen
# 安装
mkdir -p ~/.vim/autoload ~/.vim/bundle
curl -LSso ~/.vim/autoload/pathogen.vim https://tpo.pe/pathogen.vim
# 使用
" 在 .vimrc 中添加
execute pathogen#infect()
3. dein.vim
" 异步插件管理,性能更好
if &compatible
set nocompatible
endif
set runtimepath+=~/.cache/dein/repos/github.com/Shougo/dein.vim
if dein#load_state('~/.cache/dein')
call dein#begin('~/.cache/dein')
call dein#add('~/.cache/dein/repos/github.com/Shougo/dein.vim')
" 添加插件
call dein#end()
call dein#save_state()
endif
最佳实践
1. 版本控制
将 .vimrc 和插件配置纳入版本控制:
git init ~/.vim
git add .vimrc
git commit -m "Initial vim configuration"
2. 定期维护
- 每月检查插件更新
- 移除不再使用的插件
- 备份重要配置
3. 性能优化
- 使用延迟加载
- 避免安装过多插件
- 定期清理缓存文件
vim-plug 以其简洁的语法和强大的功能成为最受欢迎的 Vim 插件管理器之一。通过合理配置和管理插件,可以大大提升 Vim 的使用体验。
Vim 实用技巧合集
本文收集了 Vim 编辑器中实用的操作技巧,帮助提高编辑效率。
在行首添加内容
操作步骤:
- 在普通模式下,按
Ctrl-v进入可视块模式 - 选择要添加内容的行,按
I进入插入模式 - 编辑内容,按
Esc退出插入模式,其他行会自动添加相同内容
示例:
原始文本:
line1
line2
line3
操作后:
prefix line1
prefix line2
prefix line3
在行尾添加内容
操作步骤:
- 在普通模式下,按
gv选择上次的选区(或手动选择) - 按
$跳转到行尾,按A进入插入模式 - 编辑内容,按
Esc退出插入模式
示例:
原始文本:
line1
line2
line3
操作后:
line1 suffix
line2 suffix
line3 suffix
Vim 录制和回放
录制宏:
- 在普通模式下,按
qa开始录制(a 是宏的名称,可以使用任意字母) - 按
i进入插入模式,编辑内容 - 按
Esc退出插入模式,按q停止录制
回放宏:
- 在普通模式下,按
@a回放名为 a 的宏 - 按
10@a回放宏 10 次
注意事项:
- 录制结束时,确保光标在下一行的开头
- 宏可以保存在寄存器中,重启 Vim 后仍然可用
- 使用
:reg a查看宏 a 的内容
强制保存文件
有时你可能在 Vim 中编辑了一个文件,但没有使用 sudo。当你需要保存时,可以使用以下命令:
:w !sudo tee %
命令解释:
:w:写入文件!sudo tee %:通过 sudo 执行 tee 命令,%表示当前文件名
操作流程:
- 编辑文件时忘记使用 sudo
- 尝试保存时提示权限不足
- 执行上述命令
- 输入密码确认
- 使用
:q!退出(不保存缓冲区)
快速跳转技巧
1. 位置跳转
Ctrl-o:跳转到上一个位置Ctrl-i:跳转到下一个位置- 这两个命令可以在两个文件之间互相跳转
2. 文件跳转
gf:跳转到光标指向的文件- 需要设置
path选项:set path+=**
3. URL 打开
gx:在浏览器中打开光标指向的 URL- 需要网络连接和合适的浏览器
更多实用技巧
1. 批量替换
# 替换当前行中的第一个匹配
:s/old/new/
# 替换当前行中的所有匹配
:s/old/new/g
# 替换整个文件中的匹配
:%s/old/new/g
# 替换时确认每个匹配
:%s/old/new/gc
2. 多窗口操作
# 水平分割窗口
:sp 文件名
# 或
Ctrl-w s
# 垂直分割窗口
:vsp 文件名
# 或
Ctrl-w v
# 切换窗口
Ctrl-w h/j/k/l # 左/下/上/右
Ctrl-w w # 循环切换
3. 标签页管理
# 新建标签页
:tabnew 文件名
# 或
:tabedit 文件名
# 切换标签页
:tabn # 下一个
:tabp # 上一个
:tabfirst # 第一个
:tablast # 最后一个
# 关闭标签页
:tabclose
# 或
:tabc
4. 寄存器使用
# 查看寄存器内容
:reg
# 复制到寄存器 a
"ayy # 复制当前行到寄存器 a
"ap # 粘贴寄存器 a 的内容
# 系统剪贴板
"+yy # 复制到系统剪贴板
"+p # 从系统剪贴板粘贴
5. 搜索和导航
# 搜索
/pattern # 向前搜索
?pattern # 向后搜索
n # 下一个匹配
N # 上一个匹配
# 标记位置
ma # 标记当前位置为 a
'a # 跳转到标记 a
:marks # 查看所有标记
6. 自动补全
# 在插入模式下
Ctrl-n # 下一个补全项
Ctrl-p # 上一个补全项
Ctrl-x Ctrl-f # 文件名补全
Ctrl-x Ctrl-l # 整行补全
7. 代码折叠
# 创建折叠
zf # 创建折叠
zd # 删除折叠
zo # 打开折叠
zc # 关闭折叠
zR # 打开所有折叠
zM # 关闭所有折叠
8. 缩进调整
# 增加缩进
>> # 当前行增加缩进
>G # 从当前行到文件末尾增加缩进
# 减少缩进
<< # 当前行减少缩进
<G # 从当前行到文件末尾减少缩进
# 自动缩进
=G # 从当前行到文件末尾自动缩进
gg=G # 整个文件自动缩进
9. 文本对象操作
# 操作单词
ciw # 修改当前单词
caw # 修改当前单词(包括空格)
diw # 删除当前单词
daw # 删除当前单词(包括空格)
# 操作引号内容
ci" # 修改双引号内的内容
ci' # 修改单引号内的内容
ci` # 修改反引号内的内容
# 操作括号内容
ci( # 修改圆括号内的内容
ci[ # 修改方括号内的内容
ci{ # 修改花括号内的内容
10. 快速编辑
# 重复操作
. # 重复上一次修改
@: # 重复上一次 Ex 命令
# 大小写转换
~ # 切换当前字符大小写
g~~ # 切换当前行大小写
gUw # 将单词转换为大写
guw # 将单词转换为小写
配置建议
1. 添加快捷键
" 快速保存
nnoremap <leader>w :w<CR>
" 快速退出
nnoremap <leader>q :q<CR>
" 清除搜索高亮
nnoremap <leader>h :nohlsearch<CR>
" 切换行号显示
nnoremap <leader>n :set number!<CR>
2. 性能优化
" 禁用交换文件
set noswapfile
" 禁用备份文件
set nobackup
set nowritebackup
" 减少更新延迟
set updatetime=300
3. 外观优化
" 启用真彩色
set termguicolors
" 设置配色方案
colorscheme desert
" 高亮当前行
set cursorline
" 显示相对行号
set relativenumber
学习资源
1. 内置帮助
:help # 查看帮助
:help usr # 用户手册
:help quickref # 快速参考
2. 在线资源
3. 练习工具
- Vim Adventures:游戏化学习
- Open Vim:交互式教程
- Vim Genius:记忆卡片
掌握这些 Vim 技巧可以显著提高编辑效率。建议每天学习一两个新技巧,逐步积累经验。
Vim 基础配置文件指南
我的 .vimrc 配置
"===
"===编写脚本自动插入
"===
function AddTitleForShell()
call append(0,"#!/bin/bash")
call append(1,"# **********************************************************")
call append(2,"# * Author : Burgess Leo")
call append(3,"# * Email : liuxp731@qq.com")
call append(4,"# * Create time : ".strftime("%Y-%m-%d %H:%M"))
call append(5,"# * Filename : ".expand("%:t"))
call append(6,"# * Description : ")
call append(7,"# **********************************************************")
endfunction
autocmd BufNewFile *.sh call AddTitleForShell()
"===
"===Sync my plugins setting
"===
if empty(glob('~/.vim/autoload/plug.vim'))
silent !curl -fLo ~/.vim/autoload/plug.vim --create-dirs
\ https://raw.githubusercontent.com/lxp731/topazleaves/refs/heads/main/src/mdbook-files/plug.vim
autocmd VimEnter * PlugInstall --sync | source $MYVIMRC
endif
"===
"===System Setting
"===
let mapleader=" "
set nocompatible
set showcmd
set mouse=a
set clipboard=unnamed
vnoremap Y :w !xclip -i -sel c<CR>
filetype on
filetype indent on
filetype plugin on
filetype plugin indent on
"set laststatus=2
set autochdir
set dictionary+=/usr/share/dict/words
"autocmd InsertLeave * write
"autocmd FocusLost * if &modified | write | endif
"===
"===Open the vimrc anytime
"===
noremap <LEADER>rc :e ~/.vimrc<CR>
map <LEADER>fd /\(\<\w\+\>\)\_s*\1
"===
"===Show command autocomplete
"===
set wildignore=log/**,node_modules/**,target/**,tmp/**,*.rbc
set wildmenu
set wildmode=longest,list,full
"===
"===Search Setting
"===
set hlsearch
exec "nohlsearch"
set incsearch
set ignorecase
set smartcase
"===
"===Code Display
"===
set encoding=UTF-8
syntax on
set number
set relativenumber
set cursorline
let &t_ut=''
"===
"===Tab behavior
"===
set expandtab
set tabstop=2
set shiftwidth=2
set softtabstop=2
set list
set listchars=tab:▸\ ,trail:▫
set scrolloff=5
"===
"===Prevent auto line split
"===
set tw=0
set wrap
set indentexpr=
set backspace=indent,eol,start
set foldmethod=indent
set foldlevel=99
"===
"===快捷键映射
"===
nnoremap <LEADER><CR> :nohlsearch<CR>
nnoremap s <nop>
nnoremap S :w<CR>
nnoremap R :source $MYVIMRC<CR>
nnoremap XX :q!<CR>
nnoremap j k
nnoremap k j
nnoremap = nzz
nnoremap - Nzz
nnoremap W 5w
nnoremap B 5b
nnoremap <C-j> :belowright term<CR>
"===
"===Edit mode shortkey
"===
inoremap <C-z> <C-o>u
inoremap <C-l> <C-o>o
inoremap <C-S-k> <Esc>ddi
inoremap <C-y> <Esc>:normal! yyp<CR>a
inoremap <C-s> <Esc>:w<CR>i
"===
"===Line Moving
"===
nnoremap <A-Down> ddp
nnoremap <A-Up> dd2kp
inoremap <A-Up> <Esc>ddkPgi
inoremap <A-Down> <Esc>ddjPgi
"===
"===Words spell Checking
"===
map <LEADER>pl :set spell!<CR>
nnoremap <C-x> ea<C-x>s
inoremap <C-x> <Esc>ea<C-x>s
"===
"===分割窗口
"===
nnoremap sl :set splitright<CR>:vsplit<CR>
nnoremap snl :set nosplitright<CR>:vsplit<CR>
nnoremap sk :set splitbelow<CR>:split<CR>
nnoremap snk :set nosplitbelow<CR>:split<CR>
nnoremap <LEADER>l <C-w>l
nnoremap <LEADER>h <C-w>h
nnoremap <LEADER>j <C-w>k
nnoremap <LEADER>k <C-w>j
nnoremap <C-Up> :res +2<CR>
nnoremap <C-Down> :res -2<CR>
nnoremap <C-Left> :vertical resize-2<CR>
nnoremap <C-Right> :vertical resize+2<CR>
map <LEADER>sv <C-w>t<C-w>H
map <LEADER>sh <C-w>t<C-w>K
"===
"===Tab Management
"===
nnoremap th :tabprevious<CR>
nnoremap tl :tabnext<CR>
nnoremap to :tabclose<CR>
nnoremap tq :tabfirst<CR>
nnoremap tp :tablast<CR>
" Insert mode mappings
"inoremap tl <C-O>:tabnext<CR>
"inoremap th <C-O>:tabprevious<CR>
"inoremap tq <C-O>:tabfirst<CR>
"inoremap tp <C-O>:tablast<CR>
"===
"===保存VIM光标位置
"===
augroup remember_last_cursor_position
autocmd!
autocmd BufWritePost * mkview
autocmd BufReadPost * if line("'\"") > 0 && line("'\"") <= line("$") | exe "normal g`\"" | endif
augroup END
"===
"===VIM 插件管理器
"===
call plug#begin('~/.vim/plugged')
Plug 'sheerun/vim-polyglot'
Plug 'connorholyday/vim-snazzy'
" File navigation
Plug 'preservim/nerdtree'
Plug 'Xuyuanp/nerdtree-git-plugin'
" Taglist
Plug 'preservim/tagbar'
" Error checking
Plug 'dense-analysis/ale'
" Auto Complete
Plug 'Valloric/YouCompleteMe'
" Undo Tree
Plug 'mbbill/undotree'
" Other visual enhancement
Plug 'nathanaelkane/vim-indent-guides'
Plug 'itchyny/vim-cursorword'
" Git
Plug 'rhysd/conflict-marker.vim'
Plug 'tpope/vim-fugitive'
Plug 'mhinz/vim-signify'
Plug 'gisphm/vim-gitignore', { 'for': ['gitignore', 'vim-plug'] }
" HTML, CSS, JavaScript, PHP, JSON, etc.
Plug 'elzr/vim-json'
Plug 'hail2u/vim-css3-syntax'
Plug 'spf13/PIV', { 'for' :['php', 'vim-plug'] }
Plug 'gko/vim-coloresque', { 'for': ['vim-plug', 'php', 'html', 'javascript', 'css', 'less'] }
Plug 'pangloss/vim-javascript', { 'for' :['javascript', 'vim-plug'] }
Plug 'mattn/emmet-vim'
" Python
Plug 'vim-scripts/indentpython.vim'
Plug 'linux-cultist/venv-selector.nvim'
" Markdown
Plug 'iamcco/markdown-preview.nvim', { 'do': { -> mkdp#util#install_sync() }, 'for' :['markdown', 'vim-plug'] }
Plug 'dhruvasagar/vim-table-mode', { 'on': 'TableModeToggle' }
Plug 'vimwiki/vimwiki'
" Bookmarks
Plug 'kshenoy/vim-signature'
" Other useful utilities
Plug 'terryma/vim-multiple-cursors'
Plug 'junegunn/goyo.vim' " distraction free writing mode
Plug 'tpope/vim-surround' " type ysks' to wrap the word with '' or type cs'` to change 'word' to `word`
Plug 'godlygeek/tabular' " type ;Tabularize /= to align the =
Plug 'gcmt/wildfire.vim' " in Visual mode, type i' to select all text in '', or type i) i] i} ip
Plug 'scrooloose/nerdcommenter' " in <space>cc to comment a line
" Dependencies
Plug 'MarcWeber/vim-addon-mw-utils'
Plug 'kana/vim-textobj-user'
Plug 'fadein/vim-FIGlet'
" commenter
Plug 'preservim/nerdcommenter'
call plug#end()
"===
"===Snazzy Setting
"===
map <LEADER>c1 :set background=dark<CR>:colorscheme snazzy<CR>:AirlineTheme drak<CR>
map <LEADER>c2 :set background=light<CR>:colorscheme sorbet<CR>:AirlineTheme dark<CR>
let g:SnazzyTransparent = 1
color sorbet
"color snazzy
"color slate
"color desert
"color industry
"color evening
"color habamax
"color peachpuff
"color elflord
"color pablo
"color murphy
"color lunaperche
"color koehler
"===
"===NERDTree Setting
"===
"Start NERDTree when Vim starts with a directory argument.
autocmd StdinReadPre * let s:std_in=1
autocmd VimEnter * if argc() == 1 && isdirectory(argv()[0]) && !exists('s:std_in') |
\ execute 'NERDTree' argv()[0] | wincmd p | enew | execute 'cd '.argv()[0] | endif
"Close the tab if NERDTree is the only window remaining in it.
autocmd BufEnter * if winnr('$') == 1 && exists('b:NERDTree') && b:NERDTree.isTabTree() | quit | endif
nnoremap <C-t> :NERDTreeToggle<CR>
"nnoremap <C-n> :NERDTree<CR>
"nnoremap <C-f> :NERDTreeFind<CR>
"nnoremap <leader>n :NERDTreeFocus<CR>
" ===
" === NERDTree-git
" ===
"let g:NERDTreeGitStatusUseNerdFonts = 1
let g:NERDTreeGitStatusIndicatorMapCustom = {
\ 'Modified' :'✹',
\ 'Staged' :'✚',
\ 'Untracked' :'✭',
\ 'Renamed' :'➜',
\ 'Unmerged' :'═',
\ 'Deleted' :'✖',
\ 'Dirty' :'✗',
\ 'Ignored' :'☒',
\ 'Clean' :'✔︎',
\ 'Unknown' :'?',
\ }
" ===
" === Tagbar
" ===
" nmap <F8> :TagbarToggle<CR>
"===
"===ALE
"===
" let g:ale_fixers = {
" \ '*': ['remove_trailing_lines', 'trim_whitespace'],
" \ 'javascript': ['eslint'],
" \}
" let g:ale_fix_on_save = 1
" call deoplete#custom#option('sources', {
" \ '_': ['ale', 'foobar'],
" \})
" let g:ale_completion_enabled = 1
"===
"===Markdown Preview
"===
let g:mkdp_auto_start = 0
let g:mkdp_auto_close = 1
let g:mkdp_refresh_slow = 0
let g:mkdp_command_for_global = 0
let g:mkdp_open_to_the_world = 0
let g:mkdp_open_ip = ''
let g:mkdp_browser = ''
let g:mkdp_echo_preview_url = 0
let g:mkdp_browserfunc = ''
let g:mkdp_preview_options = {
\ 'mkit': {},
\ 'katex': {},
\ 'uml': {},
\ 'maid': {},
\ 'disable_sync_scroll': 0,
\ 'sync_scroll_type': 'middle',
\ 'hide_yaml_meta': 1
\ }
let g:mkdp_markdown_css = ''
let g:mkdp_highlight_css = ''
let g:mkdp_page_title = '「${name}」'
let g:mkdp_port = '3001'
let g:mkdp_theme = 'light' "dark OR light
" combine preview window
" ensure to set let g:mkdp_auto_close = 0 if you have enable this option
let g:mkdp_combine_preview = 0
" auto refetch combine preview contents when change markdown buffer
" only when g:mkdp_combine_preview is 1
let g:mkdp_combine_preview_auto_refresh = 1
noremap mp :MarkdownPreview<CR>
noremap ms :MarkdownPreviewStop<CR>
"===
"===MarkdownEdit
"===
autocmd Filetype markdown inoremap ,1 #<Space><Enter><++><Esc>kA
autocmd Filetype markdown inoremap ,2 ##<Space><Enter><++><Esc>kA
autocmd Filetype markdown inoremap ,3 ###<Space><Enter><++><Esc>kA
autocmd Filetype markdown inoremap ,4 ####<Space><Enter><++><Esc>kA
autocmd Filetype markdown inoremap ,5 #####<Space><Enter><++><Esc>kA
autocmd Filetype markdown inoremap ,6 ######<Space><Enter><++><Esc>kA
autocmd Filetype markdown inoremap ,f <Esc>/<++><CR>:nohlsearch<CR>c4l
autocmd Filetype markdown inoremap ,b **** <++><Esc>F*hi
autocmd Filetype markdown inoremap ,i ** <++><Esc>F*i
autocmd Filetype markdown inoremap ,s ~~~~ <++><Esc>F~hi
autocmd Filetype markdown inoremap ,d `` <++><Esc>F`i
autocmd Filetype markdown inoremap ,c ```<Enter><++><Enter>```<Enter><Enter><++><Esc>4kA
autocmd Filetype markdown inoremap ,a [](<++>) <++><Esc>F[a
autocmd Filetype markdown inoremap ,p  <++><Esc>F[a
function! CreateTable(num_cols)
let col_str = repeat('|<++>', a:num_cols) . '|'
let separator = repeat('|:----:', a:num_cols) . '|'
let result = col_str . "\n" . separator . "\n" . col_str
return result
endfunction
autocmd Filetype markdown inoremap ,t2 <Esc>i<C-R>=CreateTable(2)<CR><Esc>^3klc5l
autocmd Filetype markdown inoremap ,t3 <Esc>i<C-R>=CreateTable(3)<CR><Esc>^3klc5l
autocmd Filetype markdown inoremap ,t4 <Esc>i<C-R>=CreateTable(4)<CR><Esc>^3klc5l
autocmd Filetype markdown inoremap ,t5 <Esc>i<C-R>=CreateTable(5)<CR><Esc>^3klc5l
autocmd Filetype markdown inoremap ,t6 <Esc>i<C-R>=CreateTable(6)<CR><Esc>^3klc5l
" autocmd Filetype markdown inoremap ,t3 \|<++>\|<++>\|<++>\|<Enter>\|:----:\|:----:\|:----:\|<Enter>\|<++>\|<++>\|<++>\|<Enter><Esc>3klc4l
" autocmd Filetype markdown inoremap ,t2 \|<++>\|<++>\|<Enter>\|:----:\|:----:\|<Enter>\|<++>\|<++>\|<Enter><Esc>3klc4l
function! CreateMarkdownRow(num_cols)
let col_str = repeat('|<++>', a:num_cols) . '|'
return col_str
endfunction
autocmd Filetype markdown inoremap ,l2 <Esc>o<C-R>=CreateMarkdownRow(2)<CR><Esc>^lc5l
autocmd Filetype markdown inoremap ,l3 <Esc>o<C-R>=CreateMarkdownRow(3)<CR><Esc>^lc5l
autocmd Filetype markdown inoremap ,l4 <Esc>o<C-R>=CreateMarkdownRow(4)<CR><Esc>^lc5l
autocmd Filetype markdown inoremap ,l5 <Esc>o<C-R>=CreateMarkdownRow(5)<CR><Esc>^lc5l
autocmd Filetype markdown inoremap ,l6 <Esc>o<C-R>=CreateMarkdownRow(6)<CR><Esc>^lc5l
" autocmd Filetype markdown inoremap ,l2 \|<++>\|<++>\|
" autocmd Filetype markdown inoremap ,l3 \|<++>\|<++>\|<++>\|
autocmd Filetype markdown inoremap <C-s> <C-o>:w<CR>
"===
"===UndoTree
"===
nnoremap <F5> :UndotreeToggle<CR>
"===
"===vim-surround
"===
" objects: word(iw), line(s), tag(t)
" opretion: add, remove, change
" add: ys[objects] [Mark]
" remove: ds [Mark]
" change: cs [src_Mark], [dst_Mark]
"===
"===nerdcommenter
"===
let g:NERDCreateDefaultMappings = 1
let g:NERDSpaceDelims = 1
let g:NERDCompactSexyComs = 1
let g:NERDDefaultAlign = 'left'
let g:NERDAltDelims_java = 1
let g:NERDCustomDelimiters = { 'c': { 'left': '/**','right': '*/' } }
let g:NERDCommentEmptyLines = 1
let g:NERDTrimTrailingWhitespace = 1
let g:NERDToggleCheckAllLines = 1
配置文件详解
1. 基础设置
" 设置不兼容 vi
set nocompatible
" 启用文件类型检测
filetype on
filetype plugin on
filetype indent on
" 设置编码
set encoding=utf-8
set fileencodings=utf-8,gbk,big5,latin1
2. 界面设置
" 语法高亮
syntax on
" 显示行号
set number
" 显示相对行号
set relativenumber
" 高亮当前行
set cursorline
" 显示状态栏
set laststatus=2
" 显示命令
set showcmd
" 显示匹配的括号
set showmatch
3. 编辑设置
" 启用鼠标
set mouse=a
" 设置缩进
set autoindent
set smartindent
set tabstop=4
set shiftwidth=4
set expandtab
" 启用回退删除
set backspace=indent,eol,start
" 启用持久性撤销
set undofile
set undodir=~/.vim/undodir
4. 搜索设置
" 搜索时忽略大小写
set ignorecase
set smartcase
" 高亮搜索结果
set hlsearch
" 输入时实时搜索
set incsearch
" 搜索时循环
set wrapscan
5. 性能优化
" 禁用交换文件
set noswapfile
" 禁用备份文件
set nobackup
set nowritebackup
" 减少更新延迟
set updatetime=300
" 禁用错误铃声
set noerrorbells
set novisualbell
常用配置选项
1. 主题和颜色
" 设置配色方案
colorscheme desert
" 真彩色支持
set termguicolors
" 设置背景
set background=dark
2. 快捷键映射
" 设置 Leader 键
let mapleader = ","
" 快速保存
nnoremap <leader>w :w<CR>
" 快速退出
nnoremap <leader>q :q<CR>
" 切换行号显示
nnoremap <leader>n :set number!<CR>
" 清除搜索高亮
nnoremap <leader>h :nohlsearch<CR>
3. 插件相关
" 插件管理器初始化
call plug#begin('~/.vim/plugged')
" 插件列表
Plug 'tpope/vim-sensible'
Plug 'scrooloose/nerdtree'
Plug 'vim-airline/vim-airline'
call plug#end()
4. 文件类型特定设置
" Python 文件设置
autocmd FileType python setlocal
\ tabstop=4
\ softtabstop=4
\ shiftwidth=4
\ textwidth=79
\ expandtab
\ autoindent
\ fileformat=unix
" Markdown 文件设置
autocmd FileType markdown setlocal
\ wrap
\ linebreak
\ spell
\ spelllang=en_us
配置技巧
1. 条件配置
" 根据操作系统配置
if has('win32')
set shell=cmd.exe
else
set shell=/bin/bash
endif
" 根据终端类型配置
if &term =~ '^screen'
" tmux 特定配置
endif
2. 函数定义
" 自定义函数:删除尾部空格
function! StripTrailingWhitespace()
let l = line(".")
let c = col(".")
%s/\s\+$//e
call cursor(l, c)
endfunction
" 映射到快捷键
nnoremap <leader>sw :call StripTrailingWhitespace()<CR>
3. 自动命令
" 保存时自动格式化
autocmd BufWritePre *.py,*.js,*.json,*.md,*.txt :call StripTrailingWhitespace()
" 打开文件时自动定位到上次位置
autocmd BufReadPost *
\ if line("'\"") >= 1 && line("'\"") <= line("$") && &ft !~# 'commit'
\ | exe "normal! g`\""
\ | endif
配置文件管理
1. 模块化配置
# 创建配置目录结构
~/.vim/
├── vimrc # 主配置文件
├── config/
│ ├── basic.vim # 基础设置
│ ├── keymaps.vim # 快捷键映射
│ ├── plugins.vim # 插件配置
│ └── filetypes.vim # 文件类型设置
└── after/ # 后加载配置
2. 在 vimrc 中引入模块
" 加载模块化配置
source ~/.vim/config/basic.vim
source ~/.vim/config/keymaps.vim
source ~/.vim/config/plugins.vim
source ~/.vim/config/filetypes.vim
3. 版本控制
# 初始化 Git 仓库
cd ~
git init
git add .vimrc .vim/
git commit -m "Initial vim configuration"
调试和测试
1. 检查配置
" 查看当前设置
:set all
" 查看特定选项
:set tabstop?
" 检查语法
:syntax
2. 性能分析
" 启动性能分析
:profile start profile.log
:profile func *
:profile file *
" 执行操作
" ...
" 停止分析
:profile pause
:q
3. 错误排查
" 查看错误信息
:messages
" 查看加载的脚本
:scriptnames
" 检查运行时路径
:set runtimepath?
推荐配置
1. 开发环境配置
" 代码开发专用配置
set number
set relativenumber
set cursorline
set colorcolumn=80
set signcolumn=yes
set scrolloff=5
2. 写作环境配置
" 写作专用配置
set wrap
set linebreak
set spell
set spelllang=en_us,zh_cn
set conceallevel=2
set concealcursor=nc
3. 演示环境配置
" 演示专用配置
set nonumber
set norelativenumber
set nocursorline
set laststatus=0
set showmode
set showcmd
常见问题
问题 1:配置不生效
# 检查配置文件位置
ls -la ~/.vimrc
# 检查文件权限
chmod 644 ~/.vimrc
# 重新加载配置
vim -u ~/.vimrc
问题 2:插件冲突
" 暂时禁用插件测试
" 在配置文件中注释掉插件行
" Plug 'some/plugin'
" 重新加载配置
:source ~/.vimrc
问题 3:性能问题
" 检查启动时间
vim --startuptime startup.log
" 查看日志分析
cat startup.log | sort -k2 -nr | head -20
最佳实践
1. 渐进式配置
- 从基础配置开始
- 逐步添加需要的功能
- 定期清理不需要的配置
2. 文档化
- 为重要配置添加注释
- 记录配置变更原因
- 分享配置经验
3. 备份和同步
- 定期备份配置文件
- 使用版本控制系统
- 在多台机器间同步配置
一个好的 Vim 配置可以显著提高编辑效率。建议从基础配置开始,根据实际需求逐步添加功能,形成适合自己的个性化配置。
NERDTree:Vim 文件浏览器插件
安装 NERDTree
使用 vim-plug 安装
在 .vimrc 文件中添加以下内容:
Plug 'preservim/nerdtree'
安装步骤:
- 保存
.vimrc文件 - 重新打开 Vim 窗口
- 输入
:PlugInstall安装 NERDTree
其他安装方法:
" 使用 Vundle
Plugin 'preservim/nerdtree'
" 使用 dein.vim
call dein#add('preservim/nerdtree')
" 使用 Pathogen
git clone https://github.com/preservim/nerdtree.git ~/.vim/bundle/nerdtree
设置快捷键
在 .vimrc 中添加以下快捷键映射:
" NERDTree 快捷键
nnoremap <leader>n :NERDTreeFocus<CR>
nnoremap <C-n> :NERDTree<CR>
nnoremap <C-t> :NERDTreeToggle<CR>
nnoremap <C-f> :NERDTreeFind<CR>
快捷键说明:
<leader>n:默认<leader>键是\。将焦点从文件切换到 NERDTree<C-n>:打开 NERDTree<C-t>:切换 NERDTree 显示/隐藏<C-f>:在 NERDTree 中查找当前文件
自动打开配置
1. Vim 启动时自动打开 NERDTree
当 Vim 以目录参数启动时自动打开 NERDTree:
" 当 Vim 以目录参数启动时自动打开 NERDTree
autocmd StdinReadPre * let s:std_in=1
autocmd VimEnter * if argc() == 1 && isdirectory(argv()[0]) && !exists('s:std_in') |
\ execute 'NERDTree' argv()[0] | wincmd p | enew | execute 'cd '.argv()[0] | endif
2. 自动关闭标签页
如果 NERDTree 是标签页中唯一的窗口,则关闭标签页:
" 如果 NERDTree 是标签页中唯一的窗口,则关闭标签页
autocmd BufEnter * if winnr('$') == 1 && exists('b:NERDTree') && b:NERDTree.isTabTree() | quit | endif
基本使用
1. 打开和关闭
:NERDTree " 打开 NERDTree
:NERDTreeToggle " 切换 NERDTree 显示/隐藏
:NERDTreeClose " 关闭 NERDTree
:NERDTreeFocus " 将焦点切换到 NERDTree
2. 文件操作
在 NERDTree 窗口中:
o:打开文件或目录go:在预览窗口中打开文件t:在新标签页中打开文件T:在后台标签页中打开文件i:水平分割打开文件s:垂直分割打开文件
3. 目录操作
O:递归打开目录x:关闭当前节点的父目录X:递归关闭所有目录e:编辑当前目录
4. 书签管理
:Bookmark <name>:添加书签B:显示/隐藏书签D:删除书签
高级配置
1. 外观设置
" 显示行号
let NERDTreeShowLineNumbers=1
" 隐藏特定文件
let NERDTreeIgnore=['\.pyc$', '\~$', '\.swp$']
" 显示隐藏文件
let NERDTreeShowHidden=1
" 窗口大小
let NERDTreeWinSize=35
" 在右侧显示
let NERDTreeWinPos="right"
2. 图标支持
" 启用文件图标
let g:NERDTreeFileExtensionHighlightFullName = 1
let g:NERDTreeExactMatchHighlightFullName = 1
let g:NERDTreePatternMatchHighlightFullName = 1
" 使用 NERDTree 图标插件
Plug 'ryanoasis/vim-devicons'
let g:webdevicons_enable_nerdtree = 1
3. Git 集成
" 显示 Git 状态
Plug 'Xuyuanp/nerdtree-git-plugin'
let g:NERDTreeGitStatusIndicatorMapCustom = {
\ "Modified" : "✹",
\ "Staged" : "✚",
\ "Untracked" : "✭",
\ "Renamed" : "➜",
\ "Unmerged" : "═",
\ "Deleted" : "✖",
\ "Dirty" : "✗",
\ "Clean" : "✔︎",
\ "Ignored" : "☒",
\ "Unknown" : "?"
\ }
常用命令
1. 查找文件
:NERDTreeFind " 在 NERDTree 中定位当前文件
:NERDTree /path " 打开指定路径
2. 刷新和过滤
R " 刷新当前目录
m " 显示菜单
f " 切换文件过滤
F " 切换文件显示
3. 书签操作
:NERDTreeFromBookmark <name> " 从书签打开
:NERDTreeFindBookmark " 查找书签
集成其他插件
1. 与 fzf 集成
" 使用 fzf 在 NERDTree 中搜索
nnoremap <leader>p :NERDTreeFind<CR>:FZF<CR>
2. 与 airline 集成
" 在状态栏显示 NERDTree 状态
let g:airline#extensions#nerdtree#enabled = 1
3. 与 tagbar 集成
" 同时打开 NERDTree 和 Tagbar
nnoremap <leader>tt :NERDTreeToggle<CR>:TagbarToggle<CR>
性能优化
1. 延迟加载
" 使用 vim-plug 的延迟加载
Plug 'preservim/nerdtree', { 'on': 'NERDTreeToggle' }
2. 缓存设置
" 启用缓存
let g:NERDTreeChDirMode = 2
let g:NERDTreeBookmarksFile = expand("$HOME/.NERDTreeBookmarks")
3. 禁用不需要的功能
" 禁用鼠标支持(提高性能)
let NERDTreeMouseMode = 0
" 禁用语法高亮
let NERDTreeSyntaxDisableDefault = 1
故障排除
问题 1:NERDTree 不显示
" 检查插件是否安装
:PlugStatus
" 检查 NERDTree 命令是否可用
:command NERDTree
" 重新加载配置
:source ~/.vimrc
问题 2:快捷键冲突
" 检查快捷键映射
:map <C-n>
:map <C-t>
" 修改冲突的快捷键
nnoremap <leader>nt :NERDTreeToggle<CR>
问题 3:性能问题
" 检查加载时间
vim --startuptime startup.log
" 分析性能
:profile start profile.log
:profile func *
:profile file *
:NERDTreeToggle
:profile pause
替代方案
1. vim-dirvish
" 更轻量级的文件浏览器
Plug 'justinmk/vim-dirvish'
2. fern.vim
" 现代化的文件浏览器
Plug 'lambdalisue/fern.vim'
3. ranger.vim
" 集成 ranger 文件管理器
Plug 'francoiscabrol/ranger.vim'
最佳实践
1. 配置文件组织
" 将 NERDTree 配置放在单独文件中
source ~/.vim/config/nerdtree.vim
2. 项目特定配置
" 在项目根目录创建 .vimrc.local
if filereadable(".vimrc.local")
source .vimrc.local
endif
3. 定期更新
" 更新插件
:PlugUpdate
" 清理不需要的插件
:PlugClean
截图

更多详细信息请参考:
NERDTree 是 Vim 中最流行的文件浏览器插件之一,通过合理配置可以大大提高文件导航效率。建议根据个人习惯定制快捷键和外观设置。
NERDTree Git 插件
GitHub 仓库
https://github.com/Xuyuanp/nerdtree-git-plugin
安装
使用 vim-plug 安装
在 .vimrc 文件中添加:
Plug 'Xuyuanp/nerdtree-git-plugin'
配置 Git 状态指示器
" 显示文件数量统计
let g:NERDTreeGitStatusShowCounts = 1
" 自定义状态图标
let g:NERDTreeGitStatusIndicatorMapCustom = {
\ 'Modified' : '✹',
\ 'Staged' : '✚',
\ 'Untracked' : '✭',
\ 'Renamed' : '➜',
\ 'Unmerged' : '═',
\ 'Deleted' : '✖',
\ 'Dirty' : '✗',
\ 'Ignored' : '☒',
\ 'Clean' : '✔︎',
\ 'Unknown' : '?',
\ }
安装 Nerd Fonts
为了正确显示图标,需要安装 Nerd Fonts:
使用安装脚本
wget https://raw.githubusercontent.com/mcarvalho1/Simple-NerdFonts-Downloader/c7854dae2153aa199277926bed4b992488b65a3d/nf_downloader.sh
chmod +x nf_downloader.sh
./nf_downloader.sh
手动安装字体
# 下载字体文件
mkdir -p ~/.local/share/fonts
cd ~/.local/share/fonts
# 下载常用 Nerd Fonts
wget https://github.com/ryanoasis/nerd-fonts/releases/download/v3.0.2/Meslo.zip
unzip Meslo.zip -d Meslo
rm Meslo.zip
# 更新字体缓存
fc-cache -fv
功能特性
1. Git 状态显示
- 在 NERDTree 中显示文件的 Git 状态
- 使用图标表示不同的 Git 状态
- 支持显示修改文件数量统计
2. 状态图标说明
| 图标 | 状态 | 说明 |
|---|---|---|
| ✹ | Modified | 文件已修改 |
| ✚ | Staged | 文件已暂存 |
| ✭ | Untracked | 未跟踪文件 |
| ➜ | Renamed | 文件已重命名 |
| ═ | Unmerged | 合并冲突 |
| ✖ | Deleted | 文件已删除 |
| ✗ | Dirty | 工作目录不干净 |
| ☒ | Ignored | 被忽略的文件 |
| ✔︎ | Clean | 文件干净 |
| ? | Unknown | 未知状态 |
3. 配置选项
基本配置
" 启用 Git 状态显示
let g:NERDTreeGitStatusEnable = 1
" 显示修改文件数量
let g:NERDTreeGitStatusShowCounts = 1
" 显示 Git 状态文本
let g:NERDTreeGitStatusShowText = 1
颜色配置
" 自定义颜色
let g:NERDTreeGitStatusColors = {
\ 'Modified' : '#FFA500',
\ 'Staged' : '#00FF00',
\ 'Untracked' : '#FFFF00',
\ 'Renamed' : '#00FFFF',
\ 'Unmerged' : '#FF00FF',
\ 'Deleted' : '#FF0000',
\ 'Dirty' : '#FF4500',
\ 'Ignored' : '#808080',
\ 'Clean' : '#00FF00',
\ 'Unknown' : '#FFFFFF'
\ }
性能优化
" 延迟更新 Git 状态
let g:NERDTreeGitStatusUpdateOnWrite = 1
let g:NERDTreeGitStatusUpdateOnCursorHold = 1
" 限制 Git 命令执行频率
let g:NERDTreeGitStatusCommand = 'git'
let g:NERDTreeGitStatusAsync = 1
使用示例
1. 完整配置示例
" NERDTree Git 插件配置
Plug 'preservim/nerdtree'
Plug 'Xuyuanp/nerdtree-git-plugin'
" NERDTree 配置
let NERDTreeShowHidden=1
let NERDTreeIgnore=['\.pyc$', '\~$', '\.swp$']
" Git 状态配置
let g:NERDTreeGitStatusShowCounts = 1
let g:NERDTreeGitStatusIndicatorMapCustom = {
\ 'Modified' : '✹',
\ 'Staged' : '✚',
\ 'Untracked' : '✭',
\ 'Renamed' : '➜',
\ 'Unmerged' : '═',
\ 'Deleted' : '✖',
\ 'Dirty' : '✗',
\ 'Ignored' : '☒',
\ 'Clean' : '✔︎',
\ 'Unknown' : '?',
\ }
" 快捷键
nnoremap <C-n> :NERDTreeToggle<CR>
nnoremap <leader>nf :NERDTreeFind<CR>
2. 与其他插件集成
" 与 vim-devicons 集成
Plug 'ryanoasis/vim-devicons'
let g:webdevicons_enable_nerdtree = 1
let g:NERDTreeGitStatusUseNerdFonts = 1
" 与 airline 集成
let g:airline#extensions#nerdtree#enabled = 1
故障排除
问题 1:图标不显示
# 检查字体是否安装
fc-list | grep -i "nerd"
# 检查终端是否支持图标
echo -e "\ue0b0 \u00b1 \ue0a0 \u27a6 \u2718 \u26a1 \u2699"
# 设置终端字体
# 在终端设置中使用 Nerd Fonts
问题 2:Git 状态不更新
" 手动刷新 Git 状态
:NERDTreeRefresh
" 检查 Git 命令是否可用
:!git --version
" 启用异步更新
let g:NERDTreeGitStatusAsync = 1
问题 3:性能问题
" 禁用文件数量统计
let g:NERDTreeGitStatusShowCounts = 0
" 减少更新频率
let g:NERDTreeGitStatusUpdateOnCursorHold = 0
" 使用更快的 Git 命令
let g:NERDTreeGitStatusCommand = 'git --no-optional-locks'
高级功能
1. 自定义状态检测
" 自定义 Git 状态检测函数
function! MyGitStatusIndicator(path)
" 自定义逻辑
return '?'
endfunction
let g:NERDTreeGitStatusCustomIndicator = function('MyGitStatusIndicator')
2. 状态过滤
" 忽略特定文件的状态
let g:NERDTreeGitStatusIgnore = ['package-lock.json', 'yarn.lock']
" 只显示特定状态
let g:NERDTreeGitStatusShowOnly = ['Modified', 'Untracked']
3. 状态提示
" 启用状态提示
let g:NERDTreeGitStatusShowTooltip = 1
" 自定义提示格式
let g:NERDTreeGitStatusTooltipFormat = '%s: %d'
替代方案
1. nerdtree-git-status
" 另一个 Git 状态插件
Plug 'albfan/nerdtree-git-status'
2. vim-gitgutter
" 在侧边栏显示 Git 差异
Plug 'airblade/vim-gitgutter'
3. signify
" 轻量级 Git 状态显示
Plug 'mhinz/vim-signify'
最佳实践
1. 字体管理
# 使用字体管理器
# 如: font-manager, gnome-font-viewer
# 定期更新字体
cd ~/.local/share/fonts
git pull origin master
fc-cache -fv
2. 配置备份
# 备份配置
cp ~/.vimrc ~/.vimrc.backup
cp -r ~/.vim ~/.vim.backup
# 使用版本控制
cd ~/.vim
git init
git add .
git commit -m "Initial vim configuration"
3. 性能监控
" 监控插件性能
:profile start profile.log
:profile func *
:profile file *
:NERDTreeToggle
:profile pause
截图
NERDTree Git 插件为 NERDTree 添加了 Git 状态显示功能,让开发者可以直观地看到文件的版本控制状态。通过合理配置,可以大大提高开发效率。
YouCompleteMe:Vim 代码补全引擎
GitHub 仓库
安装
1. 使用 vim-plug 安装
在 .vimrc 文件中添加:
Plug 'ycm-core/YouCompleteMe'
2. 安装依赖
# Ubuntu/Debian
sudo apt update
sudo apt install build-essential cmake python3-dev
# CentOS/RHEL
sudo yum install gcc-c++ cmake python3-devel
# Arch Linux
sudo pacman -S base-devel cmake python
3. 编译安装
安装插件后:
cd ~/.vim/plugged/YouCompleteMe
python3 install.py --all # 安装所有语言支持
4. 最小化安装
如果只需要特定语言支持:
# 只安装 C/C++ 支持
python3 install.py --clangd-completer
# 只安装 Python 支持
python3 install.py --python-completer
# 只安装 Go 支持
python3 install.py --go-completer
解决 GLIBCXX_3.4.32 未找到错误
1. 更新系统库
sudo apt update
sudo apt install libstdc++6
2. 检查 GLIBCXX 版本
strings /usr/lib/x86_64-linux-gnu/libstdc++.so.6 | grep GLIBCXX
3. 复制库文件
如果系统中存在 GLIBCXX_3.4.32,将其复制到错误日志中显示的默认路径:
sudo cp /usr/lib/x86_64-linux-gnu/libstdc++.so.6* /home/knight/miniconda3/lib/
基本配置
1. 启用 YouCompleteMe
" 在 .vimrc 中添加
let g:ycm_global_ycm_extra_conf = '~/.vim/.ycm_extra_conf.py'
let g:ycm_confirm_extra_conf = 0
let g:ycm_collect_identifiers_from_tags_files = 1
let g:ycm_seed_identifiers_with_syntax = 1
2. 快捷键配置
" 跳转到定义
nnoremap <leader>gd :YcmCompleter GoToDefinition<CR>
nnoremap <leader>gi :YcmCompleter GoToImplementation<CR>
nnoremap <leader>gr :YcmCompleter GoToReferences<CR>
" 显示文档
nnoremap <leader>doc :YcmCompleter GetDoc<CR>
" 修复错误
nnoremap <leader>fix :YcmCompleter FixIt<CR>
3. 补全触发
" 自动触发补全
let g:ycm_auto_trigger = 1
let g:ycm_min_num_of_chars_for_completion = 2
let g:ycm_min_num_identifier_candidate_chars = 0
语言特定配置
1. C/C++ 配置
创建 ~/.vim/.ycm_extra_conf.py:
def Settings(**kwargs):
return {
'flags': [
'-Wall',
'-Wextra',
'-Werror',
'-std=c++17',
'-I', '/usr/include',
'-I', '/usr/local/include',
],
}
2. Python 配置
" Python 补全配置
let g:ycm_python_binary_path = 'python3'
let g:ycm_python_interpreter_path = 'python3'
3. JavaScript/TypeScript 配置
" 使用 TSServer
let g:ycm_use_clangd = 0
let g:ycm_language_server = [
\ {
\ 'name': 'tsserver',
\ 'cmdline': [ 'typescript-language-server', '--stdio' ],
\ 'filetypes': [ 'javascript', 'typescript', 'javascriptreact', 'typescriptreact' ],
\ },
\ ]
高级功能
1. 语义补全
" 启用语义补全
let g:ycm_seed_identifiers_with_syntax = 1
let g:ycm_collect_identifiers_from_comments_and_strings = 1
let g:ycm_complete_in_comments = 1
let g:ycm_complete_in_strings = 1
2. 诊断信息
" 显示诊断信息
let g:ycm_show_diagnostics_ui = 1
let g:ycm_enable_diagnostic_signs = 1
let g:ycm_enable_diagnostic_highlighting = 1
let g:ycm_echo_current_diagnostic = 1
3. 补全菜单
" 补全菜单配置
let g:ycm_add_preview_to_completeopt = 1
let g:ycm_autoclose_preview_window_after_completion = 1
let g:ycm_autoclose_preview_window_after_insertion = 1
性能优化
1. 缓存设置
" 启用缓存
let g:ycm_cache_omnifunc = 1
let g:ycm_disable_for_files_larger_than_kb = 1000
2. 延迟加载
" 延迟加载 YouCompleteMe
let g:ycm_filetype_whitelist = {
\ "c":1,
\ "cpp":1,
\ "python":1,
\ "java":1,
\ "javascript":1,
\ "typescript":1,
\ }
3. 服务器配置
" 调整服务器参数
let g:ycm_server_keep_logfiles = 1
let g:ycm_server_log_level = 'info'
let g:ycm_server_use_vim_stdout = 0
故障排除
问题 1:补全不工作
" 检查 YouCompleteMe 状态
:YcmDebugInfo
" 检查日志
:YcmToggleLogs
" 重新启动服务器
:YcmRestartServer
问题 2:性能问题
# 检查内存使用
ps aux | grep ycm
# 清理缓存
rm -rf ~/.ycm_*
问题 3:特定语言不支持
# 重新编译支持特定语言
cd ~/.vim/plugged/YouCompleteMe
python3 install.py --ts-completer # TypeScript
python3 install.py --rust-completer # Rust
python3 install.py --java-completer # Java
与其他插件集成
1. 与 ultisnips 集成
" 代码片段补全
Plug 'SirVer/ultisnips'
Plug 'honza/vim-snippets'
let g:ycm_use_ultisnips_completer = 1
let g:UltiSnipsExpandTrigger = '<tab>'
let g:UltiSnipsJumpForwardTrigger = '<tab>'
let g:UltiSnipsJumpBackwardTrigger = '<s-tab>'
2. 与 airline 集成
" 在状态栏显示 YouCompleteMe 状态
let g:airline#extensions#ycm#enabled = 1
3. 与 ale 集成
" 语法检查
Plug 'dense-analysis/ale'
let g:ale_completion_enabled = 1
let g:ale_sign_column_always = 1
替代方案
1. coc.nvim
" 基于 Language Server Protocol 的补全
Plug 'neoclide/coc.nvim', {'branch': 'release'}
2. deoplete.nvim
" 异步补全框架(Neovim)
Plug 'Shougo/deoplete.nvim'
if has('nvim')
let g:deoplete#enable_at_startup = 1
endif
3. LanguageClient-neovim
" Language Server Protocol 客户端
Plug 'autozimu/LanguageClient-neovim', {
\ 'branch': 'next',
\ 'do': 'bash install.sh',
\ }
最佳实践
1. 配置文件管理
# 创建配置目录
mkdir -p ~/.vim/ycm
# 备份配置
cp ~/.vim/.ycm_extra_conf.py ~/.vim/ycm/backup/
2. 定期更新
# 更新 YouCompleteMe
cd ~/.vim/plugged/YouCompleteMe
git pull
python3 install.py --all
3. 项目特定配置
# 在项目根目录创建 .ycm_extra_conf.py
import os
import ycm_core
def DirectoryOfThisScript():
return os.path.dirname(os.path.abspath(__file__))
def Settings(**kwargs):
return {
'flags': [
'-I', os.path.join(DirectoryOfThisScript(), 'include'),
'-I', os.path.join(DirectoryOfThisScript(), 'src'),
],
}
截图
YouCompleteMe 是一个功能强大的代码补全引擎,支持多种编程语言。虽然安装和配置相对复杂,但一旦配置完成,可以显著提高编码效率。
Vim 系统剪贴板支持配置
本文介绍如何让 Vim 编辑器支持系统剪贴板,实现与系统其他应用程序之间的复制粘贴。
检查 Vim 版本
首先检查当前 Vim 是否支持剪贴板:
vim --version | grep clipboard
输出示例:
knight@Lenovo:~$ vim --version | grep "clipboard"
-clipboard +keymap +printer +vertsplit
+ex_extra +mouse_netterm +syntax -xterm_clipboard
结果说明:
-clipboard:不支持系统剪贴板-xterm_clipboard:不支持 X11 剪贴板+clipboard和+xterm_clipboard表示支持
安装支持剪贴板的 Vim
1. 卸载旧版 Vim(如果已安装)
sudo apt remove vim
sudo apt autoremove
2. 安装 vim-gtk3
sudo apt install vim-gtk3
3. 验证安装
vim --version | grep clipboard
期望输出:
knight@Lenovo:~$ vim --version | grep clipboard
+clipboard +keymap +printer +vertsplit
+ex_extra +mouse_netterm +syntax +xterm_clipboard
确认关键值为 +clipboard 或 +xterm_clipboard。
配置 .vimrc
1. 启用系统剪贴板
在 ~/.vimrc 中添加:
" 使用系统剪贴板
set clipboard=unnamedplus
2. 配置说明
unnamed:使用 “* 寄存器(X11 主选择)unnamedplus:使用 “+ 寄存器(系统剪贴板)autoselect:自动将选择的内容复制到剪贴板
使用系统剪贴板
1. 复制到系统剪贴板
" 复制当前行到系统剪贴板
"+yy
" 复制选中内容到系统剪贴板
"+y
" 复制到主选择(X11)
"*yy
2. 从系统剪贴板粘贴
" 从系统剪贴板粘贴
"+p
" 从主选择粘贴(X11)
"*p
3. 删除到系统剪贴板
" 删除到系统剪贴板
"+d
" 删除行到系统剪贴板
"+dd
使用 Xclip 作为备用方案
如果 Vim 本身不支持剪贴板,可以使用 xclip 工具。
1. 安装 xclip
sudo apt install xclip
2. 配置 .vimrc
" 将选中的内容复制到系统剪贴板
vnoremap Y :w !xclip -i -sel c<CR>
3. 使用方法
- 在可视模式下选择内容
- 按
Y键 - 使用
Ctrl-v在任何地方粘贴
高级配置
1. 自动同步剪贴板
" 自动同步 Vim 和系统剪贴板
set clipboard^=unnamed,unnamedplus
" 启用鼠标选择自动复制
set mouse=a
set go+=a
2. 自定义快捷键
" 复制到系统剪贴板
nnoremap <leader>y "+y
vnoremap <leader>y "+y
" 从系统剪贴板粘贴
nnoremap <leader>p "+p
vnoremap <leader>p "+p
" 复制当前文件路径
nnoremap <leader>cf :let @+ = expand("%:p")<CR>
nnoremap <leader>cF :let @+ = expand("%:p:h")<CR>
3. 寄存器管理
" 查看寄存器内容
:reg
" 查看特定寄存器
:reg +
:reg *
" 清除寄存器
:let @+ = ""
:let @* = ""
不同系统的配置
1. Linux (X11)
" X11 系统配置
set clipboard=unnamedplus
set clipboard^=unnamed
" 如果需要,设置 X11 选择
set guioptions+=a
2. macOS
" macOS 系统配置
set clipboard=unnamed
" 使用 pbcopy/pbpaste
if has('mac')
set clipboard^=unnamed
endif
3. Windows
" Windows 系统配置
set clipboard=unnamed
" 使用 Windows 剪贴板
if has('win32') || has('win64')
set clipboard^=unnamed
endif
故障排除
问题 1:剪贴板不工作
# 检查 Vim 版本
vim --version | grep -E "clipboard|xterm_clipboard"
# 检查 xclip 是否安装
which xclip
# 测试 xclip
echo "test" | xclip -i -sel c
xclip -o -sel c
问题 2:复制内容乱码
" 设置编码
set encoding=utf-8
set fileencodings=utf-8,gbk,big5,latin1
" 剪贴板编码
set clipboardencoding=utf-8
问题 3:粘贴格式错误
" 粘贴时保持缩进
set paste
" 或使用快捷键
set pastetoggle=<F2>
问题 4:性能问题
" 禁用自动同步(提高性能)
set clipboard=
" 只在需要时启用
nnoremap <leader>cb :set clipboard^=unnamed,unnamedplus<CR>
nnoremap <leader>cn :set clipboard=<CR>
替代工具
1. xsel
# 安装
sudo apt install xsel
# 配置 Vim
vnoremap Y :w !xsel -i -b<CR>
nnoremap P :r !xsel -o -b<CR>
2. wl-clipboard (Wayland)
# 安装
sudo apt install wl-clipboard
# 配置 Vim
vnoremap Y :w !wl-copy<CR>
nnoremap P :r !wl-paste<CR>
3. tmux 剪贴板
# 在 tmux 中配置
set -g @plugin 'tmux-plugins/tmux-yank'
# 在 .tmux.conf 中
set -g @yank_with_mouse on
最佳实践
1. 测试配置
" 测试剪贴板功能
function! TestClipboard()
let test_text = "Vim clipboard test " . strftime("%Y-%m-%d %H:%M:%S")
let @+ = test_text
echo "已复制到剪贴板: " . test_text
endfunction
command! TestClipboard call TestClipboard()
2. 备份和恢复
# 备份剪贴板内容
xclip -o -sel c > ~/clipboard-backup.txt
# 恢复剪贴板内容
cat ~/clipboard-backup.txt | xclip -i -sel c
3. 安全性考虑
" 避免在剪贴板中保存敏感信息
autocmd VimLeave * call system("xclip -i -sel c", "")
性能优化
1. 延迟同步
" 只在保存时同步
autocmd BufWritePost * call system("xclip -i -sel c", @+)
2. 限制同步范围
" 只同步特定文件类型
autocmd FileType python,js,html set clipboard^=unnamed,unnamedplus
autocmd FileType markdown,txt set clipboard=
3. 使用缓存
" 缓存剪贴板内容
let g:clipboard_cache = {}
function! ClipboardCache(key, value)
let g:clipboard_cache[a:key] = a:value
endfunction
集成其他插件
1. 与 vim-easyclip 集成
" 增强剪贴板功能
Plug 'svermeulen/vim-easyclip'
let g:EasyClipUseCutDefaults = 0
nmap x <Plug>MoveMotionPlug
xmap x <Plug>MoveMotionXPlug
nmap xx <Plug>MoveMotionLinePlug
2. 与 vim-yankstack 集成
" 剪贴板历史管理
Plug 'maxbrunsfeld/vim-yankstack'
nmap <leader>p <Plug>yankstack_substitute_older_paste
nmap <leader>P <Plug>yankstack_substitute_newer_paste
3. 与 vim-clipboard-image 集成
" 处理图片剪贴板
Plug 'ekickx/clipboard-image.nvim'
" 粘贴图片
nnoremap <leader>pi :PasteImg<CR>
通过合理配置 Vim 的系统剪贴板支持,可以大大提高工作效率,实现 Vim 与其他应用程序之间的无缝数据交换。
实用脚本合集
在 Linux 系统中,使用脚本可以自动化处理重复性任务,提高工作效率。本文收集了一些实用的脚本示例。
Node.js 版本切换脚本
本文介绍如何使用脚本在多个 Node.js 版本之间切换,特别适用于需要不同 Node 版本的项目(如 Hexo 博客需要 Node v12,而其他项目需要 Node v20)。
创建版本切换脚本
1. 创建脚本文件
sudo vim hexo_start_stop.sh
2. 设置执行权限
sudo chmod +x hexo_start_stop.sh
脚本内容详解
#!/bin/bash
# 检查参数
if [ "$#" -ne 1 ]; then
echo "使用方法: $0 start|stop"
exit 1
fi
# 定义变量
NODE_V12_DIR="/home/knight/node/node-v12/bin" # Node v12 安装目录
NODE_V20_DIR="/home/knight/node/node-v20/bin" # Node v20 安装目录
NODE_BIN="/usr/bin/node" # 系统 node 命令位置
NODE_LOCAL_BIN="/usr/local/bin/node" # 本地 node 命令位置
NPM_BIN="/usr/bin/npm" # 系统 npm 命令位置
NPM_LOCAL_BIN="/usr/local/bin/npm" # 本地 npm 命令位置
NPX_BIN="/usr/bin/npx" # 系统 npx 命令位置
NPX_LOCAL_BIN="/usr/local/bin/npx" # 本地 npx 命令位置
# HEXO_LOCAL_BIN="/usr/local/bin/hexo" # Hexo 命令位置(可选)
# 根据参数执行相应的操作
case "$1" in
start)
# 切换到 Node v12(用于 Hexo)
sudo ln -sf "$NODE_V12_DIR/node" "$NODE_BIN"
sudo ln -sf "$NODE_V12_DIR/node" "$NODE_LOCAL_BIN"
sudo ln -sf "$NODE_V12_DIR/npm" "$NPM_BIN"
sudo ln -sf "$NODE_V12_DIR/npm" "$NPM_LOCAL_BIN"
sudo ln -sf "$NODE_V12_DIR/npx" "$NPX_BIN"
sudo ln -sf "$NODE_V12_DIR/npx" "$NPX_LOCAL_BIN"
# sudo ln -sf "$NODE_V12_DIR/hexo" "$HEXO_LOCAL_BIN"
echo "Node、NPM 和 NPX 链接已更新到 Node v12。"
;;
stop)
# 切换回 Node v20(默认版本)
sudo ln -sf "$NODE_V20_DIR/node" "$NODE_BIN"
sudo ln -sf "$NODE_V20_DIR/node" "$NODE_LOCAL_BIN"
sudo ln -sf "$NODE_V20_DIR/npm" "$NPM_BIN"
sudo ln -sf "$NODE_V20_DIR/npm" "$NPM_LOCAL_BIN"
sudo ln -sf "$NODE_V20_DIR/npx" "$NPX_BIN"
sudo ln -sf "$NODE_V20_DIR/npx" "$NPX_LOCAL_BIN"
# sudo rm -rf "$HEXO_LOCAL_BIN"
echo "Node、NPM 和 NPX 链接已更新到 Node v20。"
;;
*)
echo "参数错误。使用方法: $0 start|stop"
exit 1
;;
esac
exit 0
使用说明
1. 切换到 Node v12(用于 Hexo)
sudo ./hexo_start_stop.sh start
2. 切换回 Node v20(默认版本)
sudo ./hexo_start_stop.sh stop
3. 验证版本切换
# 检查 Node 版本
node --version
# 检查 npm 版本
npm --version
# 检查 npx 版本
npx --version
安装多个 Node 版本
1. 下载 Node.js 二进制包
# 创建 Node 安装目录
mkdir -p ~/node
cd ~/node
# 下载 Node v12
wget https://nodejs.org/dist/v12.22.12/node-v12.22.12-linux-x64.tar.xz
tar -xf node-v12.22.12-linux-x64.tar.xz
mv node-v12.22.12-linux-x64 node-v12
# 下载 Node v20
wget https://nodejs.org/dist/v20.11.0/node-v20.11.0-linux-x64.tar.xz
tar -xf node-v20.11.0-linux-x64.tar.xz
mv node-v20.11.0-linux-x64 node-v20
2. 验证安装
# 测试 Node v12
~/node/node-v12/bin/node --version
# 测试 Node v20
~/node/node-v20/bin/node --version
更好的解决方案:使用 nvm
1. 安装 nvm(Node Version Manager)
# 下载安装脚本
curl -o- https://raw.githubusercontent.com/nvm-sh/nvm/v0.39.0/install.sh | bash
# 或使用 wget
wget -qO- https://raw.githubusercontent.com/nvm-sh/nvm/v0.39.0/install.sh | bash
# 重新加载 shell 配置
source ~/.bashrc # 或 source ~/.zshrc
2. 使用 nvm 管理 Node 版本
# 安装 Node v12
nvm install 12
# 安装 Node v20
nvm install 20
# 列出已安装的版本
nvm ls
# 使用特定版本
nvm use 12
# 设置默认版本
nvm alias default 20
3. nvm 常用命令
# 安装指定版本
nvm install 18.19.0
# 使用最新 LTS 版本
nvm install --lts
nvm use --lts
# 卸载版本
nvm uninstall 12
# 查看可用版本
nvm ls-remote
# 在当前目录使用特定版本(创建 .nvmrc 文件)
echo "12" > .nvmrc
nvm use
项目特定配置
1. 使用 .nvmrc 文件
# 在项目根目录创建 .nvmrc 文件
echo "12" > .nvmrc
# 自动切换到指定版本
nvm use
2. 使用 package.json engines 字段
{
"engines": {
"node": ">=12.0.0 <13.0.0",
"npm": ">=6.0.0"
}
}
3. 自动化脚本
#!/bin/bash
# auto_node_version.sh
# 检查当前目录是否有 .nvmrc
if [ -f .nvmrc ]; then
nvm use
fi
# 或者根据项目类型判断
if [ -f package.json ]; then
NODE_VERSION=$(node -p "require('./package.json').engines.node" 2>/dev/null)
if [ ! -z "$NODE_VERSION" ]; then
nvm use "$NODE_VERSION"
fi
fi
系统级配置
1. 创建符号链接的替代方案
# 使用 update-alternatives(Debian/Ubuntu)
sudo update-alternatives --install /usr/bin/node node /home/knight/node/node-v12/bin/node 100
sudo update-alternatives --install /usr/bin/node node /home/knight/node/node-v20/bin/node 200
# 切换版本
sudo update-alternatives --config node
2. 使用环境变量
# 在 ~/.bashrc 或 ~/.zshrc 中添加
export PATH="/home/knight/node/node-v20/bin:$PATH"
# 创建切换函数
node-switch() {
if [ "$1" = "12" ]; then
export PATH="/home/knight/node/node-v12/bin:$PATH"
echo "切换到 Node v12"
elif [ "$1" = "20" ]; then
export PATH="/home/knight/node/node-v20/bin:$PATH"
echo "切换到 Node v20"
else
echo "使用方法: node-switch 12|20"
fi
}
故障排除
问题 1:权限不足
# 检查文件权限
ls -la /usr/bin/node
ls -la /usr/local/bin/node
# 修复权限
sudo chown root:root /usr/bin/node
sudo chmod 755 /usr/bin/node
问题 2:符号链接错误
# 检查符号链接
ls -l /usr/bin/node
ls -l /usr/local/bin/node
# 重新创建符号链接
sudo rm -f /usr/bin/node
sudo ln -s /home/knight/node/node-v20/bin/node /usr/bin/node
问题 3:版本冲突
# 检查所有 node 可执行文件位置
which -a node
# 检查 PATH 环境变量
echo $PATH | tr ':' '\n'
# 清理重复的路径
export PATH=$(echo $PATH | tr ':' '\n' | grep -v "/home/knight/node/node-v12/bin" | tr '\n' ':')
最佳实践
1. 使用 nvm(推荐)
- 更安全:不需要 sudo 权限
- 更灵活:支持多个版本并行
- 更易用:简单的命令接口
2. 项目隔离
- 每个项目使用独立的 Node 版本
- 使用 .nvmrc 文件指定版本
- 在 CI/CD 中明确指定版本
3. 定期更新
# 更新 nvm
nvm upgrade
# 更新 Node 到最新 LTS
nvm install --lts
nvm alias default lts/*
4. 备份配置
# 备份 nvm 安装的版本
nvm ls > ~/node-versions-backup.txt
# 备份全局包
npm list -g --depth=0 > ~/npm-global-packages.txt
性能考虑
1. 磁盘空间
# 查看 Node 版本占用的空间
du -sh ~/.nvm/versions/node/
# 清理旧版本
nvm uninstall 10
nvm uninstall 14
2. 启动时间
# nvm 会增加 shell 启动时间
# 可以考虑延迟加载
# 在 ~/.bashrc 或 ~/.zshrc 中添加
export NVM_DIR="$HOME/.nvm"
[ -s "$NVM_DIR/nvm.sh" ] && \. "$NVM_DIR/nvm.sh" # 延迟加载
[ -s "$NVM_DIR/bash_completion" ] && \. "$NVM_DIR/bash_completion"
通过合理管理 Node.js 版本,可以确保不同项目使用兼容的运行时环境,避免版本冲突问题。建议优先使用 nvm 进行版本管理。
Control Docker Proxy Up/Down
sudo vim docker_proxy_start_stop.sh
sudo chmod +x docker_proxy_start_stop.sh
#!/bin/bash
# Define paths
CONF_FILE="/etc/systemd/system/docker.service.d/http-proxy.conf"
BACKUP_CONF_FILE="/etc/systemd/system/docker.service.d/http-proxy.conf.bak"
# Function to enable proxy
enable_proxy() {
# Check if the current configuration file is already the backup
if [ -f "$CONF_FILE" ] && cmp --silent "$CONF_FILE" "$BACKUP_CONF_FILE"; then
echo "Proxy configuration is already enabled."
else
# Move the backup configuration to the active configuration file
sudo mv "$BACKUP_CONF_FILE" "$CONF_FILE"
# Reload systemd manager configuration
sudo systemctl daemon-reload
# Restart Docker service
sudo systemctl restart docker.service
echo "Proxy configuration enabled."
fi
}
# Function to disable proxy
disable_proxy() {
# Check if the current configuration file is the original
if [ -f "$CONF_FILE" ] && ! cmp --silent "$CONF_FILE" "$BACKUP_CONF_FILE"; then
# Move the active configuration file to the backup
sudo mv "$CONF_FILE" "$BACKUP_CONF_FILE"
# Reload systemd manager configuration
sudo systemctl daemon-reload
# Restart Docker service
sudo systemctl restart docker.service
echo "Proxy configuration disabled."
else
echo "Proxy configuration is already disabled."
fi
}
# Check the command argument
case $1 in
start)
enable_proxy
;;
stop)
disable_proxy
;;
*)
echo "Usage: $0 {start|stop}"
exit 1
;;
esac
exit 0
Push Docker Images to Private Registry
Tips:When install images, you need open the proxy, but you must close it before push.
Extract Images Name to File
From the Helm’s values.yaml, extract the images name and tag to images.tmp.
Usage:get_images.sh values-nginx.yaml
#!/bin/bash
# **********************************************************
# * Author : Burgess Leo
# * Email : liuxp731@qq.com
# * Create time : 2024-09-13 16:06
# * Filename : get_images.sh
# * Description : Extracts Docker image names and tags from a YAML file and writes them to images.tmp
# **********************************************************
# 检查是否传入文件名作为参数
if [ "$#" -ne 1 ]; then
echo "用法: $0 <values-nginx.yaml>"
exit 1
fi
# 从命令行参数获取文件名
input_file="$1"
# 清空或创建 images.tmp 文件
> images.tmp
while read -r line; do
if [[ $line == *"repository:"* ]]; then
repository=$(echo $line | cut -d':' -f2 | xargs)
elif [[ $line == *"tag:"* ]]; then
tag=$(echo $line | cut -d':' -f2 | xargs)
# 将结果写入 images.tmp 文件
echo "$repository:$tag" >> images.tmp
fi
done < "$input_file"
Pull Docker Images
Install all dcoker images in images.tmp file, one by one. If you have else docker images_list file, you can use it instead, just confirm every lines only has one docker image name.
Usage:pull_images.sh images.tmp
#!/bin/bash
# **********************************************************
# * Author : Burgess Leo
# * Email : liuxp731@qq.com
# * Create time : 2024-09-13 16:34
# * Filename : pull_images.sh
# * Description : Pull images from Internet
# **********************************************************
# 检查是否传入文件名作为参数
if [ "$#" -ne 1 ]; then
echo "用法: $0 <images.tmp>"
exit 1
fi
# 从命令行参数获取文件名
input_file="$1"
# 读取文件并拉取每个镜像
while read -r image; do
if [ -n "$image" ]; then
echo "正在拉取镜像: $image"
docker pull "$image"
fi
done < "$input_file"
Rename Docker Images
The modified image names will be saved in the new_images.tmp file. And you can modify the private_registry to change the registry you want to push to.
Usage:update_images.sh images.tmp
#!/bin/bash
# **********************************************************
# * Author : Burgess Leo
# * Email : liuxp731@qq.com
# * Create time : 2024-09-13 16:06
# * Filename : update_and_tag_images.sh
# * Description : Updates image paths and tags Docker images based on a specified file
# **********************************************************
# 检查是否传入文件名作为参数
if [ "$#" -ne 1 ]; then
echo "用法: $0 <images.tmp>"
exit 1
fi
# 从命令行参数获取文件名
input_file="$1"
output_file="new_images.tmp"
private_registry="192.167.3.18/"
# 创建或清空输出文件
> "$output_file"
# 处理文件内容并执行 docker tag 命令
while IFS= read -r original_image; do
# 检查行是否为空
if [[ -n "$original_image" ]]; then
# 在镜像名称前加上私有仓库地址
new_image_name="${private_registry}${original_image}"
# 输出正在标记的镜像信息
echo "正在标记镜像: docker tag $original_image $new_image_name"
# 执行 docker tag 命令
docker tag "$original_image" "$new_image_name"
# 将新的镜像名称写入输出文件
echo "$new_image_name" >> "$output_file"
fi
done < "$input_file"
echo "所有镜像已成功标记并保存到 $output_file"
After Tag docker images, you must check the
new_images_name.tmp, ensure the image names are correct. And you must confirm about projects created in your private harbor.
Push Images
Push images to a remote registry. This script reads a list of image names from a file named “new_images.tmp”, and pushes them to a remote registry.
Usage:push_images.sh new_images.tmp
#!/bin/bash
# **********************************************************
# * Author : Burgess Leo
# * Email : liuxp731@qq.com
# * Create time : 2024-09-14 09:01
# * Filename : push_images.sh
# * Description : Push Docker images to a registry
# **********************************************************
# 检查是否传入文件名作为参数
if [ "$#" -ne 1 ]; then
echo "用法: $0 <images.tmp>"
exit 1
fi
# 从命令行参数获取文件名
images_file="$1"
target_registry="192.167.3.18/library/"
# 遍历images.tmp文件中的每一行
while IFS= read -r line; do
# 检查行是否为空
if [ -z "$line" ]; then
continue
fi
# 打印操作信息
echo "正在推送镜像: $line"
# 推送镜像
docker push "$line"
done < "$images_file"
echo "所有指定的镜像已被推送。"
Delete Images from Local
Delete images from local.
Usage:delete_images.sh new_images.tmp
#!/bin/bash
# **********************************************************
# * Author : Burgess Leo
# * Email : liuxp731@qq.com
# * Create time : 2024-09-14 09:02
# * Filename : delete_images.sh
# * Description : Delete images that pushed
# **********************************************************
# 检查是否有参数传递
if [ $# -ne 1 ]; then
echo "Usage: $0 <path-to-file>"
exit 1
fi
# 指定包含镜像名称的文件路径
images_file="$1"
# 检查文件是否存在
if [ ! -f "$images_file" ]; then
echo "Error: File '$images_file' not found."
exit 1
fi
# 逐行读取文件中的镜像名称
while IFS= read -r image; do
# 删除镜像,忽略不存在的镜像
if docker rmi "$image" &>/dev/null; then
echo "Image $image has been deleted."
else
echo "Image $image does not exist or could not be deleted."
fi
done < "$images_file"
echo "All listed images have been processed."
ALL IN ONE
Merge all the above scripts into one.
#!/bin/bash
# **********************************************************
# * Author : Burgess Leo
# * Email : liuxp731@qq.com
# * Create time : 2024-09-13 16:06
# * Filename : all_in_one.sh
# * Description : Pull images
# **********************************************************
# 欢迎信息
echo "欢迎使用 Docker 镜像管理脚本!"
echo ""
# 菜单函数
print_menu() {
echo "*********************************************************"
echo "* *"
echo "* 1. Get images from Helm yaml files. *"
echo "* *"
echo "* 2. Pull images from docker hub to local. *"
echo "* *"
echo "* 3. Docker tag images you need to change. *"
echo "* *"
echo "* 4. Push images to your private docker registry. *"
echo "* *"
echo "* 5. Delete images from local. *"
echo "* *"
echo "* 6. cat images.tmp. *"
echo "* *"
echo "* 7. cat new_images.tmp. *"
echo "* *"
echo "* 8. About. *"
echo "* *"
echo "* 0. Exit. *"
echo "* *"
echo "*********************************************************"
}
# 主循环
while true; do
print_menu
read -p "请输入功能数字: " choice
case $choice in
1)
read -p "请输入 Helm yaml 文件路径: " yaml_file
if [ ! -f "$yaml_file" ]; then
echo "错误: 文件 '$yaml_file' 不存在."
else
> images.tmp
while read -r line; do
if [[ $line == *"repository:"* ]]; then
repository=$(echo $line | cut -d':' -f2 | xargs)
elif [[ $line == *"tag:"* ]]; then
tag=$(echo $line | cut -d':' -f2 | xargs)
echo "$repository:$tag" >> images.tmp
fi
done < "$yaml_file"
echo "已从 '$yaml_file' 中提取镜像并保存到 'images.tmp',由于 Helm yaml 文件可能包含重复的镜像以及失效的 Tag 名称,请手动检查 images.tmp 文件。"
fi
;;
2)
read -p "请输入 images.tmp 文件路径 (默认: images.tmp): " images_file
images_file=${images_file:-images.tmp} # 设置默认值
if [ ! -f "$images_file" ]; then
echo "错误: 文件 '$images_file' 不存在."
else
while IFS= read -r image || [ -n "$image" ]; do # 修复读取逻辑以处理没有换行的情况
if [ -n "$image" ]; then
echo "正在拉取镜像: $image"
docker pull "$image"
fi
done < "$images_file"
echo "所有镜像已成功拉取."
fi
;;
3)
read -p "请输入 images.tmp 文件路径 (默认: images.tmp): " images_file
images_file=${images_file:-images.tmp} # 设置默认值
if [ ! -f "$images_file" ]; then
echo "错误: 文件 '$images_file' 不存在."
else
output_file="new_images.tmp"
header="192.167.3.18/"
> "$output_file"
while IFS= read -r original_image || [ -n "$original_image" ]; do # 修复读取逻辑以处理没有换行的情况
# 在每一行前添加私有镜像仓库地址
new_image_name="${header}${original_image}"
echo "正在标记镜像: docker tag $original_image $new_image_name"
docker tag "$original_image" "$new_image_name"
echo "$new_image_name" >> "$output_file"
done < "$images_file"
if [ -s "$output_file" ]; then # 检查输出文件是否非空
echo "所有镜像已成功标记并保存到 '$output_file'."
else
echo "警告: '$output_file' 文件为空,未能标记任何镜像."
fi
fi
;;
4)
read -p "请输入 new_images.tmp 文件路径 (默认: new_images.tmp): " images_file
images_file=${images_file:-new_images.tmp} # 设置默认值
if [ ! -f "$images_file" ]; then
echo "错误: 文件 '$images_file' 不存在."
else
while IFS= read -r line || [ -n "$line" ]; do # 修复读取逻辑以处理没有换行的情况
if [ -z "$line" ]; then continue; fi
echo "正在推送镜像: $line"
docker push "$line"
done < "$images_file"
echo "所有指定的镜像已被推送."
fi
;;
5)
read -p "请输入包含要删除的镜像名称的文件路径 (默认: new_images.tmp): " images_file
images_file=${images_file:-new_images.tmp} # 设置默认值
if [ ! -f "$images_file" ]; then
echo "错误: 文件 '$images_file' 不存在."
else
while IFS= read -r image || [ -n "$image" ]; do # 修复读取逻辑以处理没有换行的情况
if docker rmi "$image" &>/dev/null; then
echo "镜像 $image 已被删除."
else
echo "镜像 $image 不存在或无法删除."
fi
done < "$images_file"
echo "所有列出的镜像已被处理."
fi
;;
6)
cat images.tmp
;;
7)
cat new_images.tmp
;;
8)
# 打印关于信息
cat << 'EOF'
_..._ 666
.' '. _
/ .-""-\ _/ \
.-| /:. | | |
| \ |:. /.-'-./
| .-'-;:__.' =/
.'= *=|NASA _.='
/ _. | ;
;-.-'| \ |
/ | \ _\ _\
\__/'._;. \==' ==\
\ \ |
/ / /
/-._/-._/
lxp \ `\ \
`-._/._/
EOF
;;
0)
echo "退出程序。再见!"
exit 0
;;
*)
echo "无效的选择,请重新输入."
;;
esac
# 打印分隔行以提高可读性,并重新显示菜单
printf "\n\n\n"
done
Linux 实用软件合集
本文收集了在 Linux 系统中常用的实用软件,涵盖开发工具、系统工具和日常应用。
软件分类
中文输入法
-
最佳的中文输入解决方案。虽然搜狗输入法也可用,但它可能导致系统变慢,特别是在重启时。
社交应用
-
基于 Wine 的微信客户端,可以在 Ubuntu 上安装使用。尽管存在一些缺陷,但对于中文用户来说是个不错的选择。
网络工具
-
Clash for Windows 之后,推荐使用 Clash Verge 作为代理客户端。
终端工具
-
强大的终端分屏工具,提高命令行工作效率。
开发工具
编辑器增强
-
让 Vim 编辑器支持系统剪贴板,提升复制粘贴效率。
一键安装常用工具
sudo apt install -y vim-gtk3 highlight bat ripgrep tree net-tools nmap
工具说明
- vim-gtk3: 支持系统剪贴板的 Vim 版本
- highlight: 代码语法高亮工具
- bat: 更好的 cat 命令替代品,支持语法高亮
- ripgrep: 快速的文件搜索工具
- tree: 以树状结构显示目录
- net-tools: 网络工具集(ifconfig、netstat 等)
- nmap: 网络扫描和安全审计工具
安装建议
1. 按需安装
根据实际需求选择安装,不必一次性安装所有软件。
2. 版本管理
对于开发工具,建议使用版本管理器:
- nvm: Node.js 版本管理
- pyenv: Python 版本管理
- rvm/rbenv: Ruby 版本管理
3. 包管理器选择
- Ubuntu/Debian: apt
- CentOS/RHEL: yum/dnf
- Arch Linux: pacman/yay
- macOS: Homebrew
软件更新
定期更新软件包以确保安全性和稳定性:
# Ubuntu/Debian
sudo apt update && sudo apt upgrade
# Arch Linux
sudo pacman -Syu
# 使用 flatpak/snap
flatpak update
snap refresh
卸载软件
如果不再需要某个软件,可以安全卸载:
# 查看已安装的软件
apt list --installed | grep 软件名
# 卸载软件
sudo apt remove 软件名
# 同时删除配置文件
sudo apt purge 软件名
软件推荐原则
本合集推荐的软件基于以下原则:
- 开源优先: 优先选择开源软件
- 社区活跃: 选择有活跃社区维护的软件
- 文档完善: 有完整的使用文档
- 兼容性好: 在主流 Linux 发行版上运行良好
- 性能优秀: 资源占用合理,运行稳定
贡献指南
如果你有好的软件推荐,欢迎:
- 测试软件在不同发行版上的兼容性
- 提供详细的安装和使用说明
- 分享使用技巧和最佳实践
- 报告软件存在的问题和解决方案
通过合理选择和配置软件,可以让 Linux 系统更加高效和易用。
Google 拼音输入法安装指南
系统要求
Google 拼音输入法基于 Fcitx 输入法框架,因此需要先安装 Fcitx。
安装 Fcitx
Ubuntu/Debian
sudo apt update
sudo apt install fcitx fcitx-config-gtk fcitx-ui-classic
Arch Linux
sudo pacman -S fcitx fcitx-configtool fcitx-gtk2 fcitx-gtk3 fcitx-qt4 fcitx-qt5
Fedora
sudo dnf install fcitx fcitx-configtool fcitx-gtk2 fcitx-gtk3 fcitx-qt4 fcitx-qt5
配置 Fcitx
1. 运行输入法配置工具
im-config
2. 选择 Fcitx
在图形界面中选择 Fcitx 作为默认输入法框架。
3. 配置环境变量
创建或编辑 ~/.xprofile 文件:
vim ~/.xprofile
添加以下内容:
export GTK_IM_MODULE=fcitx
export QT_IM_MODULE=fcitx
export XMODIFIERS=@im=fcitx
安装 Google 拼音输入法
Ubuntu/Debian
sudo apt install fcitx-googlepinyin
Arch Linux
sudo pacman -S fcitx-googlepinyin
Fedora
sudo dnf install fcitx-googlepinyin
配置 Google 拼音
1. 启动 Fcitx 配置工具
fcitx-config-gtk3
2. 添加输入法
- 点击左下角的 “+” 按钮
- 取消勾选 “Only Show Current Language”
- 在搜索框中输入 “google”
- 选择 “Google Pinyin”
- 点击 “OK”
3. 调整输入法顺序
在配置界面中,使用上下箭头调整输入法顺序,建议将 Google 拼音放在首位。
启动 Fcitx
1. 手动启动
fcitx
2. 自动启动
将 Fcitx 添加到自动启动程序:
# 创建桌面启动项
cp /usr/share/applications/fcitx.desktop ~/.config/autostart/
3. 重启生效
重启系统或重新登录使配置生效。
使用说明
1. 切换输入法
- 切换输入法:
Ctrl + Space - 切换中英文:
Shift - 切换全角/半角:
Shift + Space - 切换中英文标点:
Ctrl + .
2. 输入法面板
Fcitx 会在系统托盘中显示图标,右键点击可以:
- 打开配置界面
- 切换输入法
- 重启 Fcitx
- 退出 Fcitx
3. 候选词选择
- 翻页:
-和=键 - 选择候选词:数字键 1-9
高级配置
1. 皮肤设置
# 安装额外皮肤
sudo apt install fcitx-skin-material
# 在配置工具中选择皮肤
fcitx-config-gtk3
2. 词库管理
Google 拼音支持用户词库:
- 添加词库:在输入时选择候选词
- 导出词库:
~/.config/fcitx/pinyin/user.py - 导入词库:将词库文件复制到上述位置
3. 云输入
启用云输入可以获取更准确的联想词:
- 打开 Fcitx 配置
- 选择 Google 拼音
- 勾选 “启用云拼音”
故障排除
问题 1:Fcitx 无法启动
# 检查进程
ps aux | grep fcitx
# 查看日志
fcitx-diagnose
# 强制重启
killall fcitx
fcitx &
问题 2:输入法不显示
# 检查环境变量
echo $GTK_IM_MODULE
echo $QT_IM_MODULE
echo $XMODIFIERS
# 重新设置环境变量
export GTK_IM_MODULE=fcitx
export QT_IM_MODULE=fcitx
export XMODIFIERS=@im=fcitx
问题 3:特定应用无法输入中文
# 检查应用是否支持 Fcitx
# 对于某些应用可能需要特殊配置
# 尝试使用 fcitx5(新版)
sudo apt install fcitx5 fcitx5-chinese-addons
问题 4:候选词框位置异常
# 调整候选词框位置
# 在 Fcitx 配置中调整 "候选词框位置"
替代方案
1. Fcitx5 + Rime
# 安装
sudo apt install fcitx5 fcitx5-rime
# 配置
# Rime 提供更强大的输入法引擎
2. IBus + Pinyin
# 安装
sudo apt install ibus ibus-pinyin
# 配置
ibus-setup
3. Sogou 输入法
# 下载安装包
wget "https://cdn01.sogoucdn.com/dl/linux/sogoupinyin_版本号_amd64.deb"
# 安装
sudo dpkg -i sogoupinyin_*.deb
sudo apt install -f
最佳实践
1. 定期备份词库
# 备份用户词库
cp ~/.config/fcitx/pinyin/user.py ~/backup/fcitx-user-dict-$(date +%Y%m%d).py
2. 清理缓存
# 清理 Fcitx 缓存
rm -rf ~/.config/fcitx/cache
3. 更新输入法
# 定期更新系统包
sudo apt update && sudo apt upgrade
# 检查 Fcitx 更新
apt list --upgradable | grep fcitx
Google 拼音输入法在 Linux 上提供了良好的中文输入体验,结合 Fcitx 框架的灵活性,可以满足大多数用户的需求。如果遇到问题,可以尝试 Fcitx5 或其他输入法方案。
Linux 微信安装指南
本文介绍在 Linux 系统上安装微信的几种方法,包括 Deepin Wine 版本和官方原生版本。
方法一:使用 Deepin Wine 版本
1. 安装 Deepin 仓库
wget -O- https://deepin-wine.i-m.dev/setup.sh | sh
2. 安装微信
sudo apt update
sudo apt install com.qq.weixin.deepin
3. 解决统信应用解压失败的问题
某些系统可能会遇到解压失败的问题,需要修改脚本:
sudo vim /opt/deepinwine/tools/run_v4.sh
找到这一行:
7z x "$APPDIR/$APPTAR" -o"$1"
修改为:
7z x "$APPDIR/$APPTAR" -o"$1" || true
方法二:腾讯官方原生版本
官方网站
1. 下载安装包
wget https://dldir1v6.qq.com/weixin/Universal/Linux/WeChatLinux_x86_64.deb
2. 安装依赖
# Ubuntu/Debian
sudo apt install -f
sudo dpkg -i WeChatLinux_x86_64.deb
# 如果依赖问题,运行
sudo apt --fix-broken install
3. 启动微信
wechat
# 或通过应用程序菜单启动
方法三:使用 Flatpak
1. 安装 Flatpak(如果尚未安装)
# Ubuntu
sudo apt install flatpak
flatpak remote-add --if-not-exists flathub https://flathub.org/repo/flathub.flatpakrepo
# Fedora
sudo dnf install flatpak
flatpak remote-add --if-not-exists flathub https://flathub.org/repo/flathub.flatpakrepo
2. 安装微信
flatpak install com.qq.weixin
3. 运行微信
flatpak run com.qq.weixin
方法四:使用 Snap
1. 安装 Snap(如果尚未安装)
# Ubuntu(默认已安装)
sudo apt install snapd
# 其他发行版
sudo systemctl enable --now snapd.socket
2. 安装微信
sudo snap install wechat
3. 运行微信
wechat
卸载微信
1. 卸载 Deepin Wine 版本
sudo apt remove com.qq.weixin.deepin
2. 删除 Deepin 仓库
sudo rm /etc/apt/sources.list.d/deepin-wine.i-m.dev.list
sudo apt update
3. 卸载官方版本
# Debian/Ubuntu
sudo dpkg -r wechat
# 或使用 apt
sudo apt remove wechat
4. 卸载 Flatpak 版本
flatpak uninstall com.qq.weixin
5. 卸载 Snap 版本
sudo snap remove wechat
常见问题解决
问题 1:无法输入中文
# 检查输入法配置
echo $GTK_IM_MODULE
echo $QT_IM_MODULE
# 设置环境变量
export GTK_IM_MODULE=fcitx
export QT_IM_MODULE=fcitx
export XMODIFIERS=@im=fcitx
# 在启动脚本中添加
vim ~/.bashrc
# 添加上述环境变量
问题 2:字体显示异常
# 安装中文字体
sudo apt install fonts-wqy-microhei fonts-wqy-zenhei
# 复制 Windows 字体(如果有)
sudo cp /path/to/windows/fonts/*.ttf /usr/share/fonts/truetype/
sudo fc-cache -fv
问题 3:无法发送图片/文件
# 检查文件权限
ls -la ~/图片/
ls -la ~/文档/
# 修复权限
chmod 755 ~/图片
chmod 755 ~/文档
问题 4:闪退或崩溃
# 查看错误日志
journalctl -xe | grep wechat
# 尝试使用命令行启动查看错误
wechat --verbose
# 清理缓存
rm -rf ~/.deepinwine/Deepin-WeChat
rm -rf ~/.config/tencent-wechat
性能优化
1. 减少内存占用
# 创建启动脚本
vim ~/bin/wechat-optimized
添加内容:
#!/bin/bash
# 限制内存使用
ulimit -v 2000000
# 启动微信
wechat "$@"
2. 禁用不必要的功能
在微信设置中:
- 关闭自动下载图片
- 关闭消息预览
- 减少聊天记录保存时间
3. 定期清理缓存
# 清理微信缓存
rm -rf ~/.cache/wechat
rm -rf ~/.local/share/wechat
# 清理 Wine 缓存
rm -rf ~/.deepinwine/Deepin-WeChat/drive_c/users/$USER/Application\ Data/Tencent
安全注意事项
1. 权限管理
# 检查微信权限
flatpak info com.qq.weixin
# 或
snap info wechat
# 限制文件访问
# 使用沙盒版本(Flatpak/Snap)
2. 网络访问
# 使用防火墙限制
sudo ufw deny out from any to wechat-server
# 或使用网络监控
sudo nethogs
3. 数据备份
# 备份聊天记录
cp -r ~/.deepinwine/Deepin-WeChat/drive_c/users/$USER/My\ Documents/WeChat\ Files ~/backup/
# 备份配置
cp -r ~/.config/tencent-wechat ~/backup/
替代方案
1. 使用网页版微信
- 访问:https://wx.qq.com/
- 优点:无需安装,跨平台
- 缺点:功能有限,需要手机扫码
2. 使用第三方客户端
# Electronic WeChat(已停止维护)
# 但仍有社区版本可用
# 其他开源替代品
# 如:Franz、Rambox 等聚合客户端
3. 使用虚拟机
# 安装 VirtualBox
sudo apt install virtualbox
# 创建 Windows 虚拟机
# 在虚拟机中安装微信
最佳实践
1. 选择合适的方法
- 日常使用:推荐官方原生版本
- 兼容性需求:使用 Deepin Wine 版本
- 安全性优先:使用 Flatpak/Snap 沙盒版本
2. 定期更新
# 检查更新
sudo apt update
sudo apt upgrade
# Flatpak 更新
flatpak update
# Snap 更新
sudo snap refresh
3. 问题反馈
- 官方反馈渠道:微信设置 → 帮助与反馈
- 社区支持:Linux 用户论坛、GitHub Issues
- 日志收集:遇到问题时保存日志文件
通过选择合适的安装方法并合理配置,可以在 Linux 系统上获得良好的微信使用体验。建议优先尝试官方原生版本,如遇到兼容性问题再考虑其他方案。
Install Clash-Verge
clash-verge Project Github
https://github.com/clash-verge-rev/clash-verge-rev
Sloved Error of “clash-verge 依赖于 libwebkit2gtk-4.0-37.”
sudo vim /etc/apt/sources.list.d/ubuntu.sources
# 添加以下内容
Types: deb
URIs: http://br.archive.ubuntu.com/ubuntu/
Suites: jammy
Components: main restricted universe multiverse
Signed-By: /usr/share/keyrings/ubuntu-archive-keyring.gpg
sudo apt update
Sloved Error of starting “clash-verge” but no display window
vim /usr/share/applications/clash-verge.desktop
# 将 Exec 改为:
Exec=env WEBKIT_DISABLE_COMPOSITING_MODE=1 clash-verge
Clash For Linux
Github Repo
https://github.com/wnlen/clash-for-linux.git
Installation
git clone https://github.com/wnlen/clash-for-linux.git
Modify .env
The CLASH_URL is your subscription address, and the CLASH_SECRET is your password, when you login with web, you will use it.
Start Clash
sudo bash start.sh
As show tips, exec cmds.
Else CMD
- Close clash
sudo bash shutdown.sh
- Close proxy
proxy-off
Install Docker
Install Official Docker GPG Key
sudo apt-get update
sudo apt-get install ca-certificates curl
sudo install -m 0755 -d /etc/apt/keyrings
sudo curl -fsSL https://download.docker.com/linux/ubuntu/gpg -o /etc/apt/keyrings/docker.asc
sudo chmod a+r /etc/apt/keyrings/docker.asc
Add Official Docker Repo
echo \
"deb [arch=$(dpkg --print-architecture) signed-by=/etc/apt/keyrings/docker.asc] https://download.docker.com/linux/ubuntu \
$(. /etc/os-release && echo "$VERSION_CODENAME") stable" | \
sudo tee /etc/apt/sources.list.d/docker.list > /dev/null
Update Package Lists
sudo apt-get update
Install Docker
sudo apt-get install docker-ce docker-ce-cli containerd.io docker-buildx-plugin docker-compose-plugin
Well, you can access https://download.docker.com/ and download the .deb file manually.
Such Path: https://download.docker.com/linux/ubuntu/dists/focal/pool/stable/amd64/
Crack Pycharm
Edit vmoptions
vim /pycharm/install/path/bin/pycharm64.vmoptions
Add following options to the end of the file
-javaagent:/jar-package/path/jetbra/ja-netfilter.jar=jetbrains
--add-opens=java.base/jdk.internal.org.objectweb.asm=ALL-UNNAMED
--add-opens=java.base/jdk.internal.org.objectweb.asm.tree=ALL-UNNAMED
Activation Code
YQLSN55KLT-eyJsaWNlbnNlSWQiOiJZUUxTTjU1S0xUIiwibGljZW5zZWVOYW1lIjoi5rC45LmF5Zyw5Z2AIHd3d8K3YWppaHVvwrdjb20iLCJsaWNlbnNlZVR5cGUiOiJQRVJTT05BTCIsImFzc2lnbmVlTmFtZSI6IiIsImFzc2lnbmVlRW1haWwiOiIiLCJsaWNlbnNlUmVzdHJpY3Rpb24iOiIiLCJjaGVja0NvbmN1cnJlbnRVc2UiOmZhbHNlLCJwcm9kdWN0cyI6W3siY29kZSI6IkdPIiwicGFpZFVwVG8iOiIyMDI1LTAzLTExIiwiZXh0ZW5kZWQiOmZhbHNlfSx7ImNvZGUiOiJSUzAiLCJwYWlkVXBUbyI6IjIwMjUtMDMtMTEiLCJleHRlbmRlZCI6ZmFsc2V9LHsiY29kZSI6IkRNIiwicGFpZFVwVG8iOiIyMDI1LTAzLTExIiwiZXh0ZW5kZWQiOmZhbHNlfSx7ImNvZGUiOiJDTCIsInBhaWRVcFRvIjoiMjAyNS0wMy0xMSIsImV4dGVuZGVkIjpmYWxzZX0seyJjb2RlIjoiUlNVIiwicGFpZFVwVG8iOiIyMDI1LTAzLTExIiwiZXh0ZW5kZWQiOmZhbHNlfSx7ImNvZGUiOiJSU0MiLCJwYWlkVXBUbyI6IjIwMjUtMDMtMTEiLCJleHRlbmRlZCI6dHJ1ZX0seyJjb2RlIjoiUEMiLCJwYWlkVXBUbyI6IjIwMjUtMDMtMTEiLCJleHRlbmRlZCI6ZmFsc2V9LHsiY29kZSI6IkRTIiwicGFpZFVwVG8iOiIyMDI1LTAzLTExIiwiZXh0ZW5kZWQiOmZhbHNlfSx7ImNvZGUiOiJSRCIsInBhaWRVcFRvIjoiMjAyNS0wMy0xMSIsImV4dGVuZGVkIjpmYWxzZX0seyJjb2RlIjoiUUEiLCJwYWlkVXBUbyI6IjIwMjUtMDMtMTEiLCJleHRlbmRlZCI6ZmFsc2V9LHsiY29kZSI6IlJDIiwicGFpZFVwVG8iOiIyMDI1LTAzLTExIiwiZXh0ZW5kZWQiOmZhbHNlfSx7ImNvZGUiOiJSU0YiLCJwYWlkVXBUbyI6IjIwMjUtMDMtMTEiLCJleHRlbmRlZCI6dHJ1ZX0seyJjb2RlIjoiUk0iLCJwYWlkVXBUbyI6IjIwMjUtMDMtMTEiLCJleHRlbmRlZCI6ZmFsc2V9LHsiY29kZSI6IklJIiwicGFpZFVwVG8iOiIyMDI1LTAzLTExIiwiZXh0ZW5kZWQiOmZhbHNlfSx7ImNvZGUiOiJEUE4iLCJwYWlkVXBUbyI6IjIwMjUtMDMtMTEiLCJleHRlbmRlZCI6ZmFsc2V9LHsiY29kZSI6IkRCIiwicGFpZFVwVG8iOiIyMDI1LTAzLTExIiwiZXh0ZW5kZWQiOmZhbHNlfSx7ImNvZGUiOiJEQyIsInBhaWRVcFRvIjoiMjAyNS0wMy0xMSIsImV4dGVuZGVkIjpmYWxzZX0seyJjb2RlIjoiUFMiLCJwYWlkVXBUbyI6IjIwMjUtMDMtMTEiLCJleHRlbmRlZCI6ZmFsc2V9LHsiY29kZSI6IlJSIiwicGFpZFVwVG8iOiIyMDI1LTAzLTExIiwiZXh0ZW5kZWQiOmZhbHNlfSx7ImNvZGUiOiJSU1YiLCJwYWlkVXBUbyI6IjIwMjUtMDMtMTEiLCJleHRlbmRlZCI6dHJ1ZX0seyJjb2RlIjoiV1MiLCJwYWlkVXBUbyI6IjIwMjUtMDMtMTEiLCJleHRlbmRlZCI6ZmFsc2V9LHsiY29kZSI6IlBTSSIsInBhaWRVcFRvIjoiMjAyNS0wMy0xMSIsImV4dGVuZGVkIjp0cnVlfSx7ImNvZGUiOiJQQ1dNUCIsInBhaWRVcFRvIjoiMjAyNS0wMy0xMSIsImV4dGVuZGVkIjp0cnVlfSx7ImNvZGUiOiJBSUwiLCJwYWlkVXBUbyI6IjIwMjUtMDMtMTEiLCJleHRlbmRlZCI6ZmFsc2V9LHsiY29kZSI6IlJTIiwicGFpZFVwVG8iOiIyMDI1LTAzLTExIiwiZXh0ZW5kZWQiOnRydWV9LHsiY29kZSI6IkRQIiwicGFpZFVwVG8iOiIyMDI1LTAzLTExIiwiZXh0ZW5kZWQiOnRydWV9LHsiY29kZSI6IlBEQiIsInBhaWRVcFRvIjoiMjAyNS0wMy0xMSIsImV4dGVuZGVkIjp0cnVlfSx7ImNvZGUiOiJQUlIiLCJwYWlkVXBUbyI6IjIwMjUtMDMtMTEiLCJleHRlbmRlZCI6dHJ1ZX1dLCJtZXRhZGF0YSI6IjAyMjAyNTAyMTJQUEFNMDA2MDA1QSIsImhhc2giOiI2NjM5MzE5MS8wOjc2MDEyODIxNCIsImdyYWNlUGVyaW9kRGF5cyI6NywiYXV0b1Byb2xvbmdhdGVkIjpmYWxzZSwiaXNBdXRvUHJvbG9uZ2F0ZWQiOmZhbHNlLCJ0cmlhbCI6ZmFsc2UsImFpQWxsb3dlZCI6dHJ1ZX0=-HhxiOkGKCb3ymp+pacIhMlNE/54EGAr0LE2Qu7IBbQFZjk144sEBxR8JB3ZXyp6L1S5ruxTVpORLqQXLBrfH5m3Y7llwnp0DXPrvFLmPnYU1GnROYxpdGWZO3Tl8DpYu4uFQEY1AWkZXcy4TonPGkChktneR/7Z04tKapCFMbomkuEGb8d73c3Sviv40j1QbhKRaBlGhUUFcto9oJPl7cUf/i8Tz9FQgqdZvxpWtFgK7IeDh2N2b5AJvKH6UJadPjLYeI55r6aRNnvdyQHRTUmWvvSRO3CxNGdEeOp5YPR7pdUStvigYD+0Ww6lUuv4BB5BRY26ale5djLaBHoL7BA==-MIIETDCCAjSgAwIBAgIBETANBgkqhkiG9w0BAQsFADAYMRYwFAYDVQQDDA1KZXRQcm9maWxlIENBMB4XDTI0MDkyMDEyMTEyN1oXDTI2MDkyMjEyMTEyN1owHzEdMBsGA1UEAwwUcHJvZDJ5LWZyb20tMjAyNDA5MjAwggEiMA0GCSqGSIb3DQEBAQUAA4IBDwAwggEKAoIBAQC7SH/XcUoMwkDi8JJPzXWWHWFdOZdrP2Dqkz2W8iUi650cwz2vdPEd0tMzosLAj7ifkFEHUyiuEcL//q9d9Op7ZsV23lpPXX8tFMLFwugoQ9D8jDLT/XP9pp/YukWkKF5jpNbaCvsVQkDdYkArBkYvhH3aN4v9BkEsXahfgLLOPe4IG2FDJNf9R4to9V1vt+m2UVJB0zV4a/sVMKUZLgqKmKKKOKoLrE3OjBlZlb+Q0z2N5dsW0hDEVRFGmBUAbHN/mp44MMMvEIFKfoLIGpgic92P2O6uFh75PI7mcultL6yuR48ajErx8CjjQEGOSnoq/8hD+yVE+6GW2gJa2CPvAgMBAAGjgZkwgZYwCQYDVR0TBAIwADAdBgNVHQ4EFgQUb5NERj05GyNerQ/Mjm9XH8HXtLIwSAYDVR0jBEEwP4AUo562SGdCEjZBvW3gubSgUouX8bOhHKQaMBgxFjAUBgNVBAMMDUpldFByb2ZpbGUgQ0GCCQDSbLGDsoN54TATBgNVHSUEDDAKBggrBgEFBQcDATALBgNVHQ8EBAMCBaAwDQYJKoZIhvcNAQELBQADggIBALq6VfVUjmPI3N/w0RYoPGFYUieCfRO0zVvD1VYHDWsN3F9buVsdudhxEsUb8t7qZPkDKTOB6DB+apgt2ZdKwok8S0pwifwLfjHAhO3b+LUQaz/VmKQW8gTOS5kTVcpM0BY7UPF8cRBqxMsdUfm5ejYk93lBRPBAqntznDY+DNc9aXOldFiACyutB1/AIh7ikUYPbpEIPZirPdAahroVvfp2tr4BHgCrk9z0dVi0tk8AHE5t7Vk4OOaQRJzy3lST4Vv6Mc0+0z8lNa+Sc3SVL8CrRtnTAs7YpD4fpI5AFDtchNrgFalX+BZ9GLu4FDsshVI4neqV5Jd5zwWPnwRuKLxsCO/PB6wiBKzdapQBG+P9z74dQ0junol+tqxd7vUV/MFsR3VwVMTndyapIS+fMoe+ZR5g+y44R8C7fXyVE/geg+JXQKvRwS0C5UpnS5FcGk+61b0e4U7pwO20RlwhEFHLSaP61p2TaVGo/TQtT/fWmrtV+HegAv9P3X3Se+xIVtJzQsk8QrB/w52IB3FKiAKl/KRn1egbMIs4uoNAkqNZ9Ih2P1NpiQnONFmkiAgeynJ+0FPykKdJQbV3Mx44jkaHIif4aFReTsYX1WUBNu/QerZRjn4FVSHRaZPSR5Oi82Wz0Nj7IY9ocTpLnXFrqkb/Kt3S6B9s2Kol3Lr1ElYA
Start Pycharm like VS-Code
Modify pycharm.sh
Generally pycharm.sh is located at /pycharm/install/path/bin/pycharm.sh.
Add > /dev/null 2>&1 & to the end of the file. Make sure the file looks like this:
com.intellij.idea.Main \
"$@" \
> /dev/null 2>&1 &
Create a link file
sudo ln -sf /pycharm/install/path/bin/pycharm.sh /usr/local/bin/pycharm
Then, you can start Pycharm by typing pycharm in the terminal.
knight@Lenovo:~/workspace/game_of_thrones$ pycharm .
knight@Lenovo:~/workspace/game_of_thrones$
Tmux 终端复用器配置指南
安装 Tmux
官方网站
安装命令
# Ubuntu/Debian
sudo apt install -y tmux
# CentOS/RHEL
sudo yum install tmux
# Arch Linux
sudo pacman -S tmux
# macOS
brew install tmux
验证安装
tmux -V
# 输出类似:tmux 3.3a
安装 Tmux 插件管理器 (TPM)
官方网站
https://github.com/tmux-plugins/tpm
安装 TPM
git clone https://github.com/tmux-plugins/tpm ~/.tmux/plugins/tpm
创建 .tmux.conf 配置文件
这是我的个人 Tmux 配置文件:
### tmux.conf
# system setting
set -g default-terminal "tmux-256color"
set -g mouse on
# rebind prefix key
unbind C-b
set -g prefix 'C-d'
set -g mode-keys vi
# reload configuration
# bind R source-file ~/.tmux.conf \; display '~/.tmux.conf Reloaded!'
# windows behaver
set -g base-index 1
setw -g pane-base-index 1
set -g renumber-windows on
#setw -g automatic-rename on
# display options
set -g set-titles on
set -g display-panes-time 2000
# window navigation
unbind n
unbind p
unbind x
bind -n C-o previous-window
bind -n C-p next-window
bind -n C-n new-window -c "#{pane_current_path}"
bind -n C-q kill-pane
# split windows
unbind %
unbind \"
bind l split-window -h -c "#{pane_current_path}"
bind k split-window -v -c "#{pane_current_path}"
bind h split-window -hb -c "#{pane_current_path}"
bind j split-window -vb -c "#{pane_current_path}"
# windows size adjusting
bind -n M-f resize-pane -Z
bind -n M-j resize-pane -U 5
bind -n M-k resize-pane -D 5
bind -n M-h resize-pane -L 5
bind -n M-l resize-pane -R 5
# cursor-moving setting
unbind o
unbind \;
bind -T root C-Left select-pane -L
bind -T root C-Right select-pane -R
bind -T root C-Up select-pane -U
bind -T root C-Down select-pane -D
# pane-moving setting
bind < swap-pane -U
bind > swap-pane -D
# tmux plugins
run '~/.tmux/plugins/tmux/catppuccin.tmux'
set -g @catppuccin_flavor 'frappe' # latte | frappe | mocha | macchiato
set -g @catppuccin_window_status_style "rounded" # basic | rounded | slanted | custom | none
set -g @catppuccin_window_number_color "#{@thm_fg}"
set -g @catppuccin_window_current_number_color "#{@thm_green}"
set -g status-left ""
set -g status-right ""
set -g status-right-length 100
set -g @yank_action 'copy-pipe' # or 'copy-pipe-and-cancel' for the default
set -g status-right "#{net_speed} "
set -g @net_speed_interfaces "enp2s0 wlp3s0"
set -g @net_speed_format "%8s %8s "
set -agF status-right "#{E:@catppuccin_status_cpu}"
set -agF status-right "#{E:@catppuccin_status_weather}"
set-option -g @tmux-weather-interval 10
set -gq @catppuccin_weather_color "#ea999c"
set-option -g @tmux-weather-location "BeiJing"
set -ag status-right "#{E:@catppuccin_status_date_time}"
set -g "@catppuccin_date_time_text" " %m-%d %H:%M"
# set -ag status-right "#{E:@catppuccin_status_session}"
# set -ag status-right "#{E:@catppuccin_status_application}"
# set -ag status-right "#{E:@catppuccin_status_gitmux}"
# set -ag status-right "#{E:@catppuccin_status_load}"
# set -ag status-right "#{E:@catppuccin_status_pomodoro_plus}"
# set -ag status-right "#{E:@catppuccin_status_kube}"
# set -ag status-right "#{E:@catppuccin_status_up_time}"
# set -ag status-right "#{E:@catppuccin_status_user}"
# set -g status-right '#[fg=#{@thm_crust},bg=#{@thm_teal}] : #S '
set -g @plugin 'tmux-plugins/tpm'
set -g @plugin 'tmux-plugins/tmux-yank'
set -g @plugin 'tmux-plugins/tmux-sensible'
set -g @plugin 'tmux-plugins/tmux-cpu'
set -g @plugin 'tmux-plugins/tmux-net-speed'
set -g @plugin 'xamut/tmux-weather'
set -g @plugin 'catppuccin/tmux#v2.1.1'
run '~/.tmux/plugins/tpm/tpm'
配置文件说明
- 基础设置:修改前缀键、启用鼠标支持等
- 主题配置:设置状态栏样式和颜色
- 插件配置:定义要安装的插件列表
- 快捷键映射:自定义常用操作的快捷键
安装 Nerd Fonts 字体
官方网站
方法一:使用官方脚本安装
经过多次尝试,Meslo 字体表现最佳:
git clone --depth 1 https://github.com/ryanoasis/nerd-fonts.git && \
cd nerd-fonts/ && \
./install.sh Meslo
方法二:使用简化脚本安装(推荐)
wget https://raw.githubusercontent.com/mcarvalho1/Simple-NerdFonts-Downloader/c7854dae2153aa199277926bed4b992488b65a3d/nf_downloader.sh
注意:
nf_downloader.sh默认会安装所有字体,建议修改脚本只安装需要的字体。字体将保存在~/.local/share/fonts目录。
Tmux 基本使用
启动 Tmux
tmux
# 或指定会话名称
tmux new -s mysession
常用快捷键
| 快捷键 | 功能 |
|---|---|
Ctrl+b % | 垂直分屏 |
Ctrl+b " | 水平分屏 |
Ctrl+b 方向键 | 切换窗格 |
Ctrl+b c | 新建窗口 |
Ctrl+b n/p | 切换窗口 |
Ctrl+b d | 分离会话 |
Ctrl+b [ | 进入复制模式 |
Ctrl+b ] | 粘贴 |
会话管理
# 列出所有会话
tmux ls
# 附加到会话
tmux attach -t 会话名
# 重命名会话
tmux rename-session -t 旧名称 新名称
# 杀死会话
tmux kill-session -t 会话名
插件推荐
1. tmux-sensible
合理的默认配置
set -g @plugin 'tmux-plugins/tmux-sensible'
2. tmux-prefix-highlight
高亮显示前缀键状态
set -g @plugin 'tmux-plugins/tmux-prefix-highlight'
3. tmux-resurrect
会话保存和恢复
set -g @plugin 'tmux-plugins/tmux-resurrect'
4. tmux-continuum
自动保存会话
set -g @plugin 'tmux-plugins/tmux-continuum'
5. tmux-yank
系统剪贴板集成
set -g @plugin 'tmux-plugins/tmux-yank'
插件安装步骤
1. 添加插件到配置
在 .tmux.conf 中添加插件:
set -g @plugin 'tmux-plugins/tmux-sensible'
set -g @plugin 'tmux-plugins/tmux-yank'
# 更多插件...
2. 初始化 TPM
在配置文件末尾添加:
# 初始化 TPM
run '~/.tmux/plugins/tpm/tpm'
3. 安装插件
- 重新加载配置文件:
tmux source ~/.tmux.conf - 按
Prefix + I(大写 i)安装插件
4. 更新插件
按 Prefix + U 更新所有插件
5. 卸载插件
- 从配置文件中删除插件行
- 按
Prefix + alt + u卸载插件
高级配置
1. 主题定制
# 设置状态栏样式
set -g status-style "fg=#665c54"
set -g window-status-current-style "fg=#ea6962"
# 设置面板边框
set -g pane-border-style "fg=#3c3836"
set -g pane-active-border-style "fg=#ea6962"
2. 鼠标支持
# 启用鼠标
set -g mouse on
# 鼠标滚轮支持
bind -n WheelUpPane if-shell -F -t = "#{mouse_any_flag}" "send-keys -M" "if -Ft= '#{pane_in_mode}' 'send-keys -M' 'copy-mode -e'"
3. 复制模式优化
# 使用 vi 键绑定
setw -g mode-keys vi
# 复制到系统剪贴板
bind -T copy-mode-vi v send -X begin-selection
bind -T copy-mode-vi y send -X copy-pipe-and-cancel 'xclip -in -selection clipboard'
性能优化
1. 减少重绘
# 延长状态栏更新间隔
set -g status-interval 5
# 禁用不必要的重绘
set -g focus-events off
2. 内存优化
# 限制历史记录大小
set -g history-limit 10000
# 禁用会话恢复的自动保存
set -g @continuum-restore 'off'
故障排除
问题 1:插件不生效
# 检查 TPM 安装
ls ~/.tmux/plugins/tpm
# 重新安装插件
tmux kill-server
tmux
# 然后按 Prefix + I
问题 2:字体显示异常
# 清除字体缓存
fc-cache -fv
# 检查字体是否安装成功
fc-list | grep Meslo
问题 3:快捷键冲突
# 修改前缀键
set -g prefix C-a
unbind C-b
bind C-a send-prefix
最佳实践
1. 配置文件管理
# 将配置文件纳入版本控制
git init ~/.tmux
git add .tmux.conf
git commit -m "Initial tmux configuration"
2. 会话命名规范
# 使用有意义的会话名称
tmux new -s web-dev
tmux new -s database
tmux new -s monitoring
3. 备份和恢复
# 手动备份会话
tmux list-sessions > tmux-sessions-backup.txt
# 使用插件自动备份
# 启用 tmux-resurrect 和 tmux-continuum
Tmux 是一个强大的终端复用工具,通过合理配置可以显著提高命令行工作效率。花时间学习和定制 Tmux,你会发现它成为日常开发中不可或缺的工具。
Create WindTerm Desktop Entry
[Desktop Entry]
Name=WindTerm
Comment=A professional cross-platform SSH/Sftp/Shell/Telnet/Serial terminal
GenericName=Connect Client
Exec=/home/knight/windTerm/WindTerm_2.6.1/WindTerm
Type=Application
Icon=/home/knight/windTerm/WindTerm_2.6.1/windterm.png
StartupNotify=false
StartupWMClass=Code
Categories=Application;Development
Actions=new-empty-window
Keywords=windterm
[Desktop Action new-empty-window]
Name=New Empty Window
Exec=/home/knight/windTerm/WindTerm_2.6.1/WindTerm
Icon=/home/knight/windTerm/WindTerm_2.6.1/windterm.png
Asciiquarium Command Install
Ubuntu
sudo apt-get install -y perl libcurses-perl wget
wget http://search.cpan.org/CPAN/authors/id/K/KB/KBAUCOM/Term-Animation-2.4.tar.gz
wget http://www.robobunny.com/projects/asciiquarium/asciiquarium.tar.gz
tar -xf Term-Animation-2.4.tar.gz
tar -xf asciiquarium.tar.gz
cd Term-Animation-2.4/ && perl Makefile.PL && make && sudo make install
cd ../asciiquarium_1.1/
cp asciiquarium /usr/local/bin
sudo chmod +x /usr/local/bin/asciiquarium
asciiquarium
Centos
cd /opt
yum install -y wget
wget http://search.cpan.org/CPAN/authors/id/K/KB/KBAUCOM/Term-Animation-2.4.tar.gz
tar xf Term-Animation-2.4.tar.gz
yum install perl-Curses.x86_64 -y
yum install perl-ExtUtils-CBuilder perl-ExtUtils-MakeMaker -y
cd /opt/Term-Animation-2.4/ && perl Makefile.PL
make
make install
cd /opt
wget http://www.robobunny.com/projects/asciiquarium/asciiquarium.tar.gz
tar -zxvf asciiquarium.tar.gz
cd asciiquarium_1.1/
cp asciiquarium /usr/local/bin
chmod +x /usr/local/bin/asciiquarium
asciiquarium
使用 frp
Project Official Website
https://github.com/fatedier/frp
SSH Service
The server configuration
vim frps.toml
bindPort = 5432 # frp 建立通讯的端口
auth.token = "123456"
The Client configuration
vim frpc.toml
serverAddr = "123.00.00.01"
serverPort = 5432 # frp 建立通讯的端口
auth.token = "123456"
[[proxies]]
name = "ssh"
type = "tcp"
localIP = "127.0.0.1"
localPort = 22
remotePort = 10086 # frp 映射的端口,VPS需要打开的端口
FTP Service
The Server configuration
vim frps.toml
bindPort = 5432
auth.token = "123456"
The Client configuration
vim frpc.toml
serverAddr = "123.00.00.01"
serverPort = 5432
auth.token = "123456"
[[proxies]]
name = "test_static_file"
type = "tcp"
localPort = 21
remotePort = 10086
[proxies.plugin]
type = "static_file"
# 本地文件目录,对外提供访问
localPath = "/your/local/path"
# URL 中的前缀,将被去除,保留的内容即为要访问的文件路径
stripPrefix = "static"
httpUser = "user"
httpPassword = "password"
systemctl Configuration
- frps | Server configuration
sudo vim /etc/systemd/system/frps.service
[Unit]
# 服务名称,可自定义
Description = frp server
After = network.target syslog.target
Wants = network.target
[Service]
Type = simple
# 启动frps的命令,需修改为您的frps的安装路径
ExecStart = /root/frp/frps -c /root/frp/config.toml
[Install]
WantedBy = multi-user.target
reload daemon and start service
sudo systemctl daemon-reload
sudo systemctl enable --now frps
- frpc | Client configuration
sudo vim /etc/systemd/system/frpc.service
[Unit]
Description=FRPC Client Service
After=network.target
[Service]
User=knight
Group=knight
Type=simple
ExecStart=/home/knight/frp/frpc -c /home/knight/frp/config.toml
Restart=on-failure
RestartSec=5s
StandardOutput=syslog
StandardError=syslog
SyslogIdentifier=frpc
[Install]
WantedBy=multi-user.target
reload daemon and start service
sudo systemctl daemon-reload
sudo systemctl enable --now frpc
yt-dlp Usage
Install yt-dlp
uv tool install yt-dlp
Usage
- Download the video, auto select best quality (Recommended)
yt-dlp -f 'bestvideo[ext=mp4]+bestaudio[ext=m4a]/mp4' \
https://www.youtube.com/watch?v=4-8hXLxWVvE
- Download the video, auto select best quality(Not recommended)
yt-dlp https://www.youtube.com/watch?v=4-8hXLxWVvE
Replace URL with you will download, It will download the video that format is webm, some videoplayer cannot play it.
- List all available formats
yt-dlp -F https://www.youtube.com/watch?v=4-8hXLxWVvE
Output example:
ID EXT RESOLUTION FPS CH │ FILESIZE TBR PROTO │ VCODEC VBR ACODEC ABR ASR MORE INFO
─────────────────────────────────────────────────────────────────────────────────────────────────────────────────────
232 mp4 1280x720 25 │ ~20.15MiB 820k m3u8 │ avc1.4D401F 820k video only Untested
136 mp4 1280x720 25 │ 11.27MiB 459k https │ avc1.4d401f 459k video only 720p, mp4_dash
609 mp4 1280x720 25 │ ~23.73MiB 966k m3u8 │ vp09.00.31.08 966k video only Untested
247 webm 1280x720 25 │ 10.72MiB 437k https │ vp9 437k video only 720p, webm_dash
398 mp4 1280x720 25 │ 11.41MiB 465k https │ av01.0.05M.08 465k video only 720p, mp4_dash
270 mp4 1920x1080 25 │ ~62.58MiB 2548k m3u8 │ avc1.640028 2548k video only Untested
137 mp4 1920x1080 25 │ 40.80MiB 1661k https │ avc1.640028 1661k video only 1080p, mp4_dash
614 mp4 1920x1080 25 │ ~55.61MiB 2265k m3u8 │ vp09.00.40.08 2265k video only Untested
248 webm 1920x1080 25 │ 22.82MiB 929k https │ vp9 929k video only 1080p, webm_dash
399 mp4 1920x1080 25 │ 20.32MiB 827k https │ av01.0.08M.08 827k video only 1080p, mp4_dash
Select the you like to download, only mark the ID
yt-dlp -f 399 https://www.youtube.com/watch?v=4-8hXLxWVvE
- Rename the file
yt-dlp -o "my_video.mp4" https://www.youtube.com/watch?v=4-8hXLxWVvE
- Setting the proxy
yt-dlp --proxy "http://127.0.0.1:7890" https://www.youtube.com/watch?v=4-8hXLxWVvE
- Download the subtitles(If exists)
yt-dlp --write-sub --sub-lang en https://www.youtube.com/watch?v=4-8hXLxWVvE
Entertainment
Install KODI
sudo apt install software-properties-common
sudo add-apt-repository -y ppa:team-xbmc/ppa
sudo apt install kodi
Install TMM
https://www.tinymediamanager.org/download/
qBittorrent Enhanced
https://github.com/c0re100/qBittorrent-Enhanced-Edition/releases
LX Music
https://github.com/lyswhut/lx-music-desktop/releases
All Kinds of Proxy Setting
In china, you can’t access to the real Internet directly. So you have to use some proxy in some software.
系统代理配置指南
本文介绍如何在 Linux 系统中配置全局代理设置,适用于所有用户和应用程序。
创建代理配置脚本
1. 编辑代理脚本
sudo vim /etc/profile.d/proxy.sh
2. 脚本内容
#!/bin/bash
# 设置代理函数
set_proxy() {
# 为所有用户设置代理配置(通过 profile.d)
# 小写环境变量(适用于大多数工具)
export http_proxy="http://127.0.0.1:7890/"
export https_proxy="http://127.0.0.1:7890/"
export ftp_proxy="http://127.0.0.1:7890/"
export no_proxy="127.0.0.1,localhost"
# 大写环境变量(适用于 curl 等工具)
export HTTP_PROXY="http://127.0.0.1:7890/"
export HTTPS_PROXY="http://127.0.0.1:7890/"
export FTP_PROXY="http://127.0.0.1:7890/"
export NO_PROXY="127.0.0.1,localhost"
# 设置 socks 代理(如果需要)
export socks_proxy="socks5://127.0.0.1:7891/"
export SOCKS_PROXY="socks5://127.0.0.1:7891/"
# 设置 all_proxy(适用于某些工具)
export all_proxy="socks5://127.0.0.1:7891/"
export ALL_PROXY="socks5://127.0.0.1:7891/"
echo "代理已设置。"
}
# 取消代理函数
unset_proxy() {
# 取消所有代理配置
# 取消小写环境变量
unset http_proxy
unset https_proxy
unset ftp_proxy
unset no_proxy
# 取消大写环境变量
unset HTTP_PROXY
unset HTTPS_PROXY
unset FTP_PROXY
unset NO_PROXY
# 取消 socks 代理
unset socks_proxy
unset SOCKS_PROXY
# 取消 all_proxy
unset all_proxy
unset ALL_PROXY
echo "代理已取消。"
}
# 显示当前代理设置
show_proxy() {
echo "当前代理设置:"
echo "http_proxy: ${http_proxy:-未设置}"
echo "https_proxy: ${https_proxy:-未设置}"
echo "HTTP_PROXY: ${HTTP_PROXY:-未设置}"
echo "HTTPS_PROXY: ${HTTPS_PROXY:-未设置}"
echo "socks_proxy: ${socks_proxy:-未设置}"
echo "SOCKS_PROXY: ${SOCKS_PROXY:-未设置}"
echo "no_proxy: ${no_proxy:-未设置}"
}
# 主函数
case $1 in
set)
set_proxy
;;
unset)
unset_proxy
;;
show)
show_proxy
;;
*)
echo "使用方法:source $0 {set|unset|show}"
echo " set - 设置代理"
echo " unset - 取消代理"
echo " show - 显示当前代理设置"
;;
esac
设置脚本权限
添加执行权限
sudo chmod +x /etc/profile.d/proxy.sh
验证权限
ls -la /etc/profile.d/proxy.sh
# 应该显示:-rwxr-xr-x
使用代理脚本
1. 设置代理
source /etc/profile.d/proxy.sh set
2. 取消代理
source /etc/profile.d/proxy.sh unset
3. 显示代理状态
source /etc/profile.d/proxy.sh show
4. 创建别名方便使用
# 在 ~/.bashrc 或 ~/.zshrc 中添加
alias proxy-set='source /etc/profile.d/proxy.sh set'
alias proxy-unset='source /etc/profile.d/proxy.sh unset'
alias proxy-show='source /etc/profile.d/proxy.sh show'
验证代理设置
1. 检查环境变量
env | grep -i proxy
2. 测试代理连接
# 测试 HTTP 代理
curl -I http://www.google.com
# 测试 HTTPS 代理
curl -I https://www.google.com
# 使用代理测试
curl --proxy http://127.0.0.1:7890 -I https://www.google.com
3. 检查 IP 地址
# 查看当前 IP
curl http://ipinfo.io/ip
# 通过代理查看 IP
curl --proxy http://127.0.0.1:7890 http://ipinfo.io/ip
代理配置详解
1. 代理地址说明
127.0.0.1:7890: 本地 HTTP/HTTPS 代理端口127.0.0.1:7891: 本地 SOCKS5 代理端口- 根据你的代理软件调整端口号
2. 环境变量说明
| 变量名 | 用途 | 示例 |
|---|---|---|
http_proxy | HTTP 代理 | http://127.0.0.1:7890/ |
https_proxy | HTTPS 代理 | http://127.0.0.1:7890/ |
ftp_proxy | FTP 代理 | http://127.0.0.1:7890/ |
socks_proxy | SOCKS 代理 | socks5://127.0.0.1:7891/ |
all_proxy | 通用代理 | socks5://127.0.0.1:7891/ |
no_proxy | 排除列表 | 127.0.0.1,localhost |
3. no_proxy 配置
# 常见排除列表
export no_proxy="127.0.0.1,localhost,192.168.0.0/16,10.0.0.0/8,172.16.0.0/12,.internal,.local"
应用程序特定配置
1. APT (Ubuntu/Debian)
# 创建 APT 代理配置
sudo vim /etc/apt/apt.conf.d/proxy.conf
添加内容:
Acquire::http::Proxy "http://127.0.0.1:7890";
Acquire::https::Proxy "http://127.0.0.1:7890";
2. Git
# 设置 Git 代理
git config --global http.proxy http://127.0.0.1:7890
git config --global https.proxy http://127.0.0.1:7890
# 取消 Git 代理
git config --global --unset http.proxy
git config --global --unset https.proxy
3. npm
# 设置 npm 代理
npm config set proxy http://127.0.0.1:7890
npm config set https-proxy http://127.0.0.1:7890
# 取消 npm 代理
npm config delete proxy
npm config delete https-proxy
4. Docker
# 创建 Docker 代理配置
sudo mkdir -p /etc/systemd/system/docker.service.d
sudo vim /etc/systemd/system/docker.service.d/proxy.conf
添加内容:
[Service]
Environment="HTTP_PROXY=http://127.0.0.1:7890"
Environment="HTTPS_PROXY=http://127.0.0.1:7890"
Environment="NO_PROXY=localhost,127.0.0.1"
重启 Docker:
sudo systemctl daemon-reload
sudo systemctl restart docker
高级配置
1. 用户特定配置
# 在 ~/.bashrc 或 ~/.zshrc 中添加个人配置
if [ -f /etc/profile.d/proxy.sh ]; then
source /etc/profile.d/proxy.sh set
fi
2. 条件代理
# 根据网络环境自动设置代理
auto_proxy() {
if ping -c 1 -W 2 8.8.8.8 > /dev/null 2>&1; then
# 可以访问外网,不设置代理
source /etc/profile.d/proxy.sh unset
else
# 无法访问外网,设置代理
source /etc/profile.d/proxy.sh set
fi
}
# 登录时自动检测
auto_proxy
3. 代理验证
# 带认证的代理
export http_proxy="http://username:password@proxy-server:port/"
export https_proxy="http://username:password@proxy-server:port/"
故障排除
问题 1:代理不生效
# 检查代理服务是否运行
netstat -tlnp | grep 7890
# 检查环境变量
printenv | grep -i proxy
# 测试代理连接
curl -x http://127.0.0.1:7890 http://www.google.com
问题 2:某些应用不走代理
# 检查应用的代理配置
# 某些应用需要单独配置代理
# 使用 strace 跟踪
strace -e trace=network application
问题 3:代理速度慢
# 测试代理延迟
time curl --proxy http://127.0.0.1:7890 -I https://www.google.com
# 检查代理服务器状态
# 考虑更换代理服务器或调整配置
问题 4:证书错误
# 导入代理证书
# 某些 HTTPS 代理需要安装证书
# 临时忽略证书验证(不推荐)
export CURL_CA_BUNDLE=""
安全注意事项
1. 代理认证
# 不要在脚本中硬编码密码
# 使用环境变量或配置文件
export PROXY_PASSWORD="your_password"
export http_proxy="http://user:${PROXY_PASSWORD}@proxy:port/"
2. 访问控制
# 限制代理使用范围
# 只允许特定用户或应用使用代理
3. 日志记录
# 记录代理使用情况
# 监控代理流量和访问记录
替代方案
1. 使用 Proxychains
# 安装
sudo apt install proxychains
# 配置
sudo vim /etc/proxychains.conf
# 使用
proxychains curl http://www.google.com
2. 使用环境管理器
# 使用 direnv 管理环境
echo "export http_proxy='http://127.0.0.1:7890'" > .envrc
direnv allow
3. 使用系统设置
# GNOME 桌面环境
gsettings set org.gnome.system.proxy mode 'manual'
gsettings set org.gnome.system.proxy.http host '127.0.0.1'
gsettings set org.gnome.system.proxy.http port 7890
通过合理配置系统代理,可以方便地管理网络访问,提高工作效率。建议根据实际需求选择合适的代理配置方案。
Setting Docker Mirror Acceleration
Edit Conf File
sudo vim /etc/docker/daemon.json
Add Lines
{
"registry-mirrors": [
"https://docker.1ms.run",
"https://docker.xuanyuan.me",
"https://docker.wanpeng.life",
"https://docker.imgdb.de"
]
}
sudo systemctl daemon-reload
sudo systemctl restart docker
Configure Docker Proxy
Edit Conf File
sudo mkdir -p /etc/systemd/system/docker.service.d && \
sudo vim /etc/systemd/system/docker.service.d/http-proxy.conf
Add Lines
[Service]
Environment="HTTP_PROXY=http://127.0.0.1:7890"
Environment="HTTPS_PROXY=http://127.0.0.1:7890"
Reload Daemon & Restart Docker
sudo systemctl daemon-reload
sudo systemctl restart docker
Configure Container Proxy
Edit Conf File
vim ~/.docker/config.json
Add Lines
{
"proxies":
{
"default":
{
"httpProxy": "http://172.17.0.1:7890",
"httpsProxy": "http://172.17.0.1:7890",
"noProxy": "*.<domain>,127.0.0.0/8"
}
}
}
Reload Daemon & Restart Docker
sudo systemctl daemon-reload
sudo systemctl restart docker
Configure K3S Proxy
-
/etc/systemd/system/k3s.service.env -
/etc/systemd/system/k3s-agent.service.env
HTTP_PROXY=http://your-proxy.example.com:8888
HTTPS_PROXY=http://your-proxy.example.com:8888
NO_PROXY=127.0.0.0/8,10.0.0.0/8,172.16.0.0/12,192.168.0.0/16
Podman 容器代理配置指南
问题描述
宿主机配置了 http_proxy=127.0.0.1:7890,但容器内 127.0.0.1 指向容器自身,导致代理不可用。
根本原因
Podman 默认行为:
- 自动继承宿主机的
*_proxy环境变量(优先级最高) - 即使
containers.conf中配置了env = [...],若未禁用自动继承,宿主机变量仍会覆盖配置
解决方案
1. 编辑配置文件
路径选择:
- 当前用户生效:
~/.config/containers/containers.conf - 全局生效:
/etc/containers/containers.conf
配置内容:
[containers]
# 禁用自动继承宿主机代理变量(关键)
http_proxy = false
# 手动指定代理,使用 host.containers.internal 指向宿主机
env = [
"http_proxy=http://host.containers.internal:7890",
"https_proxy=http://host.containers.internal:7890",
"no_proxy=127.0.0.1,localhost",
"HTTP_PROXY=http://host.containers.internal:7890",
"HTTPS_PROXY=http://host.containers.internal:7890",
"NO_PROXY=127.0.0.1,localhost"
]
注意:
http_proxy = false必须生效(取消注释)- 同时配置大小写变量,确保所有应用兼容
- 文件中只保留一组
env = [...],避免被覆盖host.containers.internal需 Podman ≥ 4.0
2. 验证配置
# 确认配置文件路径
podman info --format '{{.Host.ConfigFile}}'
# 启动容器检查环境变量
podman run --rm -it ubuntu /bin/bash
# 容器内执行:
env | grep -i proxy
# 预期输出应包含 host.containers.internal,而非 127.0.0.1
# 测试网络连通性
curl -I https://example.com
3. 临时方案(命令行覆盖)
无需修改配置文件,单次运行生效:
podman run --rm -it --http-proxy=false \
-e http_proxy=http://host.containers.internal:7890 \
-e https_proxy=http://host.containers.internal:7890 \
-e no_proxy=127.0.0.1,localhost \
ubuntu /bin/bash
4. 故障排查
| 现象 | 检查项 | 命令/操作 |
|---|---|---|
| 配置未生效 | 配置文件路径 | podman info --format '{{.Host.ConfigFile}}' |
| 配置被忽略 | 语法错误 | podman info 能否正常执行 |
| 配置冲突 | 多配置文件优先级 | 检查 /usr/share/containers/containers.conf |
| 临时参数干扰 | 命令行 --http-proxy | 命令行参数优先级 > 配置文件 |
| 域名无法解析 | Podman 版本 | podman --version(需 ≥ 4.0) |
5. 备选方案
若 host.containers.internal 不可用,可改用宿主机真实 IP:
# 获取宿主机在 podman 网络中的网关 IP
HOST_IP=$(ip route | grep default | awk '{print $3}')
podman run --rm -it --http-proxy=false \
-e http_proxy=http://$HOST_IP:7890 \
-e https_proxy=http://$HOST_IP:7890 \
ubuntu /bin/bash
⚠️ 此方法依赖宿主机网络环境,重启后 IP 可能变化,建议优先使用
host.containers.internal。
有趣的 Docker 项目集锦
这里收集了一些有趣且实用的 Docker 项目。如果你也想尝试部署这些项目,请确保已经安装了 Docker 和 Docker Compose。
项目列表
OpenWeb-UI
一个基于浏览器的本地 AI 对话界面,可以与你的 Ollama 模型进行交互。它提供了完整的历史记录管理和会话管理功能,让你能够更方便地使用本地大语言模型。
YesPlayMusic
一款界面精美的音乐播放器,支持在自有服务器上部署。如果你想要一个私人的音乐流媒体服务,这个项目是个不错的选择。
使用建议
这些项目都经过了实际部署测试,配置相对简单。每个项目都有详细的部署指南,点击对应的链接即可查看具体的配置方法。
如果你在部署过程中遇到问题,或者有更多有趣的 Docker 项目推荐,欢迎在评论区交流分享!
OpenWeb-UI:本地 AI 对话界面的完美解决方案
项目简介
OpenWeb-UI 是一个开源的 Web 界面,专门为本地部署的 Ollama 大语言模型设计。它提供了一个美观、易用的聊天界面,让你能够在浏览器中与本地 AI 模型进行自然对话。
官方网站:https://docs.openwebui.com/
核心功能
- 直观的聊天界面:类似 ChatGPT 的用户体验
- 会话管理:支持创建、保存和管理多个对话会话
- 历史记录:完整的对话历史保存和检索功能
- 多模型支持:可以连接多个不同的 Ollama 模型
- 本地部署:所有数据都保存在本地,确保隐私安全
Docker 部署指南
准备工作
- 确保已安装 Docker 和 Docker Compose
- 确保 Ollama 服务已正确配置(参考:Ollama 服务发现配置)
docker-compose.yml 配置
version: '3'
services:
open-webui:
image: ghcr.io/open-webui/open-webui:main
container_name: open-webui
ports:
- "3000:8080" # 将容器的 8080 端口映射到主机的 3000 端口
volumes:
- open-webui:/app/backend/data # 数据持久化存储
# restart: always # 取消注释以启用自动重启
extra_hosts:
- "host.docker.internal:host-gateway" # 允许容器访问主机服务
volumes:
open-webui: # 定义数据卷
部署步骤
- 创建
docker-compose.yml文件,将上述配置复制进去 - 在终端中运行以下命令启动服务:
docker-compose up -d - 打开浏览器访问
http://localhost:3000
重要提示
⚠️ 关键配置:在部署 OpenWeb-UI 之前,必须正确配置 Ollama 服务发现,否则 OpenWeb-UI 将无法识别本地安装的 Ollama 模型。
使用体验
部署完成后,你可以在浏览器中享受与本地 AI 模型的流畅对话体验。界面支持暗色/亮色主题切换,响应式设计确保在手机和电脑上都有良好的使用体验。
OpenWeb-UI 的社区非常活跃,定期更新功能和修复问题。如果你在使用过程中遇到任何问题,可以在项目的 GitHub 仓库中提交 issue 或参与讨论。
进阶配置
对于高级用户,OpenWeb-UI 还支持:
- 自定义主题和界面样式
- API 密钥管理
- 多用户支持
- 模型参数调优
这些功能可以通过环境变量或配置文件进行设置,具体参考官方文档。
小贴士:如果你有多个不同的 AI 模型(如 Llama、Mistral、Gemma 等),可以在 OpenWeb-UI 中轻松切换,体验不同模型的对话风格和能力差异。
YesPlayMusic:高颜值的自托管音乐播放器
项目介绍
YesPlayMusic 是一款基于 Vue.js 开发的现代化音乐播放器,以其精美的用户界面和流畅的交互体验而闻名。虽然它主要面向网易云音乐用户,但其设计和功能理念使其成为自托管音乐服务的优秀选择。
GitHub 仓库:https://github.com/qier222/YesPlayMusic
特色功能
- 🎨 精美界面:现代化的 Material Design 设计风格
- 🚀 快速响应:基于 Vue 3 + Vite 构建,加载速度快
- 🎵 完整功能:播放列表、歌词显示、音质选择等
- 📱 响应式设计:完美适配桌面和移动设备
- 🔒 隐私保护:自托管确保音乐数据安全
Docker 一键部署
基础部署配置
version: '3.9'
services:
yesplaymusic:
image: fogforest/yesplaymusic # 社区维护的 Docker 镜像
container_name: yesplaymusic # 容器名称
restart: always # 自动重启策略
ports:
- "7900:80" # 主机端口:容器端口
部署步骤
- 创建
docker-compose.yml文件,复制上述配置 - 运行部署命令:
docker-compose up -d - 访问
http://localhost:7900即可使用
进阶配置(可选)
如果你需要更复杂的配置,可以参考以下示例:
version: '3.9'
services:
yesplaymusic:
image: fogforest/yesplaymusic
container_name: yesplaymusic
restart: always
ports:
- "7900:80"
environment:
- NODE_ENV=production
volumes:
- ./config:/app/config # 挂载配置文件目录
- ./cache:/app/cache # 挂载缓存目录
networks:
- music-network
networks:
music-network:
driver: bridge
使用指南
首次使用
- 部署完成后,打开浏览器访问对应地址
- 界面会自动加载,你可以开始探索各项功能
- 如果需要登录网易云账号,可以在设置中配置
功能亮点
- 智能推荐:根据你的听歌习惯推荐音乐
- 歌词同步:精确到字的歌词显示
- 多主题支持:多种配色方案可选
- 键盘快捷键:提升操作效率
注意事项
- 版权声明:YesPlayMusic 是一个第三方客户端,使用时请遵守相关音乐平台的用户协议
- 数据来源:项目依赖网易云音乐的 API,功能可能随 API 变化而调整
- 社区维护:Docker 镜像由社区维护,建议定期更新到最新版本
故障排除
如果遇到部署问题,可以尝试:
- 检查端口是否被占用:
sudo lsof -i :7900 - 查看容器日志:
docker logs yesplaymusic - 确保 Docker 服务正常运行:
sudo systemctl status docker
结语
YesPlayMusic 不仅是一个音乐播放器,更是前端技术实践的优秀案例。它的代码结构清晰,设计理念先进,非常适合前端开发者学习和参考。
无论你是想搭建私人音乐服务,还是单纯欣赏优秀的前端项目,YesPlayMusic 都值得一试。部署简单,体验出色,何乐而不为呢?
更新提示:建议定期关注 GitHub 仓库的 Releases 页面,获取最新版本和功能更新。Docker 镜像也会相应更新,记得使用 docker-compose pull 拉取最新镜像。